Deploying Coro with JumpCloud
This guide describes how to deploy the Coro Agent to your macOS endpoint devices through JumpCloud.
Important
JumpCloud does not support dynamic links and requires a non-changing, static URL to deploy applications using their Software Management feature. This is a known limitation - to learn more, see: https://jumpcloud.com/support/software-management-macos.
Coro recommends deploying the Agent in one of the following ways:
- Use a shell script. For full details, see Using a shell script to deploy Coro to macOS devices .
- Host the Agent installer package on your cloud storage service (such as AWS, Backblaze, or Dropbox), as recommended by JumpCloud. Then, set the installer path to the relevant location in that service. For example: https://host.com/path/CoroInstaller_123abc-456def-789abc.pkg . Through this method, you can utilize your new static URL to deploy the Agent using JumpCloud's Software Management feature. For information and questions regarding this method, contact JumpCloud Support .
To deploy the Coro Agent via JumpCloud, complete the following processes:
Prerequisites
Make sure you have the following prerequisites:
- Admin access to an active JumpCloud environment, configured to allow package and configuration deployment to your devices.
- Coro Agent installer (.pkg) file.
Downloading the Coro Agent installer
To download the Coro Agent installer package:
- Sign in to the Coro console .
-
From the sidebar, select
 to access the
Control Panel
.
to access the
Control Panel
.
-
Select
Devices
:

-
Select
Agent Deployment
:

-
Select
ACTIONS > Download
adjacent to the macOS Agent version you want to install:

Coro downloads the Agent installer to your device, ready for hosting in cloud storage.
Configuring JumpCloud policies
Perform the following steps to configure the JumpCloud policies for deploying the Coro Agent on a group of devices:
- Sign in to the JumpCloud Admin Portal ( https://console.jumpcloud.com/login ), and then go to DEVICE MANAGEMENT > Policy Management .
- Create policies for application privacy preferences .
- Create a policy for approving system extensions .
- Create a policy for automatically approving Coro notifications .
- Create a policy for automatically approving Coro’s web content filter .
- Apply the policies to a group of devices .
Creating policies for application privacy preferences
To create policies for application privacy preferences:
-
To create a policy, select
+
:

JumpCloud displays the New Policy dialog.
-
At the top of the dialog, select
Mac
:

JumpCloud displays the Mac tab.
-
Locate
Application Privacy Preferences
and select
configure
:

JumpCloud displays the Details tab:

- (Optional) In Policy Name enter a new name for the custom configuration profile policy or keep the default.
-
Locate and select
Application Information
. Configure the following settings:
-
Code Requirement
: Copy and paste
anchor apple generic and identifier "net.coro.endsec.Coro" and
(certificate leaf[field.1.2.840.113635.100.6.1.9] /* exists */ or certificate
1[field.1.2.840.113635.100.6.2.6] /* exists */ and certificate
leaf[field.1.2.840.113635.100.6.1.13] /* exists */ and certificate leaf[subject.OU] = E3P52EVK39)
note
Do not change the code as it results in Apple not approving the policy.
- Identifier : Enter net.coro.endsec.Coro
- Identifier Type : Select BundleID

-
Code Requirement
: Copy and paste
-
Locate
Privacy Preferences
and enable the following settings:
- Allow Access to All Files
-
Allow Access to SysAdmin Files

Select Save to add the new policy.
-
Add a second policy by repeating
steps 1
-
6
, but for
Application Information
configure the following settings:
-
Code Requirement
: Copy and paste
anchor apple generic and identifier "net.coro.endsec.CoroService" and (certificate leaf[field.1.2.840.113635.100.6.1.9] /* exists */ or certificate 1[field.1.2.840.113635.100.6.2.6] /* exists */ and certificate leaf[field.1.2.840.113635.100.6.1.13] /* exists */ and certificate leaf[subject.OU] = E3P52EVK39) - Identifier : Enter net.coro.endsec.CoroService
-
Identifier Type
: Select
BundleID

-
Code Requirement
: Copy and paste
-
Add a third policy by repeating
steps 1
-
6
, but for
Application Information
configure the following settings:
-
Code Requirement
: Copy and paste
anchor apple generic and identifier "net.coro.endsec.TrafficService" and (certificate leaf[field.1.2.840.113635.100.6.1.9] /* exists */ or certificate 1[field.1.2.840.113635.100.6.2.6] /* exists */ and certificate leaf[field.1.2.840.113635.100.6.1.13] /* exists */ and certificate leaf[subject.OU] = E3P52EVK39) - Identifier : Enter net.coro.endsec.TrafficService
-
Identifier Type
: Select
BundleID

-
Code Requirement
: Copy and paste
Creating a policy for approving system extensions
To create a policy for approving system extensions:
- From the Policy Management page, Select + .
- At the top of the dialog, select Mac :
-
Locate
System Extension
and select
configure
:

-
Specify the following settings:
- (Optional) In Policy Name enter a new name for the custom configuration profile policy or keep the default.
- team ID : Enter E3P52EVK39
-
Bundle ID
: For each of the following, select
Add Bundle ID
and add the ID:
- net.coro.endsec.Coro
- net.coro.endsec.CoroService
- net.coro.endsec.TrafficService
- Security Extension : Enable

- Select Save .
Creating a policy for automatically approving Coro notifications
To create a policy for automatically approving notifications:
- Go to DEVICE MANAGEMENT > Policy Management . Select + to create a policy.
- At the top of the dialog, select Mac .
-
Locate
App Notification Settings
and select
configure
:

-
On the
Details
tab, specify the following settings:
- (Optional) In Policy Name enter a new name for the custom configuration profile policy or keep the default.
- Bundle Identifier : Enter net.coro.endsec.Coro
-
Select the alert types to automatically approve for devices using this policy:

- Select Save .
Creating a policy for automatically approving Coro’s web content filter
Create a configuration profile policy by creating a configuration file and then creating a policy that uses it.
To create a policy for automatically approving or enabling Coro’s web content filter:
-
Copy the following configuration listing:
Expand for configuration listing
<?xml version="1.0" encoding="UTF-8"?><!DOCTYPE plist PUBLIC "-//Apple//DTD PLIST 1.0//EN" "http://www.apple.com/DTDs/PropertyList-1.0.dtd"> <plist version="1"> <dict> <key>PayloadUUID</key> <string>7E53AC50-B88D-4132-99B6-29F7974EAA3C</string> <key>PayloadType</key> <string>Configuration</string> <key>PayloadOrganization</key> <string>Coronet Cyber Security</string> <key>PayloadIdentifier</key> <string>7E53AC50-B88D-4132-99B6-29F7974EAA3C</string> <key>PayloadDisplayName</key> <string>Coro System Extensions</string> <key>PayloadDescription</key> <string/> <key>PayloadVersion</key> <integer>1</integer> <key>PayloadEnabled</key> <true/> <key>PayloadScope</key> <string>System</string> <key>PayloadContent</key> <array> <dict> <key>PayloadUUID</key> <string>2BA070D9-2233-4827-AFC1-1F44C8C8E527</string> <key>PayloadType</key> <string>com.apple.webcontent-filter</string> <key>PayloadOrganization</key> <string>Coronet Cyber Security</string> <key>PayloadIdentifier</key> <string>CEBF7A71-D9A1-48BD-8CCF-BD9D18EC155A</string> <key>PayloadDisplayName</key> <string>Approved Network Extension</string> <key>PayloadDescription</key> <string/> <key>PayloadVersion</key> <integer>1</integer> <key>PayloadEnabled</key> <true/> <key>FilterType</key> <string>Plugin</string> <key>UserDefinedName</key> <string>Coro Network Extension</string> <key>PluginBundleID</key> <string>net.coro.endsec.Coro</string> <key>FilterSockets</key> <true/> <key>FilterDataProviderBundleIdentifier</key> <string>net.coro.endsec.TrafficService</string> <key>FilterDataProviderDesignatedRequirement</key> <string>identifier "net.coro.endsec.TrafficService" and anchor apple generic and certificate 1[field.1.2.840.113635.100.6.2.6] /* exists */ and certificate leaf[field.1.2.840.113635.100.6.1.13] /* exists */ and certificate leaf[subject.OU] = E3P52EVK39</string> </dict> </array> </dict> </plist> - Paste the configuration listing into a text editor and save it as coroagent.mobileconfig .
- Go to DEVICE MANAGEMENT > Policy Management . Select + to create a policy.
- At the top of the dialog, select Mac .
-
Locate
MDM Custom Configuration Profile
, then select
configure
:

- (Optional) In Policy Name enter a new name for the custom configuration profile policy or keep the default.
-
Under
Settings
, select
upload file
:

- Select coroagent.mobileconfig and select Open .
- Upload the coroagent.mobileconfig file to the custom configuration profile and select Save .
Applying the policies to a group of devices
This section describes the steps to apply the policies to a group of devices:
To apply the new Coro policies to a group of devices:
-
Go to
DEVICE MANAGEMENT
>
Device Groups
:

- Select a group of devices to apply the policies to. Alternatively, select + to create a group, and then select the new group.
-
Select
Policies
.
JumpCloud displays the Policies tab:

- From the list of policies, select the new policies, then select Save .
-
Go to
DEVICE MANAGEMENT > Policy Groups
. Select one of:
- + to create a policy group.
-
An existing policy group suitable to distribute the Coro Agent to your devices:

-
Go to
DEVICE MANAGEMENT
>
Software Management
:
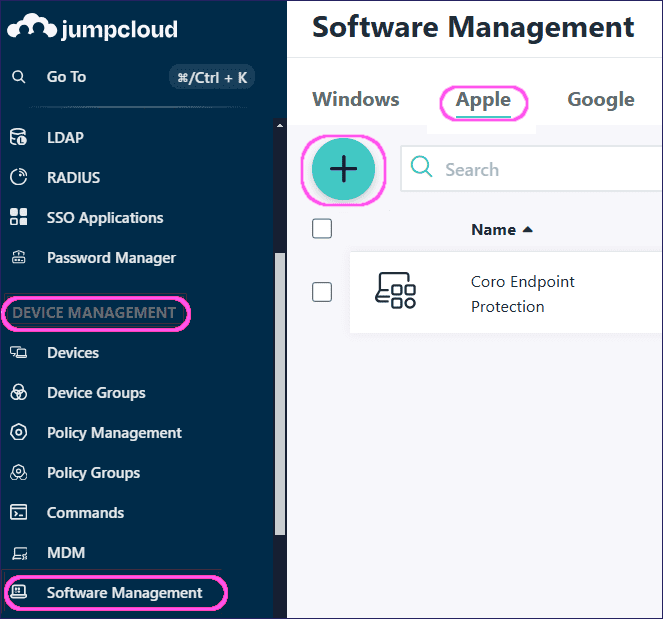
JumpCloud opens the Software Management page.
- Select Apple , then select + to configure the upload settings.
-
On the
Details
tab, in
Software Description
, enter a name for your installation package.
In
Software Package URL
add your Coro Agent installer package cloud storage location URL, and then select
Validate
to validate the URL:

note
If this method fails due to JumpCloud validation failure of external URL package hosting, Coro recommends deploying the Coro Agent via shell script. To execute a command in JumpCloud, go to Device Management > Commands. Select + and set Type to Mac. If you experience issues executing commands, contact JumpCloud Support.
- Select Device Groups or Devices as applicable to configure your device distribution.
- Select Save to save your changes.
The JumpCloud configuration is complete. Your JumpCloud schedule determines when to distribute and install the Coro Agent.