This guide explains how to deploy and uninstall the Coro Agent on your Windows endpoint devices using the Windows Server Group Policy Object (GPO) manager.
Coro recommends creating a new GPO specifically designed for deploying the Coro Agent.
To create a deployment GPO:
From your Windows server device, access the Group Policy Management console (select Windows Key + R, enter gpmc.msc, and select OK).
Create a GPO and provide a name.
The GPO name must not exceed the Windows 260 character path limit and must not contain special characters.
Link the GPO to the domain or the dedicated organizational unit (OU) containing the target devices for Coro deployment.
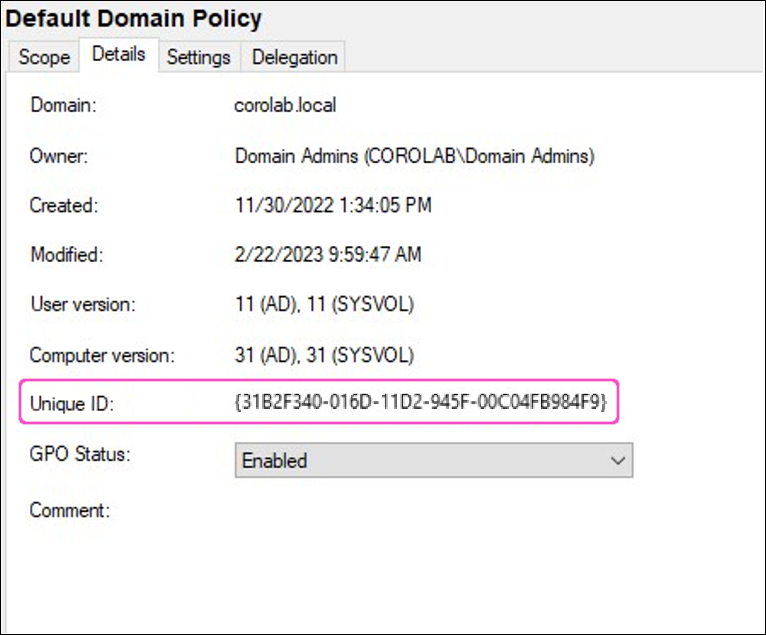
After creating and linking the new GPO, make a note of the ID of the policy (double-click the GPO and select the Details tab):
Download the Coro Agent Windows PowerShell deployment script and configure it for your workspace, as shown:
ImportantWhen deploying the Coro Agent via an RMM, run the script under the Local System account (SYSTEM) to ensure it has the necessary permissions.
########################

# IMPORTANT #

# This script requires elevated privileges (Run PowerShell as Admin) to run.
# If you are deploying it via GPO or any other RMM, they will already run it in elevated mode, unless specifically configured otherwise.
# However, if you run it locally as a user, you must make sure your PowerShell instance is elevated (Run PowerShell as Admin), otherwise the script will fail.

# This script can be used both locally and with GPO or any other RMM that support PowerShell. However, some specific RMMs only support limited PowerShell commands, so this script might not work on these. In this case, please contact Coro support for help.

########################

#Add the Coro installation URL below (in between quotes ""). You can obtain the URL from your Coro Workspace (go to Control Panel -> Devices. Scroll down
#to the latest Windows version, select the Actions button, then select Copy URL. From the Copy Invite Link dialog, select Copy.) Finally, paste the URL below.

$url = "Add the Coro installation URL obtained from Coro Workspace here. Do not delete the quotes"

#The URL above contains a string named CoroInstaller_XXXXX-XXXXX-XXXXX-XXXXX-XXXXX.msi (where X represents random numbers). Paste this string below (in between quotes "").

$newFilename = "Add the Coro msi package from the URL here. For example, CoroInstaller_1b16c978-cd39-49bf-8809-7b4e87227e4e.msi. Do not delete the quotes"

###########################
# FOR SPECIFIC CASES ONLY #

#Set the variable below to $false if you want the script to bypass Coro installation check.
#This might be useful in some specific cases when it is required to reinstall Coro over the corrupted version.
#However, please note that this method not work in all cases. In such cases Coro needs to be uninstalled first and then reinstalled.

$checkCoroInstall = $true #Use only when asked to do so by Support: set this variable to $false to instruct the script bypass Coro installation check.

###########################################################
##### NO NEED TO AMEND ANYTHING ELSE BELOW THIS LINE ######
###########################################################

#Checking for elevated permissions

$isElevated = [Security.Principal.WindowsPrincipal]::new([Security.Principal.WindowsIdentity]::GetCurrent()).IsInRole([Security.Principal.WindowsBuiltInRole]::Administrator)

$isUserContext = -not ([Environment]::UserInteractive -and $isElevated)

if (-not $isElevated -and $isUserContext) {

    Write-Host ""
	Write-Host "This script is not running in elevated mode. Please run Powershell as Administrator and execute this script." -ForegroundColor Cyan
	Write-Host "The script will now terminate as it cannot run without elevated permissions." -ForegroundColor Cyan

	Start-Sleep -Seconds 7
	exit 1

} else {

    Write-Host "This instance is elevated, proceeding to the next step" -ForegroundColor Green
    Write-Host ""
}

#Display OS version

try {

Write-Host ""
Write-Host ""
$operatingSystem = Get-CimInstance -ClassName Win32_OperatingSystem
$osVersion = $operatingSystem.Version
$osEdition = $operatingSystem.Caption
$osArchitecture = $operatingSystem.OSArchitecture
$OSVersion = "$osEdition $osArchitecture $osVersion"
Write-Host "### $OSVersion ###"
Write-Host ""

	} catch {
}

#Set variables

Write-Host "Configuring variables"

$logFilePath = "C:\Windows\Temp\CoroInstallerlog.txt"
$msiFilePath = "C:\Windows\Temp\$newFilename"
$folder = "C:\Program Files\Coro Cyber Security Ltd\Coro"
$file1 = "C:\Program Files\Coro Cyber Security Ltd\Coro\coronet-agent.exe"    #CoroAgent1SRV
$file2 = "C:\Program Files\Coro Cyber Security Ltd\Coro\CsAgent\csagent.exe"  #CoroAgent2SRV
$file3 = "C:\Program Files\Coro Cyber Security Ltd\Coro\user_working_dir\Coro.exe"  #Coro UI
$file4 = "C:\Program Files\Coro Cyber Security Ltd\Coro\coro-agent-s.exe"     #CoroAgent3SRV
$file5 = "C:\Program Files\Coro Cyber Security Ltd\Coro\coro-agent-w.exe"     #CoroAgent5SRV

Write-Host "Done!" -ForegroundColor Green

#Check if Coro is installed

if ($checkCoroInstall -ne $false) {

	Write-Host ""
	Write-Host "Checking if Coro is already installed"

	$installed = $false
	$present1 = $false
	$present2 = $false
	$present3 = $false
	$present4 = $false
	$present5 = $false

if (Test-Path -Path $folder -PathType Container) {

    $folderPresent = $true
	Write-Host ""
	Write-Host "$folder folder is detected" -ForegroundColor Yellow
	Write-Host "The script will check further" -ForegroundColor Yellow

} else {

    $folderPresent = $false
	Write-Host "Done! Coro is not installed, the script will carry on" -ForegroundColor Green
}

if ($folderPresent -ne $false) {

    if (Test-Path -Path $file1 -PathType Leaf) { $present1 = $true }
	if (Test-Path -Path $file2 -PathType Leaf) { $present2 = $true }
    if (Test-Path -Path $file3 -PathType Leaf) { $present3 = $true }
    if (Test-Path -Path $file4 -PathType Leaf) { $present4 = $true }
    if (Test-Path -Path $file5 -PathType Leaf) { $present5 = $true }

    if ($present1 -and $present2 -and $present3 -and $present4 -and $present5) {

	$installed = $true
	Write-Host""
	Write-Host "Coro is already installed. The script will terminate now" -ForegroundColor Cyan
	Start-Sleep -Seconds 7
	exit 1

	}	elseif ($present1 -or $present2 -or $present3 -or $present4 -or $present5) {

		$installed = $false
		Write-Host""
		Write-Host "Coro is installed, but the following critical file(s) is/are missing:" -ForegroundColor Yellow
		Write-Host ""

		if (!$present1) { Write-Host "  - $file1 (CoroAgent1SRV)" -ForegroundColor Yellow}
        if (!$present2) { Write-Host "  - $file2 (CoroAgent2SRV)" -ForegroundColor Yellow}
        if (!$present3) { Write-Host "  - $file3 (CoroUI service)" -ForegroundColor Yellow}
        if (!$present4) { Write-Host "  - $file4 (CoroAgent3SRV)" -ForegroundColor Yellow}
        if (!$present5) { Write-Host "  - $file5 (CoroAgent5SRV)" -ForegroundColor Yellow}

		Write-Host ""
		Write-Host "The script will still attempt to install Coro" -ForegroundColor Green
		Write-Host "If the installation fails, please uninstall Coro and retry" -ForegroundColor Green

	} else {

		$installed = $false
		Write-Host "Done! Coro is not installed, the script will carry on" -ForegroundColor Green
	}
}

} else {

	$installed = $false
}

if ($installed -ne $true) {

#Download Coro installer

Write-Host ""
Write-Host "Downloading Coro installer. This might take some time, depending on download speed"

$webClient = New-Object System.Net.WebClient

try {

    $webClient.DownloadFile($url, $msiFilePath)
    Write-Host "Done! The installer is placed in C:\Windows\Temp" -ForegroundColor Green

} catch {

	$errorMessage = $_.Exception.Message

    if ($errorMessage -like "*Could not find file*") {

    Write-Host ""
        Write-Host "Download error." -ForegroundColor Cyan
		Write-Host "Make sure Coro download URL and MSI file name are properly entered in `$url and `$newFilename variables in the script." -ForegroundColor Cyan
        Write-Host "Retry the script after checking." -ForegroundColor Cyan
        Write-Host ""
        Write-Host "If the error persists, please contact Support and provide a screenshot of this message." -ForegroundColor Cyan

    } elseif ($errorMessage -like "*The path is not of a legal form*") {

		Write-Host ""
        Write-Host "Download error. Error code: The path is not of a legal form." -ForegroundColor Cyan
        Write-Host ""
        Write-Host "Make sure the `$newFilename and `$url variables are not empty" -ForegroundColor Cyan
        Write-Host "Retry the script after checking." -ForegroundColor Cyan
        Write-Host ""
        Write-Host "If the error persists, please contact Support and provide a screenshot of this message." -ForegroundColor Cyan

	} elseif ($errorMessage -like "*Value cannot be null*") {

        Write-Host ""
        Write-Host "Download error. Error code: Value cannot be null. Parameter name: address." -ForegroundColor Cyan
        Write-Host ""
        Write-Host "Make sure the `$url variable is not renamed in the script." -ForegroundColor Cyan
        Write-Host "Retry the script after checking." -ForegroundColor Cyan
        Write-Host ""
        Write-Host "If the error persists, please contact Support and provide a screenshot of this message." -ForegroundColor Cyan

	 } elseif ($errorMessage -like "*An exception occurred during a WebClient request*") {

	    Write-Host ""
        Write-Host "Download error. Error code: An exception occurred during a WebClient request." -ForegroundColor Cyan
        Write-Host ""
        Write-Host "Make sure the `$newFilename variable is not renamed in the script and that it contains the correct name of Coro MSI file." -ForegroundColor Cyan
        Write-Host "Retry the script after checking." -ForegroundColor Cyan
        Write-Host ""
        Write-Host "If the error persists, please contact Support and provide a screenshot of this message." -ForegroundColor Cyan

	} else {

    Write-Host ""
        Write-Host "Error when downloading. Error message: $errorMessage" -ForegroundColor Cyan
        Write-Host ""
        Write-Host "Please contact Support and provide a screenshot of the error" -ForegroundColor Cyan
    }

    Start-Sleep -Seconds 10
    exit 1
}

$webClient.Dispose()

#Install the downloaded file

try {
		Write-Host ""
		Write-Host "Installing Coro"
		$coroInstall = Start-Process msiexec.exe -PassThru -Wait -ArgumentList "/i `"$msiFilePath`" /qn /L*V `"$logFilePath`""
		$exitCode = $coroInstall.ExitCode

		if ($exitCode -eq 0) {

		Write-Host "Done! It is recommended to reboot your machine to finalise the install" -ForegroundColor Green
		Start-Sleep -Seconds 1
		$success = $true

		} elseif ($exitCode -eq 1619) {

		Write-Host "Installation failed because of value of `$msiFilePath variable" -ForegroundColor Cyan
		Write-Host ""
		Write-Host "Please check the `$msiFilePath variable in the script" -ForegroundColor Cyan
		Write-Host "If the variable is correct, then this is something else" -ForegroundColor Cyan
		Write-Host ""
		Write-Host "Error code: $exitCode" -ForegroundColor Cyan
		Write-Host "Please contact Support and send $logFilePath log file along with a screenshot of this output" -ForegroundColor Cyan
		Remove-Item -Path $msiFilePath -Force -Confirm:$false
		Start-Sleep -Seconds 10
		exit 1

		} elseif ($exitCode -eq 1612) {

		Write-Host "Installation failed because the installation source is not available" -ForegroundColor Cyan
		Write-Host ""
		Write-Host "This often happens when Coro was already deployed via GPO/RMM in a wrong way (msi package renamed)" -ForegroundColor Cyan
		Write-Host "So please check GPO/RMM to ensure it is not pushing any Coro install policy to this device" -ForegroundColor Cyan
		Write-Host "After that, it is recommended to run the Uninstall script to delete all registry leftovers" -ForegroundColor Cyan
		Write-Host "Re-run this script after that" -ForegroundColor Cyan
		Write-Host ""
		Write-Host "If the error persists after all this, then this is something else" -ForegroundColor Cyan
		Write-Host ""
		Write-Host "Error code: $exitCode" -ForegroundColor Cyan
		Write-Host "Please contact Support and send $logFilePath log file along with a screenshot of this output" -ForegroundColor Cyan
		Remove-Item -Path $msiFilePath -Force -Confirm:$false
		Start-Sleep -Seconds 10
		exit 1

		} elseif ($exitCode -eq 1639) {

		Write-Host "Installation failed because of incorrect argument(s) of ArgumentList argument" -ForegroundColor Cyan
		Write-Host ""
		Write-Host "Please check the script" -ForegroundColor Cyan
		Write-Host ""
		Write-Host "If the argument is correct, then this is something else"
		Write-Host "Error code: $exitCode" -ForegroundColor Cyan
		Write-Host "Please contact Support and send a screenshot of this output" -ForegroundColor Cyan
		Remove-Item -Path $msiFilePath -Force -Confirm:$false
		Start-Sleep -Seconds 10
		exit 1

		} elseif ($exitCode -eq 1603 -and $checkCoroInstall -ne $true) {

		Write-Host "Installation failed" -ForegroundColor Cyan
		Write-Host ""
		Write-Host "Make sure the script is running in Elevated mode (Run PowerShell as Admin)" -ForegroundColor Cyan
		Write-Host "Also, make sure Coro's registry hive is present in HKEY_LOCAL_MACHINE\SOFTWARE\Classes\Installer\Products" -ForegroundColor Cyan
		Write-Host "If you just uninstalled Coro by any means, please reboot first and then run this script again" -ForegroundColor Cyan
		Write-Host "If the issue still persists, then there is some other corruption. Try to run the Uninstall script and retry" -ForegroundColor Cyan
		Write-Host ""
		Write-Host "Error code: $exitCode" -ForegroundColor Cyan
		Write-Host "Please contact Support and send a screenshot of this output" -ForegroundColor Cyan
		Remove-Item -Path $msiFilePath -Force -Confirm:$false
		Start-Sleep -Seconds 10
		exit 1

		} elseif ($exitCode -eq 1603) {

		Write-Host "Installation failed" -ForegroundColor Cyan
		Write-Host ""
		Write-Host "Make sure the script is running in Elevated mode (Run PowerShell as Admin)" -ForegroundColor Cyan
		Write-Host "If you just uninstalled Coro by any means, please reboot first and then run this script again" -ForegroundColor Cyan
		Write-Host "If the issue still persists, then there is some other corruption. Try to run the Uninstall script and retry" -ForegroundColor Cyan
		Write-Host ""
		Write-Host "Error code: $exitCode" -ForegroundColor Cyan
		Write-Host "Please contact Support and send a screenshot of this output" -ForegroundColor Cyan
		Remove-Item -Path $msiFilePath -Force -Confirm:$false
		Start-Sleep -Seconds 10
		exit 1

		} elseif ($exitCode -eq 1625) {

		Write-Host "Installation failed" -ForegroundColor Cyan
		Write-Host ""
		Write-Host "This often occurs when Coro is already installed but corrupted" -ForegroundColor Cyan
		Write-Host "Try to remove existing version of Coro via Control Panel or Uninstall script" -ForegroundColor Cyan
		Write-Host "If the issue still persists, then there is something else" -ForegroundColor Cyan
		Write-Host ""
		Write-Host "Error code: $exitCode" -ForegroundColor Cyan
		Write-Host "Please contact Support and send a screenshot of this output" -ForegroundColor Cyan
		Remove-Item -Path $msiFilePath -Force -Confirm:$false
		Start-Sleep -Seconds 10
		exit 1

		} else {

		Write-Host "Installation failed, error code: $exitCode" -ForegroundColor Cyan
		Write-Host ""
		Write-Host "If Coro was ever installed on this machine, please first run the Uninstall script to clear all the leftovers and then retry."
		Write-Host "Please contact Support and send $logFilePath log file along with a screenshot of this output" -ForegroundColor Cyan
		Remove-Item -Path $msiFilePath -Force -Confirm:$false
		Start-Sleep -Seconds 10
		exit 1

		}

	} catch { }

#Delete installation files

if ($success -eq $true) {

Write-Host ""
Write-Host "Deleting installation and log files as they are no longer required"

if (Test-Path -Path $logFilePath) {

    Remove-Item -Path $logFilePath -Force -Confirm:$false
}

if (Test-Path -Path $msiFilePath) {

    Remove-Item -Path $msiFilePath -Force -Confirm:$false
}

Write-Host "Done!"  -ForegroundColor Green
Write-Host ""
Write-Host "Coro has been installed successfully" -ForegroundColor Green

Start-Sleep -Seconds 5

} else { }

} else { }
Replace the following variable markers in the script with real values:
$url: The download URL for the latest version of the Coro Agent installer for Windows, obtained from the Coro console. For details, see Deploying Coro on Windows devices.
$newFilename: The .msi installer filename, extracted from the download URL.

For example, if you use the following download URL:
https://s3.amazonaws.com/client-repo.coro.net/beta/win/releases/2.0.412.1/CoroInstaller.msi?response-content-disposition=attachment%3B%20filename%3DCoroInstaller_123abc-456def-789abc.msi&AWSAccessKeyId=AKIA5XP6&Signature=y4V3Tq2dU9mE%3D&Expires=2005954595
This results in the following script values:
 Important
Make sure you do not delete the quotation marks when replacing the placeholder text.
Coro generates a unique installer filename for each workspace. Therefore, you must create a copy of the standard Coro deployment script and repeat this process for each workspace.
Save this script as a PowerShell file on the Windows server device hosting your Active Directory and GPO, in the following location:
\\[your domain]\sysvol\[your domain]\Policies\{ID of GPO obtained in Step 2 above}\MACHINE\Scripts\StartupIf do not have sufficient permissions to save files to this location, save the script to:
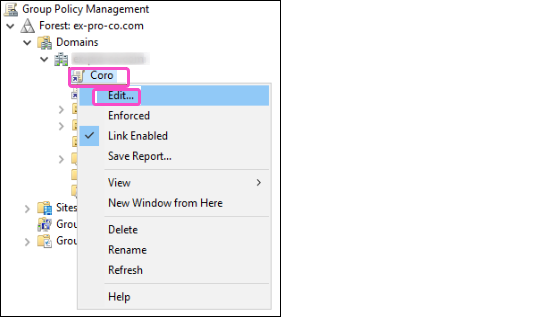
C:\Windows\SYSVOL\domain\Policies\{ID of GPO obtained in Step 2 above}\Machine\Scripts\StartupIn the Group Policy Management Editor, right-click the newly created group policy object and select Edit:
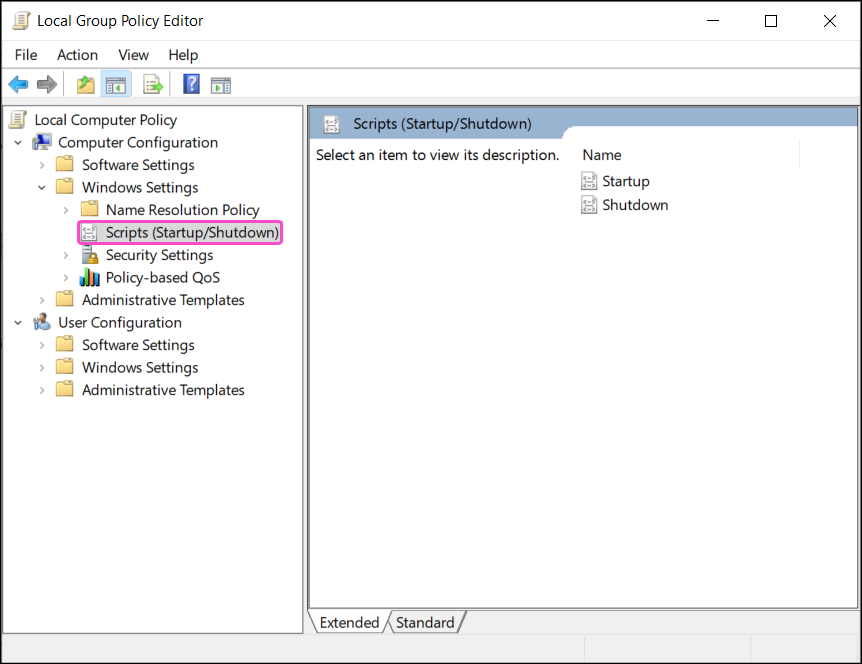
Go to Computer Configuration > Policies > Windows Settings > Scripts (Startup/Shutdown):
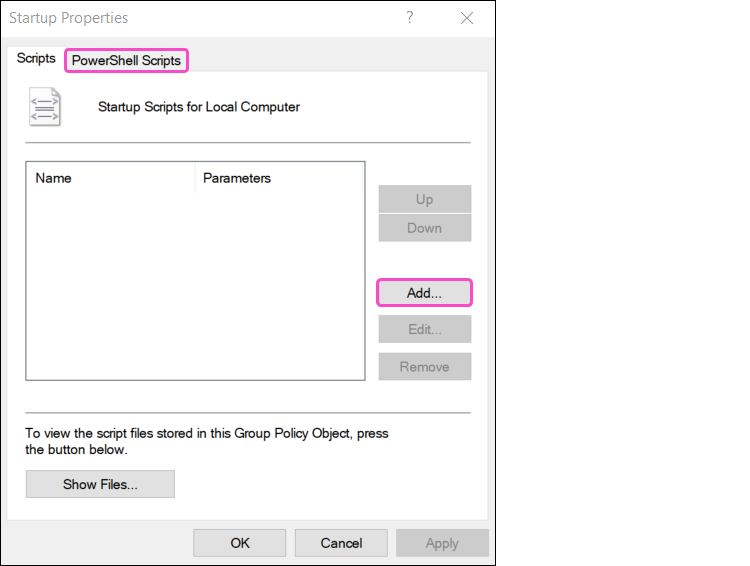
Double-click Startup:

Windows Server GPO displays the Startup Properties dialog.
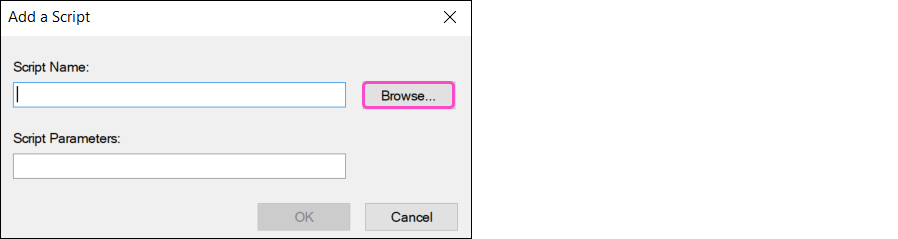
Select the PowerShell Scripts tab and then select Add:
Windows Server GPO displays the Add a Script dialog.
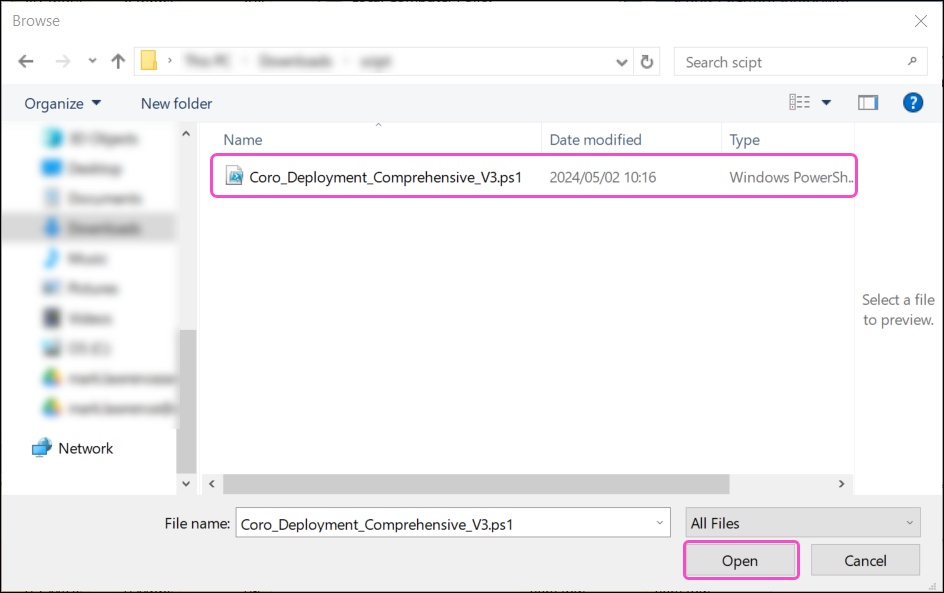
Select Browse:
Go to the location where you saved the PowerShell script file and then select Open:
Select OK:

Coro adds the file to the PowerShell Scripts tab in the Windows PowerShell Startup Scripts for Local Computer section of the Startup Properties dialog.
Select Apply and then select OK:
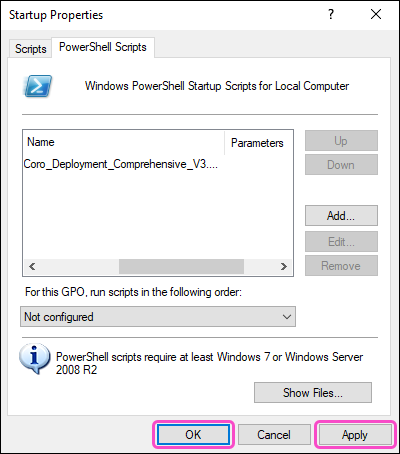
The settings are saved, and the Startup Properties dialog closes.
From the same GPO settings, go to Computer Configuration > Policies > Administrative Templates > System > Scripts.
Double-click Specify maximum wait time for Group Policy scripts:
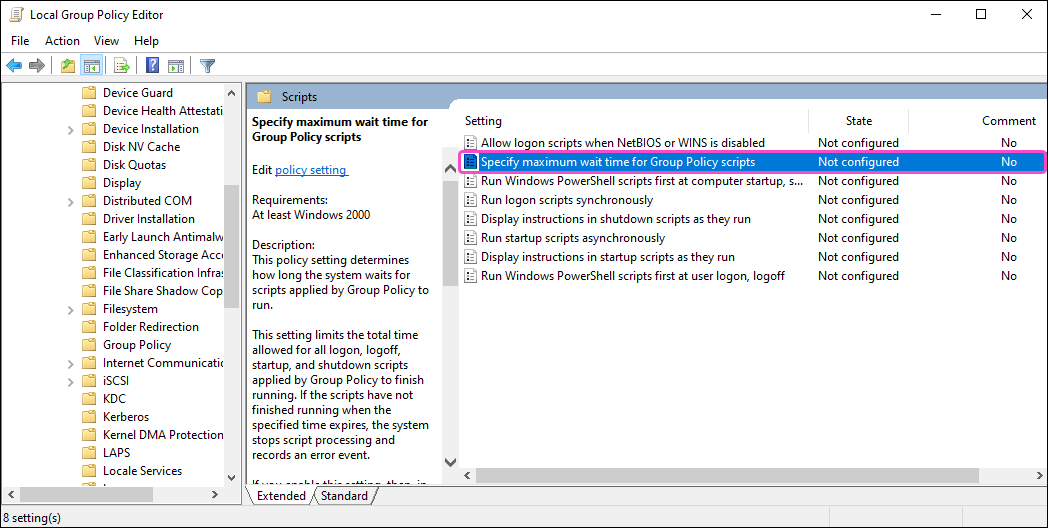
Windows Server GPO displays the Specify maximum wait time for Group Policy scripts settings dialog. This setting specifies the maximum duration allowed for all scripts to finish execution.
Configure the settings as follows:
- Select Enabled.
- In the Options section enter the desired number of Seconds for the wait time:
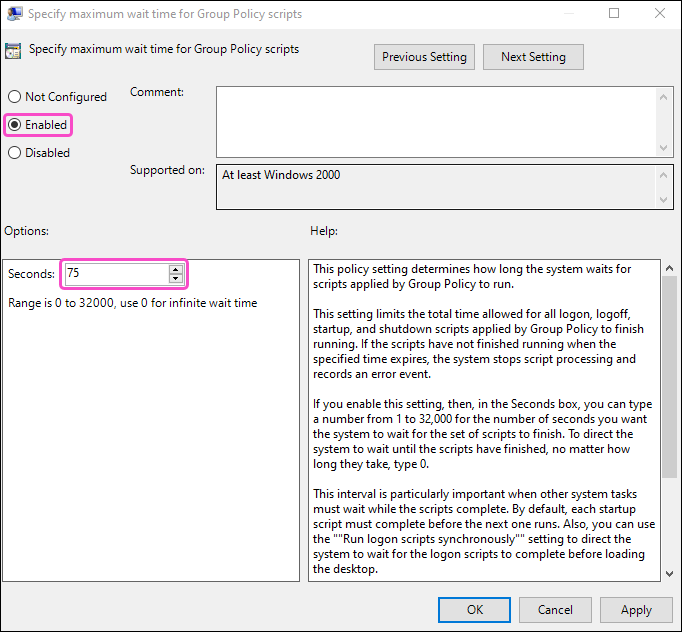
Consider the number of startup items when setting the wait time. Typically, a wait time between 60-120 seconds is recommended.
Select OK to save your changes and then close the Group Policy Management Editor.
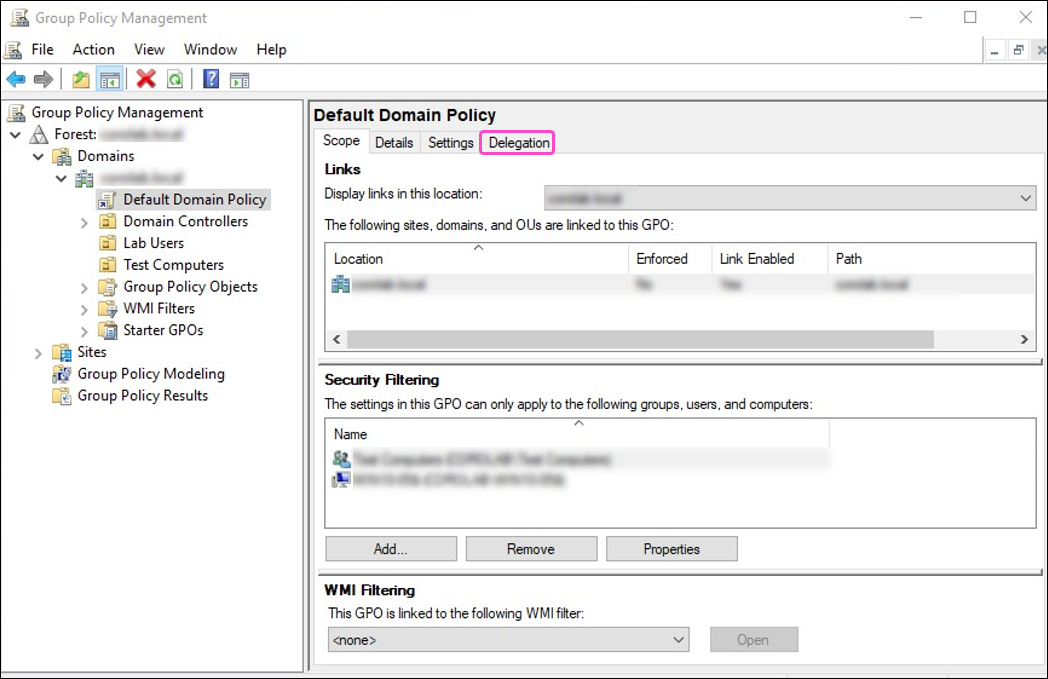
Select your GPO from the Group Policy Management console and then select the Delegation tab:
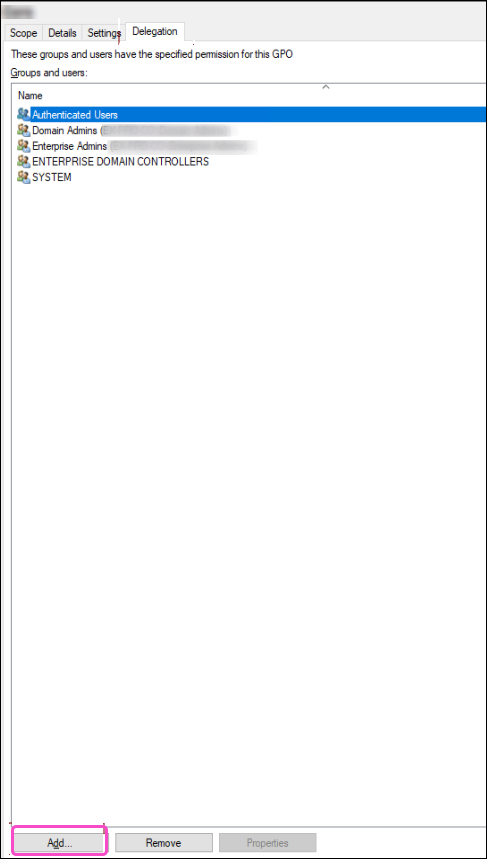
Select Add:
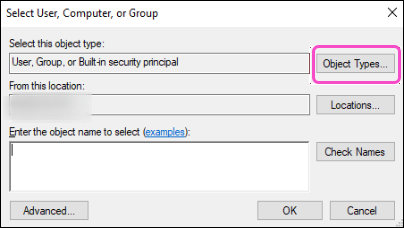
Windows Server GPO displays the Select User, Computer, or Group dialog.
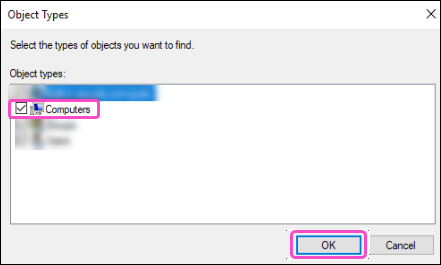
Select Object Types:
Select Computers and then select OK:
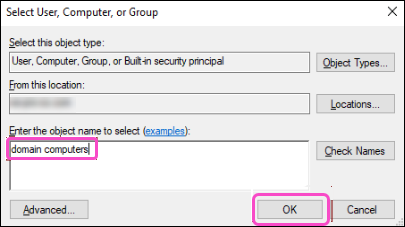
Enter Domain computers into the Enter the object name to select field and then select OK:
Windows Server GPO dispays the Add Group or User dialog:
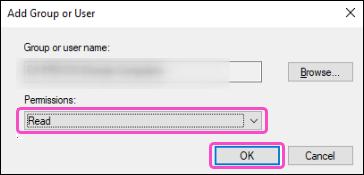
Select Read from the Permissions dropdown and then select OK:
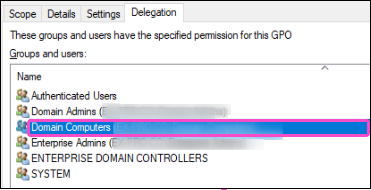
A Domain Computers entry is added to the Delegation section:
Coro strongly recommends creating a dedicated OU in your Active Directory for all devices intended for Coro deployment. This is necessary because the Group Policy Management console does not display the default Computers and Users OU in Active Directory:
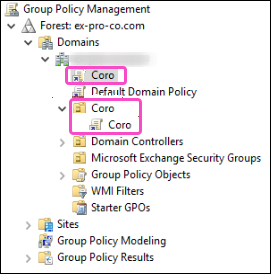
After you create the OU, link the new policy to it to ensure that the policy applies to all devices:
Depending on your environment and specific configuration, you can also link this new GPO to the entire domain.
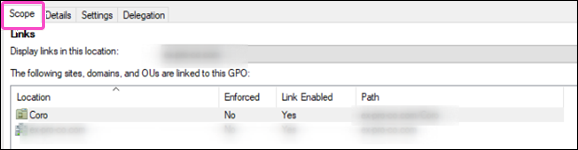
After you have linked the new policy to the OU perform the following steps to apply the GPO to all devices in the OU:
Go to the Scope tab of the newly created GPO:
Select Add from the Security Filtering section:
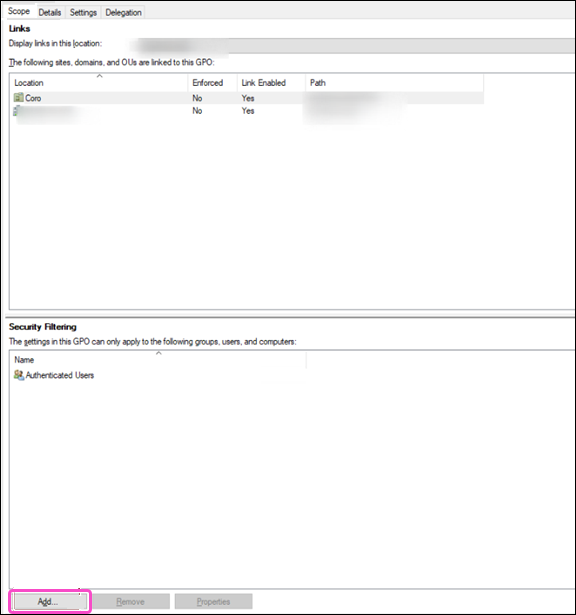
Select Computers and then select OK:
Enter Domain computers into the Enter the object name to select field and then select OK:
Windows Server GPO applies the GPO to all devices in the OU which are linked to the newly created policy:
If you want to deploy Coro to selected devices without creating a dedicated OU, or if you want to use an existing OU other than the default Computers OU, you must add the individual workstations to the Security Filtering section, rather than Domain Computers:
 Important
Coro strongly recommends that you create a dedicated OU in your Active Directory for all workstations intended for Coro deployment, instead of adding individual workstations to the policy.
Reboot your devices at least twice to ensure that the group policy changes take effect. Alternatively, execute the command
gpupdate /forcein a Command Prompt to apply the policy; in this case, only one reboot is necessary.
If Windows Server GPO fails to apply the policy:
Go to the Group Policy Results module in the Group Policy Management console.
Run the wizard against the device in question (right-click the Group Policy Results item and then select Group Policy Results Wizard.)
Verify that the policy is applied to the device:
If Windows Server GPO successfully applies the policy:
The policy instructs the device to download and install the Coro agent. The time this takes can vary based on internet speed, and deployment progress may not be immediately visible.
Deployment might also be affected by any existing internet restrictions. Wait 15-20 minutes to allow the installation to complete before starting any troubleshooting.
If the policy does not take effect after several reboots and a waiting period:
Determine if other restrictive policies might be interfering with policy application. You can check which policies are affecting the workstation by adding it to the Group Policy Results module in the Group Policy Management console.
Policy application might fail if Windows Firewall settings block communication between the device and the domain controller. If so, temporarily disable Windows Firewall, reboot the device, and check if this resolves the issue.
Coro recommends creating a new GPO specifically designed for uninstalling the Coro Agent.
Follow the same steps described in Deploying the Coro Agent to uninstall the Coro Agent from your Windows devices through Windows Server Group Policy Object (GPO) manager. You can obtain a Windows PowerShell uninstall script as follows:
Expand for more details
########################

# IMPORTANT #

# This script requires elevated privileges (Run PowerShell as Admin) to work.
# If you are deploying it via GPO or any other RMM, they will already run it in elevated mode, unless specifically configured otherwise.
# However, if you run it locally as a user, you must make sure your PowerShell instance is elevated (Run PowerShell as Admin), otherwise the script will fail.

# This script can be used both locally and with GPO or any other RMM that support PowerShell. However, some specific RMMs only support limited PowerShell commands, so this script might not work on these. In this case, please contact Coro support for help.

##########################################################
#### BYPASS SWITCH #######################################
##########################################################

#This script will always attempt to uninstall Coro using native methods (MSI package) and will only resort to a manual uninstall if the native methods fail
#However, in some specific scenarios, it might be required to skip the native method and instruct the script to directly execute a manual uninstall (for example, when we need to uninstall Coro version 2.0.42.1 if it fails to update to the latest version)
#For those cases, set the value of the variable below to $true. This will instruct the script to skip native uninstall methods and immediately proceed with the manual uninstall.
#The script will still check for Tamper Protection status because if it is enabled, we can only uninstall Coro in Safe Mode.
#If that's the case, simply run the script in Safe Mode (with or without the switch below as it is not triggering in Safe Mode), and it will uninstall Coro manually.

$skipNativeUninstall = $false #Use only when asked to do so by Support: set this variable to $true to skip native uninstall methods.

###########################################################
##### NO NEED TO AMEND ANYTHING ELSE BELOW THIS LINE ######
###########################################################

#Checking for elevated permissions

$isElevated = [Security.Principal.WindowsPrincipal]::new([Security.Principal.WindowsIdentity]::GetCurrent()).IsInRole([Security.Principal.WindowsBuiltInRole]::Administrator)

$isUserContext = -not ([Environment]::UserInteractive -and $isElevated)

if (-not $isElevated -and $isUserContext) {

    Write-Host ""
	Write-Host "This script is not running in elevated mode. Please run Powershell as Administrator and execute this script." -ForegroundColor Cyan
	Write-Host "The script will now terminate as it cannot run without elevated permissions." -ForegroundColor Cyan

	Start-Sleep -Seconds 7
	exit 1

} else {

    Write-Host "This instance is elevated, proceeding to the next step" -ForegroundColor Green
    Write-Host ""
}

#Display OS version

try {

$operatingSystem = Get-CimInstance -ClassName Win32_OperatingSystem
$osVersion = $operatingSystem.Version
$osEdition = $operatingSystem.Caption
$osArchitecture = $operatingSystem.OSArchitecture
$OSVersion = "$osEdition $osArchitecture $osVersion"
Write-Host "$OSVersion"
Write-Host ""

	} catch {
}

#Set variables

$global:outputTimestamp = Get-Date -Format "dd-MM-yyyy HH:mm"
$global:outputSpace = " " * 18

Write-Host "[$outputTimestamp] Configuring variables (might take some time...)"

$tamperPath = "HKLM:\SOFTWARE\Coro Cyber Security Ltd\Coro"
$tamperValue = "SelfProtected"
$coroVersion = "Version"

$uninstallPath32 = "HKLM:\Software\Wow6432Node\Microsoft\Windows\CurrentVersion\Uninstall\*"
$registryResult32 = Get-ItemProperty -Path $uninstallPath32 | Where-Object { $_.DisplayName -like "Coro*" }

$uninstallPath64 = "HKLM:\Software\Microsoft\Windows\CurrentVersion\Uninstall\*"
$registryResult64 = Get-ItemProperty -Path $uninstallPath64 | Where-Object { $_.DisplayName -like "Coro*" }

$valueReg64 = $registryResult64.UninstallString

$match = [regex]::Match($valueReg64, '\{[^}]+\}')

if ($match.Success) {

    $uninstallStringReg64 = $match.Value

} else { }

try {

    $packageResult = Get-Package | Where-Object { $_.Name -like "Coro*" }

	} catch {
}

try {

    $wmiResult = Get-WmiObject -Class Win32_Product | Where-Object { $_.Name -like "Coro*" }

    if ($wmiResult -ne $null) {

		$wmiIdentifyingNumber = $wmiResult.IdentifyingNumber
        $wmiValue = $true

    } else {

		$wmiValue = $false

	}

	} catch {

		$wmiValue = $false
}

Write-Host "$outputSpace Done!" -ForegroundColor Green

#Detecting Safe Mode

Write-Host "[$outputTimestamp] Checking if the OS is running in Safe Mode"

$safeMode = $false

try {

	$safeModeDetector = (gwmi win32_computersystem -Property BootupState).BootupState

	if ($safeModeDetector -ne "Normal boot") {

	$safeMode = $true

	} else {

	$safeMode = $false

	}

} catch {

		Write-Warning "Error checking safe mode: $_"
	}


if ($safeMode -eq $false) {

  Write-Host "$outputSpace Not in Safe Mode" -ForegroundColor Green

} else {

  Write-Host "$outputSpace Safe Mode detected" -ForegroundColor Yellow

}

#Check for potential corruption

if ($safeMode -eq $false -and $skipNativeUninstall -eq $false) {

	Write-Host "[$outputTimestamp] Checking Coro's integrity"

	$registryValue = Get-ItemProperty -Path $tamperPath -Name $tamperValue -ErrorAction SilentlyContinue

		if ($registryValue -and $registryValue.$tamperValue -eq "true") {

		$TamperProtectionON = $true

		} else {

		$TamperProtectionON = $false

	} }	else {}


if ($safeMode -eq $false -and $skipNativeUninstall -eq $false) {

	if ($TamperProtectionON -eq $true) {

    $service1 = Get-Service "CoroAgent1SRV"
    $service2 = Get-Service "CoroAgent2SRV"

    if ($service1.Status -eq "Running" -and $service2.Status -eq "Running") {

		Write-Host "$outputSpace Done!" -ForegroundColor Green

    } else {

		Write-Host "$outputSpace Core Coro services are not running. Attempting to start them..." -ForegroundColor DarkYellow

		sc.exe config $service1 start=auto 2>1 1>2 | Out-Null
		sc.exe config $service2 start=auto 2>1 1>2 | Out-Null

        Start-Service $service1, $service2 -ErrorAction SilentlyContinue -WarningAction SilentlyContinue 2>1 1>2 | Out-Null -ErrorAction SilentlyContinue

        Start-Sleep -Seconds 3

        if ($service1.Status -eq "Running" -and $service2.Status -eq "Running") {

		Write-Host "$outputSpace Done!" -ForegroundColor Green

		} else {

			sc.exe config $service1 start=auto 2>1 1>2 | Out-Null
			sc.exe config $service2 start=auto 2>1 1>2 | Out-Null

            Start-Service $service1, $service2 -ErrorAction SilentlyContinue -WarningAction SilentlyContinue 2>1 1>2 | Out-Null -ErrorAction SilentlyContinue

            Start-Sleep -Seconds 3

            if ($service1.Status -ne "Running" -and $service2.Status -ne "Running") {

			Write-Host "$outputSpace A potential integrity corruption is detected." -ForegroundColor Cyan
			Write-Host ""
			Write-Host "$outputSpace Tamper Protection: ON | Coro Agent1 and Coro Agent2 services: Stopped." -ForegroundColor Cyan
			Write-Host "$outputSpace The script could not start Coro Agent1 and Coro Agent2 services." -ForegroundColor Cyan
			Write-Host ""
			Write-Host "$outputSpace This means Tamper Protection won't disable on this device if disabled from the Workspace." -ForegroundColor Cyan
			Write-Host "$outputSpace As Coro cannot be uninstalled when Tamper Protection is on, please boot Windows" -ForegroundColor Cyan
			Write-Host "$outputSpace into the Safe Mode and re-run this script again to bypass Tamper Protection and uninstall Coro." -ForegroundColor Cyan
			Write-Host ""
			Write-Host "$outputSpace Please contact Support if you require any assistance with this." -ForegroundColor Cyan
			Write-Host "$outputSpace The script will terminate now." -ForegroundColor Cyan
			Start-Sleep -Seconds 5
			exit 1

            } elseif ($service1.Status -ne "Running" -and $service2.Status -eq "Running") {

			Write-Host "$outputSpace A potential integrity corruption is detected." -ForegroundColor Cyan
			Write-Host ""
			Write-Host "$outputSpace Tamper Protection: ON | Coro Agent1 service: Stopped." -ForegroundColor Cyan
			Write-Host "$outputSpace The script could not start Coro Agent1 service." -ForegroundColor Cyan
			Write-Host ""
			Write-Host "$outputSpace This means Tamper Protection won't disable on this device if disabled from the Workspace." -ForegroundColor Cyan
			Write-Host "$outputSpace As Coro cannot be uninstalled when Tamper Protection is on, please boot Windows" -ForegroundColor Cyan
			Write-Host "$outputSpace into the Safe Mode and re-run this script again to bypass Tamper Protection and uninstall Coro." -ForegroundColor Cyan
			Write-Host ""
			Write-Host "$outputSpace Please contact Support if you require any assistance with this." -ForegroundColor Cyan
			Write-Host "$outputSpace The script will terminate now." -ForegroundColor Cyan
			Start-Sleep -Seconds 5
			exit 1

			} elseif ($service1.Status -eq "Running" -and $service2.Status -ne "Running") {

			Write-Host "$outputSpace A potential integrity corruption is detected." -ForegroundColor Cyan
			Write-Host ""
			Write-Host "$outputSpace Tamper Protection: ON | Coro Agent2 service: Stopped." -ForegroundColor Cyan
			Write-Host "$outputSpace The script could not start Coro Agent2 service." -ForegroundColor Cyan
			Write-Host ""
			Write-Host "$outputSpace This means Tamper Protection won't disable on this device if disabled from the Workspace." -ForegroundColor Cyan
			Write-Host "$outputSpace As Coro cannot be uninstalled when Tamper Protection is on, please boot Windows" -ForegroundColor Cyan
			Write-Host "$outputSpace into the Safe Mode and re-run this script again to bypass Tamper Protection and uninstall Coro." -ForegroundColor Cyan
			Write-Host ""
			Write-Host "$outputSpace Please contact Support if you require any assistance with this." -ForegroundColor Cyan
			Write-Host "$outputSpace The script will terminate now." -ForegroundColor Cyan
			Start-Sleep -Seconds 5
			exit 1

			} else {

			Write-Host "$outputSpace Done!" -ForegroundColor Green
			Start-Sleep -Seconds 1

			}
        }
    }
	} else {

		Write-Host "$outputSpace Done!" -ForegroundColor Green
	}

} else {}

#Check Tamper Protection status

if ($safeMode -eq $false) {

Write-Host "[$outputTimestamp] Detecting Tamper Protection status"

$registryValue1 = Get-ItemProperty -Path $tamperPath -Name $tamperValue -ErrorAction SilentlyContinue

if ($registryValue1 -and $registryValue1.$tamperValue -eq "true") {

	Write-Host ""
	Write-Host "$outputSpace Tamper Protection is enabled. Coro cannot uninstall when Tamper protection is enabled." -ForegroundColor Cyan
	Write-Host "$outputSpace Please disable the Tamper Protection from Coro Workspace, wait 10-15 minutes and retry the script." -ForegroundColor Cyan
	Write-Host ""
	Write-Host "$outputSpace If your Coro agent is corrupted and doesn't communicate with the Workspace, please run" -ForegroundColor Cyan
	Write-Host "$outputSpace this script in Safe Mode to uninstall." -ForegroundColor Cyan
	Write-Host ""
	Write-Host "$outputSpace Please contact Support if you require any assistance with this." -ForegroundColor Cyan
	Write-Host ""
	Write-Host "$outputSpace The script will now terminate as it cannot uninstall Coro when Tamper Protection is enabled." -ForegroundColor Cyan
	Start-Sleep -Seconds 20
	exit 1

} else {

	Write-Host "$outputSpace Tamper Protection is disabled" -ForegroundColor Green
}
}	else {

}

#Check Coro version

$version42 = $false

if ($safeMode -eq $false -and $skipNativeUninstall -eq $false) {

	Write-Host "[$outputTimestamp] Obtaining Coro version number"

	if (Test-Path $tamperPath) {

    $versionValue = Get-ItemProperty -Path $tamperPath -Name "Version" -ErrorAction SilentlyContinue

      if ($versionValue) {

        if ($versionValue.$valueName -eq "2.0.42.1") {

			$version42 = $true

            Write-Host "$outputSpace Version 2.0.42.1 detected. This version cannot be uninstalled in traditional way." -ForegroundColor Cyan
			Write-Host "$outputSpace Please download the latest Stable version of Coro from the Workspace, install it and retry this script again." -ForegroundColor Cyan
			Write-Host "$outputSpace If you are unable to install Coro due to corruption, please either run this script in Safe Mode" -ForegroundColor Cyan
			Write-Host "$outputSpace or set the value of `$skipNativeUninstall to `$true in this script and re-run the script." -ForegroundColor Cyan
			Write-Host ""
			Write-Host "$outputSpace Please contact Support first and show this message." -ForegroundColor Cyan
			Write-Host ""
			Write-Host "$outputSpace The script will terminate now." -ForegroundColor Cyan
			Start-Sleep -Seconds 30
			exit 1

        } else {

			$version42 = $false
			Write-Host "$outputSpace Done! Coro version: $($versionValue.Version)" -ForegroundColor Green
        }

    } else {

        $version42 = $false
		Write-Output "Version value not found. This might be because Coro is either uninstalled or corrupted." -ForegroundColor Cyan
	}

	} else {

	$version42 = $false
	Write-Host "$outputSpace Version not found. This might be because Coro was previously removed." -ForegroundColor Cyan

	}

} else {}

#Detect and stop Coro services

Write-Host "[$outputTimestamp] Detecting and stopping Coro services"

$services = Get-Service -DisplayName "Coro*"

if ($services) {

    $failedServices = @()

    foreach ($service in $services) {

        if ($service.Name -eq "CoroProtectedService") {
            continue
        }

        $service | Stop-Service -Force -WarningAction SilentlyContinue -ErrorVariable err 2>&1 | Out-Null

        if ($err) {

            Start-Sleep -Seconds 5
            $service | Stop-Service -Force -WarningAction SilentlyContinue -ErrorVariable retryErr 2>&1 | Out-Null

            if ($retryErr) {
                $failedServices += [PSCustomObject]@{
                    Name = $service.Name
                    Error = $retryErr[0].Exception.Message
                }
            }
        }
    }

    if ($failedServices) {
        foreach ($fail in $failedServices) {

            Write-Host "$outputSpace $($fail.Error)" -ForegroundColor Red
        }

	} else {

        Write-Host "$outputSpace Done!" -ForegroundColor Green
    }

} else {

    Write-Host "$outputSpace Couldn't detect Coro services." -ForegroundColor Cyan
    Write-Host "$outputSpace But the script will carry on." -ForegroundColor Green
}

#Uninstall Coro

	Write-Host "[$outputTimestamp] Uninstalling Coro"

	$uninstalled = $false

<#
if ($safeMode -eq $false -and $skipNativeUninstall -eq $false -and $version42 -eq $false) {

	try {

		if ($wmiValue -eq $true) {

			Write-Host "$outputSpace Uninstalling Coro using the first method."

			try {

				$uninstalledWmi = Start-Process msiexec.exe -PassThru -Wait -ArgumentList "/x $wmiIdentifyingNumber /qn"
				$exitCodeWmi = $uninstalledWmi.ExitCode

				if ($exitCodeWmi -eq 0) {

					$uninstalled = $true
					Write-Host "$outputSpace Done!" -ForegroundColor Green

				} elseif ($exitCodeWmi -eq 1619) {

					$uninstalled = $false
					Write-Host "$outputSpace wmiIdentifyingNumber not found but the script will carry on." -ForegroundColor Cyan

				} elseif ($exitCodeWmi -eq 1639){

					$uninstalled = $false
					Write-Host "$outputSpace uninstalledWmi: failed as arguments (/qn) are wrong. But the script will carry on."  -ForegroundColor Cyan

				} elseif ($exitCodeWmi -eq 1720) {

					$uninstalled = $false
					Write-Host "$outputSpace uninstalledWmi: There is a problem with the Windows Installer package but the script will carry on."  -ForegroundColor Cyan

				} 	elseif ($exitCodeWmi -eq 1619) {

					$uninstalled = $false
					Write-Host "$outputSpace uninstalledWmi: The installation package could not be opened but the script will carry on."  -ForegroundColor Cyan

				} else {

					$uninstalled = $false
					Write-Host "$outputSpace The first method didn't work. Error code: $exitCodeWmi" -ForegroundColor Cyan
					Write-Host "$outputSpace But the script will try the next uninstall method." -ForegroundColor Cyan
				}

			} catch { }
		}

		} catch { }
}
#>

if ($registryResult64 -and $uninstalled -eq $false) {

	try {

		if ($safeMode -eq $false -and $skipNativeUninstall -eq $false -and $version42 -eq $false) {

			try {

			Write-Host "$outputSpace Uninstalling Coro using the second method."

			$uninstalledReg64 = Start-Process msiexec.exe -PassThru -Wait -ArgumentList "/x $uninstallStringReg64 /qn"
			$ExitCodeReg64 = $uninstalledReg64.ExitCode

			if ($ExitCodeReg64 -eq 0) {

					Write-Host "$outputSpace Done!" -ForegroundColor Green

					$uninstalled = $true

				} elseif ($ExitCodeReg64 -eq 1619) {

					Write-Host "$outputSpace uninstallStringReg64 not found but the script will carry on." -ForegroundColor Cyan
					$uninstalled = $false

				} elseif ($ExitCodeReg64 -eq 1639){

					Write-Host "$outputSpace The second method failed as arguments (/qn) are wrong. The script will carry on."  -ForegroundColor Cyan
					$uninstalled = $false

				} elseif ($ExitCodeReg64 -eq 1720) {

					Write-Host "$outputSpace uninstalledReg64: There is a problem with the Windows Installer package. The script will carry on."  -ForegroundColor Cyan
					$uninstalled = $false

				} 	elseif ($ExitCodeReg64 -eq 1619) {

					Write-Host "$outputSpace uninstalledReg64: The installation package could not be opened. The script will carry on."  -ForegroundColor Cyan
					$uninstalled = $false

				} else {

					Write-Host "$outputSpace The second method didn't work. Error code: $ExitCodeReg64" -ForegroundColor Cyan
					Write-Host "$outputSpace But the script will try the next uninstall method." -ForegroundColor Cyan
					$uninstalled = $false
				}

			} catch {

				$uninstalled = $false
			}

		} else {

		$uninstalled = $false

		}

	} catch {

	$uninstalled = $false

	}

} else {

	$uninstalled = $true
}

if ($uninstalled -eq $false) {

Write-Host "$outputSpace Uninstalling Coro using the third method" -ForegroundColor Yellow

} else {

Write-Host "$outputSpace Coro is uninstalled." -ForegroundColor Green
Write-Host "[$outputTimestamp] Removing leftovers"

}

#Remove Coro and its leftovers

try {

	taskkill /IM coro-notifications.exe /F > $null 2>&1
	taskkill /IM coro.exe /F > $null 2>&1

	} catch {}

####

$registryPath1 = "HKLM:\SYSTEM\CurrentControlSet\Services"

	Get-ChildItem -Path $registryPath1 | ForEach-Object {

	if ($_.PSChildName -like "Coro*") {

	Remove-Item -Path "$registryPath1\$($_.PSChildName)" -Force -Recurse -ErrorAction SilentlyContinue

	}
}

####

$registryPath2 = "HKLM:\SOFTWARE\Bitdefender"

	if (Test-Path -Path $registryPath2) {

    Remove-Item -Path $registryPath2 -Force -Recurse -ErrorAction SilentlyContinue
}

####

$registryPath3 = "HKLM:\SOFTWARE\Coro Cyber Security Ltd"

	if (Test-Path -Path $registryPath3) {

    Remove-Item -Path $registryPath3 -Force -Recurse -ErrorAction SilentlyContinue
}

####

#### Please note that if the user doesn't have permissions to run Powershell and it requires an admit to enter their credentials, then the Powershell script will essentialy
#### look into admin's HKCU hive, so user's HKCU hive entries will not be deleted. In this case, it might be required to delete the entry below manually as the user. This is not #### the case when user just selects Run Powershell as Administrator and elevates the Powershell with their own user account, without entering admin credentials.
#### This is also irrelevant when the script is deployed via GPO/RMM as it is deployed on system level

$registryPath4 = "HKCU:\SOFTWARE\Microsoft\Installer\Products"

if (Test-Path $registryPath4) {

		Get-ChildItem $registryPath4 | ForEach-Object {

		$property = Get-ItemProperty -Path "$registryPath4\$($_.PSChildName)"

		if(($property.PSObject.Properties | Where-Object { $_.Value -match "Coro" })) {

		Remove-Item -Path "$registryPath4\$($_.PSChildName)" -Force -Recurse -ErrorAction SilentlyContinue

		}
	}
}

####

$registryPath5 = "HKLM:\SOFTWARE\Microsoft\Windows\CurrentVersion\Installer\Folders"

if (Test-Path -Path $registryPath5) {

	if ($wmiValue -eq $true) {

		$registryItems = Get-ItemProperty -Path $registryPath5

		foreach ($property in $registryItems.PSObject.Properties) {

        if ("$($property.Name)" -like "*$wmiIdentifyingNumber*") {

            try {

            Remove-ItemProperty -Path $registryPath5 -Name $property.Name -Force -ErrorAction SilentlyContinue

            } catch {}
        }
    }
	}
}

####

$registryPath6 = "HKLM:\SOFTWARE\Microsoft\Windows\CurrentVersion\Installer\Managed"

if (Test-Path -Path $registryPath6) {

    if ($wmiValue -eq $true) {

        $hivekeys = Get-ChildItem -Path $registryPath6 -Recurse

        foreach ($hivekey in $hivekeys) {

            if ($hivekey.PSChildName -like "*$wmiIdentifyingNumber*") {

                if (Test-Path -Path $hivekey.PSPath) {

					try {

						Remove-Item -Path $hivekey.PSPath -Force -Recurse -ErrorAction SilentlyContinue

					} catch { }
                }

			} else {

                $hivekeyValues = Get-ItemProperty -Path $hivekey.PSPath

				foreach ($value in $hivekeyValues.PSObject.Properties) {
                    if ($value.Value -is [string] -and $value.Value -like "*$wmiIdentifyingNumber*") {

                        if (Test-Path -Path $hivekey.PSPath) {

						try {

							Remove-Item -Path $hivekey.PSPath -Force -Recurse -ErrorAction SilentlyContinue

							} catch { }
                        }

						break
                    }
                }
            }
        }
    }
}

####

$registryPath7 = "HKLM:\SOFTWARE\Classes\Installer\Products"

	Get-ChildItem -Path $registryPath7 | ForEach-Object {

	$values1 = Get-ItemProperty -Path "$registryPath7\$($_.PSChildName)"

	if(($values1.PSObject.Properties | Where-Object { $_.Value -match "Coro" })) {

	Remove-Item -Path "$registryPath7\$($_.PSChildName)" -Force -Recurse -ErrorAction SilentlyContinue

	}
}

####

$registryPath8 = "HKLM:\SOFTWARE\Microsoft\Windows\CurrentVersion\Uninstall"

	Get-ChildItem -Path $registryPath8 | ForEach-Object {

	$values2 = Get-ItemProperty -Path "$registryPath8\$($_.PSChildName)"

	if(($values2.PSObject.Properties | Where-Object { $_.Value -match "Coro" })) {

	Remove-Item -Path "$registryPath8\$($_.PSChildName)" -Force -Recurse -ErrorAction SilentlyContinue

	}
}

####

$registryPath9 = "HKLM:\SOFTWARE"

	Get-ChildItem -Path $registryPath9 | ForEach-Object {

	if ($_.Name -match "Coro*") {

    Remove-Item -Path $_.PSPath -Force -Recurse -ErrorAction SilentlyContinue

	}
}

####

$registryPath10 = "HKCU:\SOFTWARE"

	Get-ChildItem -Path $registryPath10  | ForEach-Object {

	if ($_.Name -like "Coro*") {

    Remove-Item -Path $_.PSPath -Force -Recurse -ErrorAction SilentlyContinue

	}
}

####

$registryPath11 = "HKLM:\SOFTWARE\Microsoft\Windows\CurrentVersion\Installer\Folders"

    if (Test-Path -Path $registryPath11) {

	$registryNewItems = Get-ItemProperty -Path $registryPath11

    foreach ($property in $registryNewItems.PSObject.Properties) {

			if ("$($property.Name)" -like "*Coro*") {

			try {

			Remove-ItemProperty -Path $registryPath11 -Name $property.Name -Force -ErrorAction SilentlyContinue

			} catch {}
		}
	}
}

####

$registryPath12 = "HKLM:\SOFTWARE\Classes\Installer\Products"

if (Test-Path -Path $registryPath12) {

	if ($wmiValue -eq $true) {

	Get-ChildItem -Path $registryPath12 | ForEach-Object {

	$values12 = Get-ItemProperty -Path "$registryPath12\$($_.PSChildName)"

		if(($values12.PSObject.Properties | Where-Object { $_.Value -like "*$wmiIdentifyingNumber*" })) {

		Remove-Item -Path "$registryPath12\$($_.PSChildName)" -Force -Recurse -ErrorAction SilentlyContinue

		}
	}
	}
}

####

$registryPath13 = "HKLM:\SOFTWARE\Microsoft\Windows\CurrentVersion\Uninstall"

if (Test-Path -Path $registryPath13) {

	if ($wmiValue -eq $true) {

	Get-ChildItem -Path $registryPath13 | ForEach-Object {

	$values11 = Get-ItemProperty -Path "$registryPath13\$($_.PSChildName)"

		if(($values11.PSObject.Properties | Where-Object { $_.Value -like "*$wmiIdentifyingNumber*" })) {

		Remove-Item -Path "$registryPath13\$($_.PSChildName)" -Force -Recurse -ErrorAction SilentlyContinue

		}
	}
	}
}

####

$registryPath14 = "HKLM:\SYSTEM\Setup\FirstBoot\Services"

	if (Test-Path -Path $registryPath14) {

	Get-ChildItem -Path $registryPath14 | ForEach-Object {

	if ($_.PSChildName -like "Coro*") {

	Remove-Item -Path "$registryPath14\$($_.PSChildName)" -Force -Recurse -ErrorAction SilentlyContinue

		}
	}
}

####

$registryPath15 = "HKLM:\SOFTWARE\Microsoft\Windows\CurrentVersion\Installer\UserData\S-1-5-18\Components"

	if (Test-Path -Path $registryPath15) {

	Get-ChildItem -Path $registryPath15 | ForEach-Object {

	$values15 = Get-ItemProperty -Path "$registryPath15\$($_.PSChildName)"

		if(($values15.PSObject.Properties | Where-Object { $_.Value -like "*Coro*" })) {

		Remove-Item -Path "$registryPath15\$($_.PSChildName)" -Force -Recurse -ErrorAction SilentlyContinue

		}
	}
}

####

$registryPath16 = "HKLM:\SOFTWARE\Microsoft\Windows\CurrentVersion\Installer\UserData\S-1-5-18\Products"

if (Test-Path -Path $registryPath16) {

    if ($wmiValue -eq $true) {

        $newhivekeys = Get-ChildItem -Path $registryPath16 -Recurse

        foreach ($newhivekey in $newhivekeys) {

            if (-not (Test-Path -Path $newhivekey.PSPath)) {

                continue
            }

            if ($newhivekey.PSChildName -like "*$wmiIdentifyingNumber*") {

                try {

                    Remove-Item -Path $newhivekey.PSPath -Force -Recurse -ErrorAction SilentlyContinue

                } catch { }

            } else {

                $newhivekeyValues = Get-ItemProperty -Path $newhivekey.PSPath
                $shouldDeleteParent = $false

                foreach ($valuepo in $newhivekeyValues.PSObject.Properties) {

                    if ($valuepo.Value -is [string] -and $valuepo.Value -like "*$wmiIdentifyingNumber*") {

                        $shouldDeleteParent = $true
                        break
                    }
                }

                if ($shouldDeleteParent) {

                    $parentKeyPath = Split-Path -Path $newhivekey.PSPath -Parent

                    if (Test-Path -Path $parentKeyPath) {

                        try {

                            Remove-Item -Path $parentKeyPath -Force -Recurse -ErrorAction SilentlyContinue

                        } catch {

                        }
                    }
                }
            }
        }
    }
}

####

$filepath1 = "C:\Windows\System32\drivers\corodriver.sys"

if (Test-Path -Path $filepath1 -PathType Leaf) {

    Remove-Item -Path $filepath1 -Force -ErrorAction SilentlyContinue
}

####

$filepath2 = "C:\Windows\System32\drivers\CoroWPDFilter.sys"

if (Test-Path -Path $filepath2 -PathType Leaf) {

    Remove-Item -Path $filepath2 -Force -ErrorAction SilentlyContinue
}

####

$directoryPath1 = "C:\ProgramData\CoroInstaller"

if (Test-Path -Path $directoryPath1 -PathType Container) {

    Remove-Item -Path $directoryPath1 -Force -Recurse -ErrorAction SilentlyContinue
}

####

$directoryPath2 = "$env:localappdata\Coro"

if (Test-Path -Path $directoryPath2 -PathType Container) {

    Remove-Item -Path $directoryPath2 -Force -Recurse -ErrorAction SilentlyContinue
}

####

$directoryPath3 = "C:\Program Files\Coro Cyber Security Ltd"

if (Test-Path -Path $directoryPath3 -PathType Container) {

    Remove-Item -Path $directoryPath3 -Force -Recurse -ErrorAction SilentlyContinue
}

####

$directoryPath4 = "C:\ProgramData\CoroAgent1SRV"

	if (Test-Path -Path $directoryPath4 -PathType Container) {

	Remove-Item $directoryPath4 -Force -Recurse -ErrorAction SilentlyContinue

}

####

$directoryPath5 = "C:\ProgramData\CoroAgent2SRV"

	if (Test-Path -Path $directoryPath5 -PathType Container ) {

	Remove-Item $directoryPath5 -Force -Recurse -ErrorAction SilentlyContinue

}

Write-Host "$outputSpace Done!" -ForegroundColor Green
Write-Host ""
Write-Host "All done. Please reboot your machine to complete the procedure."  -ForegroundColor Green
Start-Sleep -Seconds 7