Deploying Coro on macOS devices
This guide describes the process for deploying the Coro Agent to macOS devices.
Prerequisites and system requirements
Before you begin, make sure your macOS device meets the following prerequisites:
- Coro Security Platform utilizes a Bitdefender Software Development Kit (SDK). To avoid conflicts that may interfere with the installation of the Coro Agent, Bitdefender and any other antivirus software based on Bitdefender must be uninstalled prior to installing the Coro Agent.
- macOS devices must meet the minimum specifications .
- You must have administrative permissions to install applications on your macOS device.
Deployment options
Install the Coro Agent through one of the processes described below:
- Self-install on single devices : An admin user provides specific users with an installer link via email. Users select the link and follow the on-screen instructions to install the software on their devices.
-
Mass deployment
: An admin user downloads the Agent installer package and deploys it across all devices using a mass deployment tool.
Coro provides a number of articles covering mass deployment scenarios. To learn more:
Note
While deploying the Coro Agent to macOS devices, end users typically receive a pop-up warning requesting confirmation to allow or not allow the Coro Agent to filter network content:
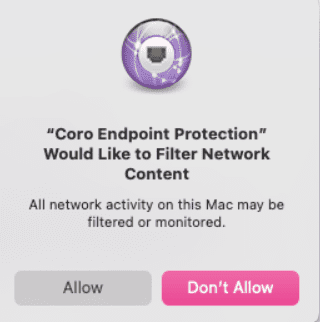
This warning is a security feature included with macOS and applies to all applications installed on the device that require such access. If you are deploying the Coro Agent via MDM tools to one or more devices and want to provide a silent installation, use the following configuration to automatically allow this component and bypass the warning:
Expand for configuration listing
<?xml version="1.0" encoding="UTF-8"?><!DOCTYPE plist PUBLIC "-//Apple//DTD PLIST 1.0//EN" "http://www.apple.com/DTDs/PropertyList-1.0.dtd"> <plist version="1"> <dict> <key>PayloadUUID</key> <string>7E53AC50-B88D-4132-99B6-29F7974EAA3C</string> <key>PayloadType</key> <string>Configuration</string> <key>PayloadOrganization</key> <string>Coronet Cyber Security</string> <key>PayloadIdentifier</key> <string>7E53AC50-B88D-4132-99B6-29F7974EAA3C</string> <key>PayloadDisplayName</key> <string>Coro System Extensions</string> <key>PayloadDescription</key> <string/> <key>PayloadVersion</key> <integer>1</integer> <key>PayloadEnabled</key> <true/> <key>PayloadScope</key> <string>System</string> <key>PayloadContent</key> <array> <dict> <key>PayloadUUID</key> <string>2BA070D9-2233-4827-AFC1-1F44C8C8E527</string> <key>PayloadType</key> <string>com.apple.webcontent-filter</string> <key>PayloadOrganization</key> <string>Coronet Cyber Security</string> <key>PayloadIdentifier</key> <string>CEBF7A71-D9A1-48BD-8CCF-BD9D18EC155A</string> <key>PayloadDisplayName</key> <string>Approved Network Extension</string> <key>PayloadDescription</key> <string/> <key>PayloadVersion</key> <integer>1</integer> <key>PayloadEnabled</key> <true/> <key>FilterType</key> <string>Plugin</string> <key>UserDefinedName</key> <string>Coro Network Extension</string> <key>PluginBundleID</key> <string>net.coro.endsec.Coro</string> <key>FilterSockets</key> <true/> <key>FilterDataProviderBundleIdentifier</key> <string>net.coro.endsec.TrafficService</string> <key>FilterDataProviderDesignatedRequirement</key> <string>identifier "net.coro.endsec.TrafficService" and anchor apple generic and certificate 1[field.1.2.840.113635.100.6.2.6] /* exists */ and certificate leaf[field.1.2.840.113635.100.6.1.13] /* exists */ and certificate leaf[subject.OU] = E3P52EVK39</string> </dict> </array> </dict> </plist>Save this configuration to a file on your local workstation. This file can then be used on any MDM platform that supports custom policies. Refer to your MDM platform for specific instructions on deploying custom policies.
Downloading and installing the Agent
Important
The Agent detects the operating system's language during installation and adjusts its interface language to match.
The Agent supports the following languages:
- English
- Spanish (Spain)
- Italian (Italy)
If the selected OS language is not supported, Coro defaults to English.
Admin users with sufficient permissions download the Agent from the Agent Deployment tab on the Control Panel > Devices page:

The Channel column on the Coro Agent deployment list categorizes each available version of the Agent based on its current stage within the Agent release lifecycle as follows:
| Release Stage | Description |
|---|---|
| Beta | The initial development and promotion phase of the Agent. |
| Release Candidate | Quality assurance testing starts, followed by the initial internal deployment of the Agent. |
| Gradual Rollout | Incremental update rollout starts for the stable Agent. Coro gradually rolls out new Agent versions to all customers. |
| General Availability | The incremental rollout concludes, and the Agent is fully released to all Coro protected users. |
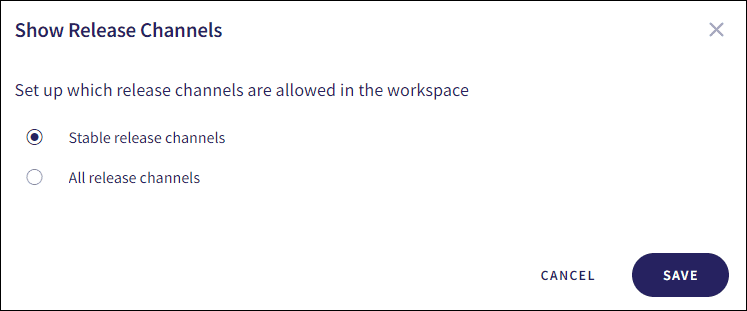
The All channels option allows admin users to select which release channels are allowed in the workspace:

The following options are available:
- Stable release channels : Only Gradual Rollout and General Availability release channels are allowed in the workspace.
- All release channels : All release channels are allowed in the workspace.
To download and install (or upgrade) the Coro Agent:
- Sign in to the Coro console .
-
From the sidebar, select
 to access the
Control Panel
.
to access the
Control Panel
.
- Select Devices > Agent Deployment .
-
Scroll to the
macOS
section:

-
Select
ACTIONS
for the version you want to install:

Choose from the following actions:
-
Obtain a download link URL for the Agent installer:
-
Select
Copy link
.
Coro displays a Copy Download Link dialog, which contains a URL link to the Agent installation file:
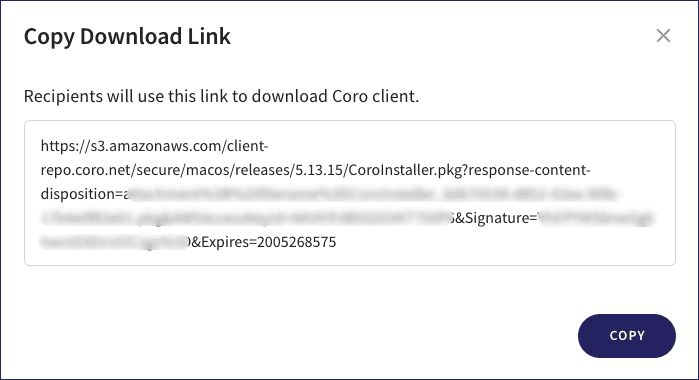
-
Select
COPY
.
The browser copies the download link to your clipboard.
- Paste the link into a web browser and follow the instructions to install.
note
Admin users can distribute this link to endpoint device users for direct installation of the Agent. Additionally, you can use the same link for mass deployment tools.
-
Select
Copy link
.
-
Download the installer file:
-
Select
Download
.
The Agent installation file is downloaded to your local device.
warning
Do not rename the downloaded Agent installation file.
- After the download is complete, open the installation file and follow the instructions to install.
-
Select
Download
.
-
Obtain a download link URL for the Agent installer:
After the installation completes, the Coro Agent may prompt you—via a notification—to enable additional system settings, depending on your macOS device's security posture:
note
If you are installing on devices running macOS 14 or earlier, see Deploying Coro Agent on macOS 14.
If you are installing on devices running macOS 15 or later, see Deploying Coro Agent on macOS 15.
Important
After the installation is complete, ensure you disable any firewall rules that might interfere with Coro Agent connectivity.
Deploying Coro Agent on macOS 14
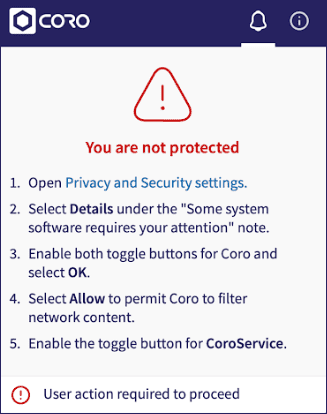
When deploying the Coro Agent on devices running macOS 14 or earlier, you might need to confirm additional system settings. For example, macOS can require you to explicitly allow the Coro Endpoint Protection application to function.
Perform the following steps to confirm your system settings:
-
Select Apple
 > System Settings > Privacy & Security
.
> System Settings > Privacy & Security
.
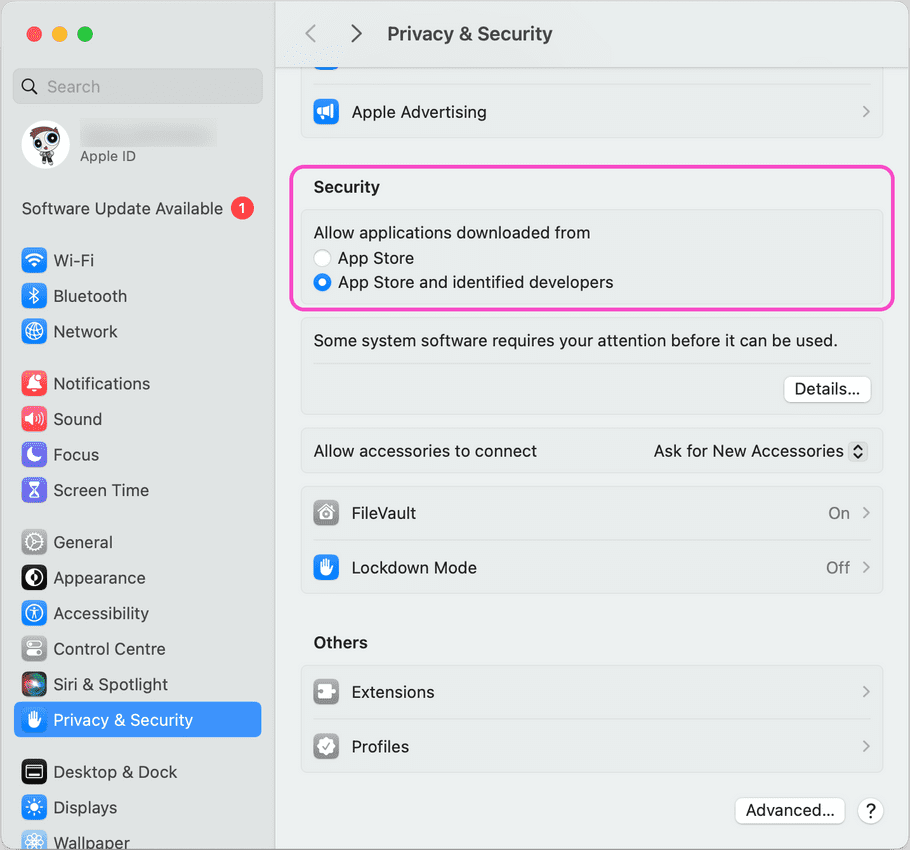
- Locate the Security section.
-
In
Allow applications downloaded from
, select
App store and identified developers
:
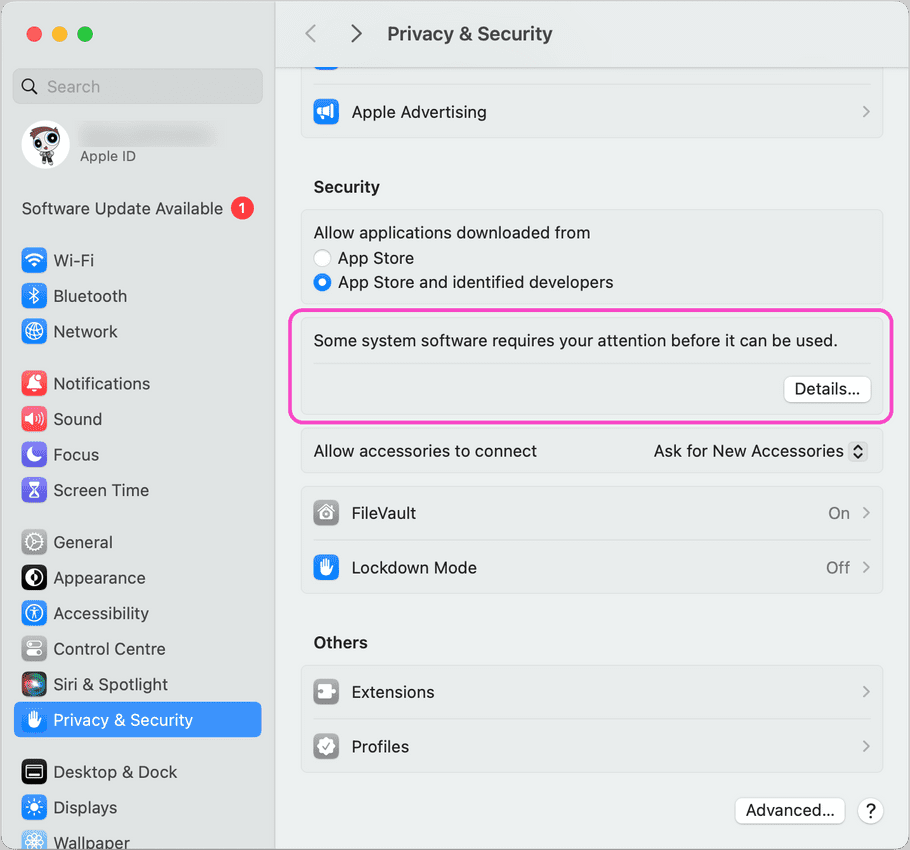
-
At the prompt for
Some system software requires your attention before it can be used.
, select
Details...
:
-
In the dialog, make sure
both
entries for
Coro Endpoint Protection
are enabled:
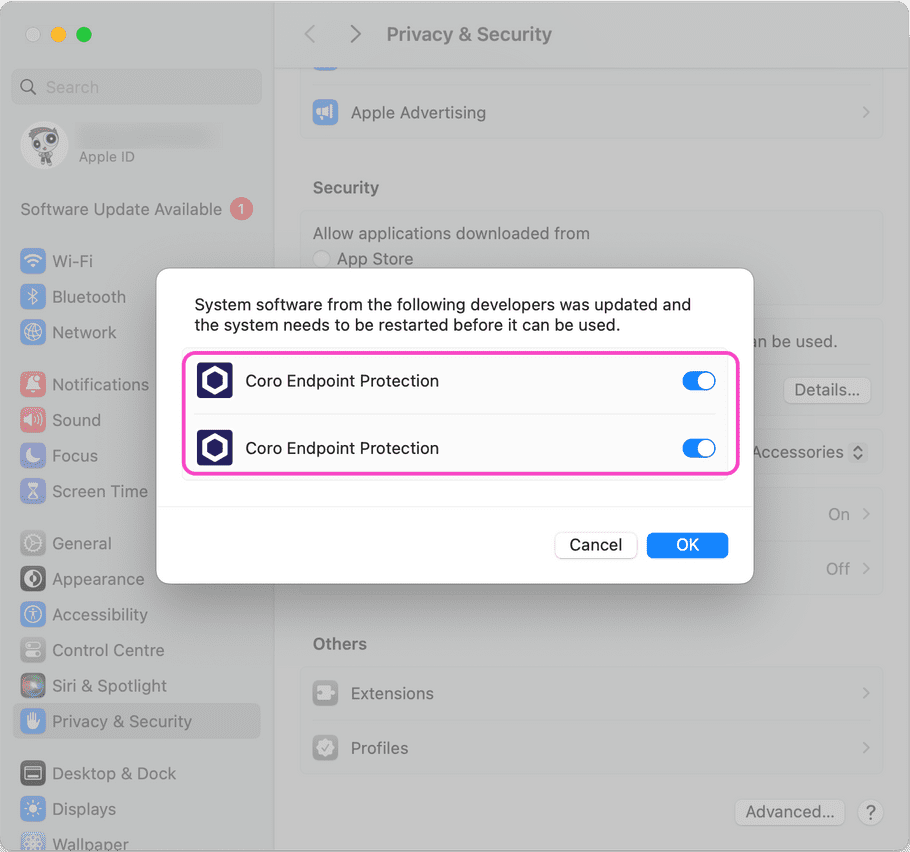
Select OK to save your changes and close the dialog.
-
To allow the Agent to access your device storage, select
Open Full Disk Access
:
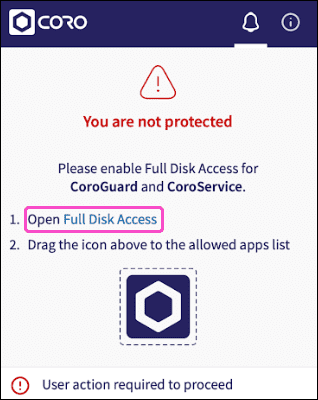
-
Drag and drop Coro into the
Full Disk Access
list to enable
CoroService
and
CoroGuard
:
Alternatively, enable CoroService and CoroGuard manually from the Full Disk Access list:
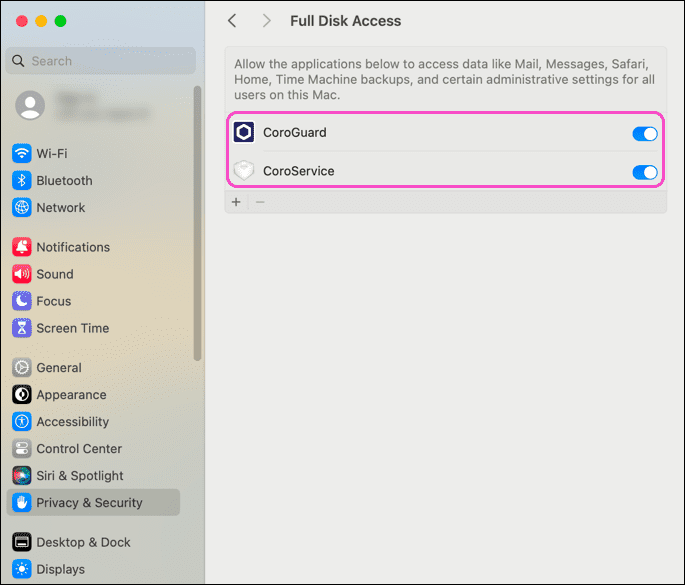
note
CoroService manages Coro's endpoint protection functionality.
CoroGuard manages Coro's log processing and file quarantine functionality.
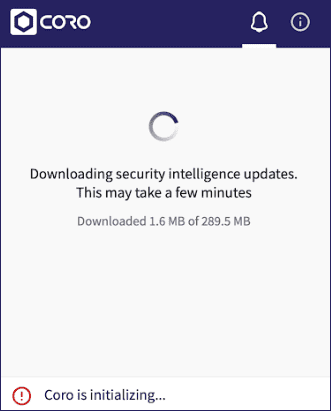
After the installation and security configuration is complete, the Agent might download additional updates:
After the update process is complete, view the Agent settings and notifications by opening the Agent desktop application from the macOS menu bar:

Deploying Coro Agent on macOS 15
note
During the setup wizard, two system extension prompts appear in quick succession. If you have not enabled the first setting before selecting Open System Settings in the second prompt, both might disappear without directing you to the correct setting. Full instructions for locating both settings are included in this article.
For macOS 15, ignore the instructions provided in the Coro Agent.
When deploying the Coro Agent on devices running macOS 15 or later, you need to confirm additional system settings:
- Enabling Network Extensions
- Enabling Endpoint Protection
- Enabling Full Disk Access
- Allowing Coro in the background
Enabling Network Extensions
-
Select Apple
> System Settings > General > Login Items & Extensions
. Select
 adjacent to
Network Extensions
.
adjacent to
Network Extensions
.
-
Turn on
Coro Endpoint Protection
:
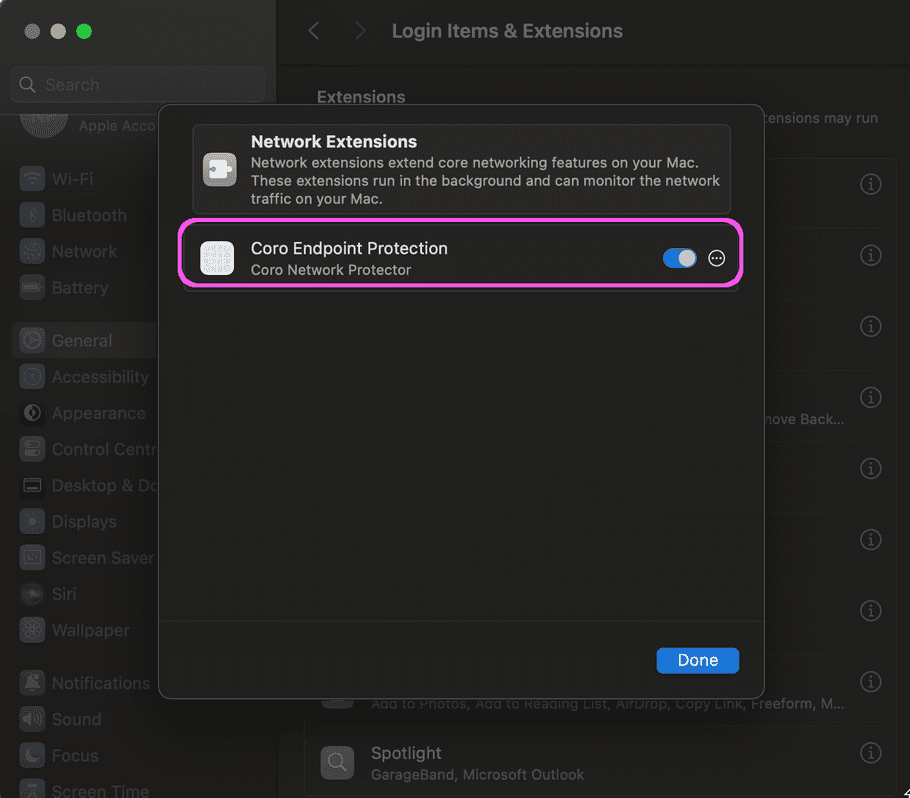
- Enter your macOS password to validate your identity.
- When prompted to allow Coro Endpoint Protection to filter network content, select Allow .
- Select Done .
Enabling Endpoint Protection
-
Select Apple
> System Settings > General > Login Items & Extensions
.
-
Locate
Endpoint Security Extensions
and select
adjacent to
Endpoint Security Extensions
.
-
Turn on
Coro Endpoint Protection
:

- If prompted, enter your macOS password to validate your identity.
- Select Done .
Enabling Full Disk Access
-
From the Agent, select
Open Full Disk Access
to grant the Agent access to your device storage:
-
Drag and drop Coro into the
Full Disk Access
list to enable
CoroService
and
CoroGuard
:
Alternatively, enable CoroService and CoroGuard manually from the Full Disk Access list:
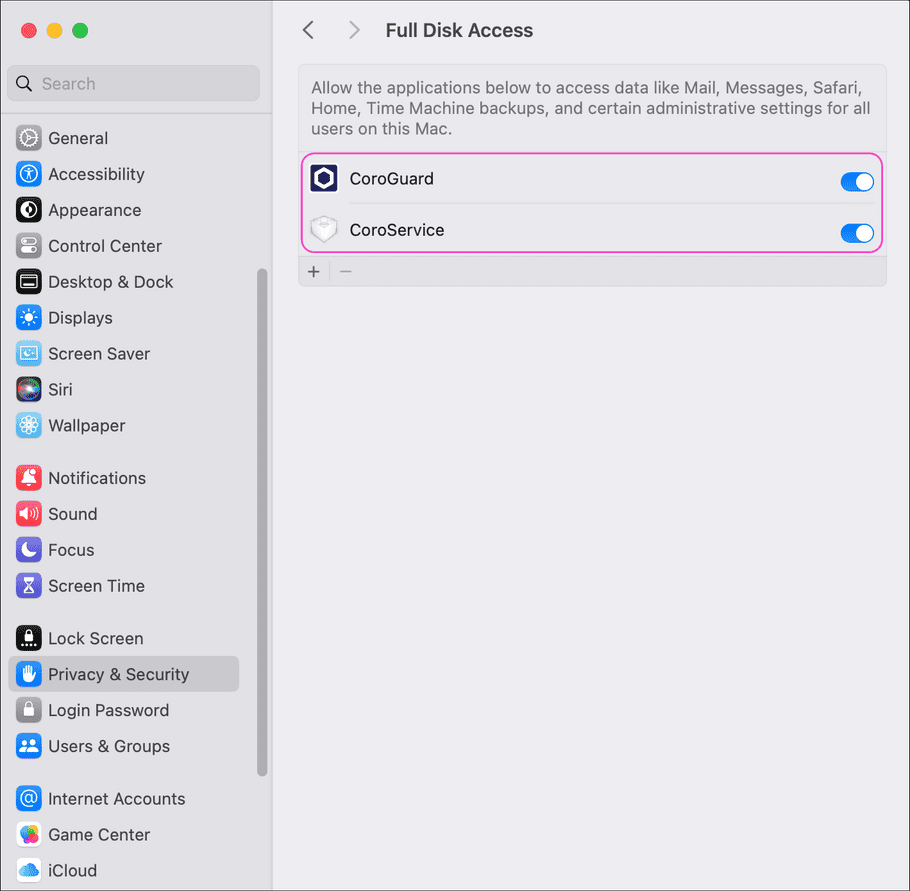
note
CoroService manages Coro's endpoint protection functionality.
CoroGuard manages Coro's log processing and file quarantine functionality.
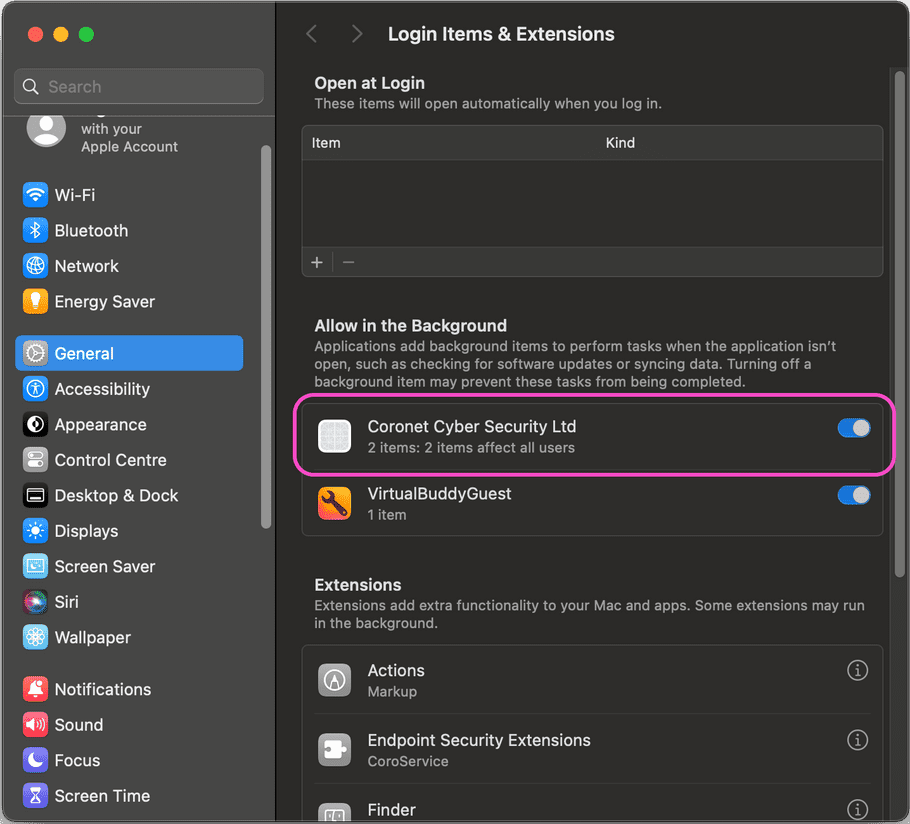
Allowing Coro in the background
-
Select Apple
> System Settings > General > Login Items & Extensions
.
- Locate the Allow in the Background section.
-
Make sure you have an entry for
Coronet Cyber Security Ltd
which is enabled. In a typical deployment, Coro adds and enables this item by default so no further action is required: