v2.0
Version 2.0 provides new features, existing feature enhancements, and fixes.
New features
This section describes the following new features that we are releasing with version 2.0:
- Restructured control panel
- Data permissions extended to custom data types
- Synchronize users from cloud apps button
- Data governance actions available directly from data tickets
- Excluding outgoing email scans by keyword in subject line
1 - Restructured control panel
The Control Panel has been restructured as follows:

The Protection area (previously Protection Coverage) now contains the following sections:
1.1 - Cloud apps
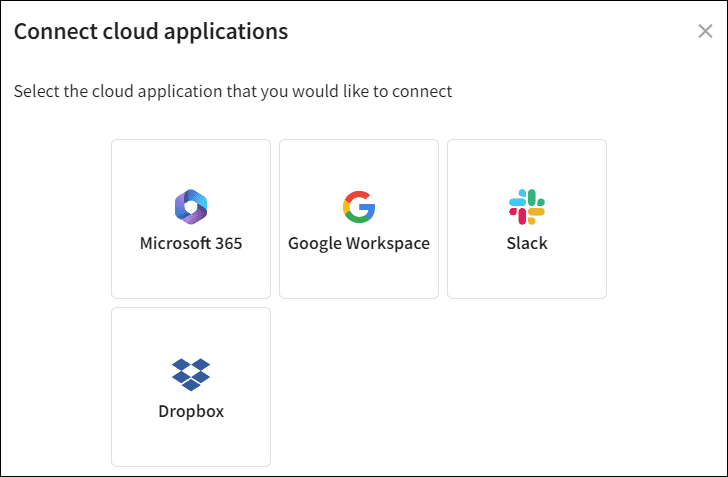
The functionality of the Cloud Applications section (previously Cloud Apps) remains the same, but now also includes the + CONNECT button located on the top right of the screen:

Select + CONNECT to display the Connect cloud applications dialog, which enables you to connect to cloud applications that are not currently connected.
1.2 - Devices
The Devices section (previously Endpoint Devices) contains the following tabs:
1.2.1 Agent Deployment
The Agent Deployment (previously Deployment) tab functionality remains the same.
1.2.2 Labels
The Labels tab functionality remains the same, and now also includes predefined device labels.

1.2.3 Settings
The Settings tab now contains the following components:
- Heartbeat interval
- Tamper Protection : by default On
-
Real-Time Malware and Ransomware Protection
: by default
On
. If Off, the sub-items are grayed out and locked for changes. (previously located in the
Malware & Ransomware
section)
- Advanced Threat Control : by default On
- Secured Shadow Backups : by default On
- Enhanced EDR Block Mode : by default On
- Enable an initial malware and ransomware scan : by default Off . (previously located in the Malware & Ransomware section)
- WiFi Phishing : by default On (previously located in the Phishing section)
The Settings tab now also includes: Applying device protection settings to specific devices.

1.2.4 Device Posture
The Device Posture tab now also includes: Applying device posture policies to specific devices.
1.3 - Users
The Users section (previously Protected Users) contains the following tabs:
1.3.1 Protected Users
The Protected Users tab (previously Users) remains the same.
1.3.2 Protected Groups
The Protected Groups tab (previously Groups) remains the same.
1.3.3 Exclusions
The Exclusions tab (previously Exceptions) remains the same.
1.4 - Email
The Email section (previously Phishing) contains the following tabs:
1.4.1 Settings
The Settings tab now also includes: Quarantining incoming emails with attachments from a predefined list of file extensions.
1.4.2 Allow/Block
The Allow/Block tab functionality remains the same.
1.4.3 Add-ins
The new Add-ins tab contains the functionality previously contained in the User Feedback section (Phishing > Settings.)

1.5 - Data
The Data section (previously named Data Governance) contains the following tabs:
1.5.1 Monitoring
The interface of the Monitoring tab has been updated and now includes the following sections:
- Data Exposure : Allows you to specify the types of sensitive data to monitor (on access and exposure) within the email and shared cloud drive data
- Data Possession : Allows you to specify the types of sensitive data to monitor when scanning endpoint device drives
- Security and business sensitive data (previously located in the Custom Data tab): Allows you to specify monitoring of additional sensitive data, including Source code and Passwords

1.5.2 Permissions
The Permissions tab now also includes Extending data permissions to custom data types.
1.5.3 Exclusions
The new Exclusions tab allows Excluding outgoing email scans by keyword in subject line.
2 - Extending data permissions to custom data types
Custom data permissions are now configurable from the Permissions tab under Control Panel > Data:

You can configure the following custom data type permissions:
- Passwords
- Certificates
- Source Code
- Sensitive Keywords
Select the + ADD PERMISSION button to configure custom data permissions.
The Apply policy dialog allows you to specify:
- The Data Type for which the policy is applied (in this case one of Passwords , Certificates , Source Code , or Sensitive Keywords )
- The Permission level ( Can Access or Can Access and Expose )
- To whom the policy is applied ( All Users , Specific Groups , or Specific Users/Domains )

Once a policy is created, it is displayed on the Permissions list.
The following ticket Types are created and displayed in the Ticket Log when a potential permission violation is detected:
- Suspicious Exposure of Certificate
- Suspicious Exposure of Critical Data
- Suspicious Exposure of Password
- Suspicious Exposure of Source Code
The above ticket Types include a Policy Violations section under Full Details, which describes the particular policy violation:

3 - Synchronize users from cloud apps button
A Synchronize users from cloud apps button has been added to the Protected users and Protected Groups tabs. This helps you ensure that cloud application users and groups who are added to protection are synchronized within seconds.

When synchronization is initiated, a confirmation message is displayed:

Additionally, an entry is created in the Activity Log:

When the synchronization is complete, a confirmation message is displayed to confirm the successful synchronization of cloud application users and groups to protection:

4 - Data governance actions available directly from data tickets
The ACTIONS menu allows Coro administrators to select Add to data governance permissions and perform permissive actions directly from Data tickets.

4.1 - Open tickets
If the Add to data governance permissions action is selected for an Open ticket, the following Extend data governance permissions dialog is displayed:
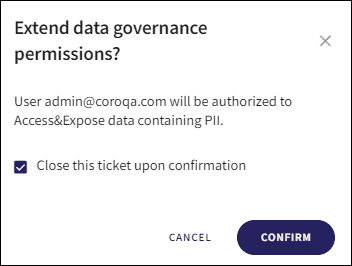
Select or deselect Close this ticket upon confirmation, and select the CONFIRM button.
If Close this ticket upon confirmation is selected, the ticket is closed. The user(s) affected are granted Access/Access & Expose permissions to the type of sensitive data specified in the ticket (NPI, PCI, PII, PHI), and the following confirmation message is displayed:

Select the VIEW button to display the Closed ticket in the Ticket Log:

If Close ticket upon confirmation is not selected, the ticket remains open. The user(s) affected are granted Access/Access & Expose permissions to the type of sensitive data specified in the ticket (NPI, PCI, PII, PHI), and the following confirmation message is displayed:

Navigate to the Permissions page to view the permissions authorized to the user(s) listed under the specific sensitive data type heading:


Navigate to the Permissions page to view the permissions authorized to the user(s) listed under the specific sensitive data type heading:

4.2 - Closed tickets
If the Add to data governance permissions action is selected for a Closed ticket, the following Extend data governance permissions dialog is displayed:
After the CONFIRM button is selected, the user(s) affected are granted Access/Access & Expose permissions to the type of sensitive data specified in the ticket (NPI, PCI, PII, PHI), and the following confirmation message is displayed:

5 - Excluding outgoing email scans by keyword in subject line
Email subjects with specific keywords can now be excluded from DLP for outgoing emails by adding specific keywords and selecting Exclude email with specified keywords in the subject line. All outgoing emails with the specified keywords in the subject line are excluded from scanning.

When Exclude email with specified keywords in the subject line is enabled or disabled, an entry is created in the Activity Log:

Enhancements
This section describes the following existing feature enhancements that we are releasing with version 2.0:
- Device posture settings
- Predefined device labels
- Updated activity log message for disabled devices
- Improved email notification information related to data tickets
- Quarantining incoming emails with attachments from a predefined list of file extensions
- Improved ticket action confirmation message
1 - Device posture settings
After creating a workspace for new customers, the system defaults all Device Posture settings to Review. This allows you to configure your Device Posture settings based on your preferences and security requirements.
For existing customers, your current Device Posture settings will remain unchanged and are not be affected by this feature.
2 - Predefined device labels
Upon Workspace creation, a pre-defined set of device labels that implicitly represent the four groups of devices are included as follows:
- All devices
- Windows Desktop devices
- Windows Server devices
- macOS devices
Pre-defined labels are displayed on the Labels tab under Control Panel > Endpoint Devices. Pre-defined labels cannot be edited or deleted, and do not have an associated action menu:

note
Pre-defined labels are not visible on the Devices page.
Pre-defined labels are used when:
- Applying device protection settings to specific devices
- Applying device posture policies to specific devices
2.1 - Applying device protection settings to specific devices
Real-time Malware and Ransomware Protection settings can now be applied to a specific group of devices:

2.1.1 - Adding device label(s) to a specific device protection setting
Select the Device labels section under the specific Real-time Malware and Ransomware Protection setting.

Select from the list of pre-defined or custom device labels.

The specific setting is only applied to devices with the selected device labels.

You can remove a device label from a device protection setting by selecting the delete icon inside the individual device label.

Caution
Applying device labels to a specific device protection setting has no effect if Real-time Malware and Ransomware Protection or any related child settings are not enabled.
2.2 - Applying device posture policies to specific devices
Device posture policies can now be applied to a specific group of devices:

2.2.1 - Adding device label(s) to a new device posture policy
Select the Add button at the top right of the screen. From the dropdown, select the operating system for which the new policy is added (Windows or macOS).

From the Add new device Policy dialog, select the Labels section under the Apply policy to devices with these labels header.
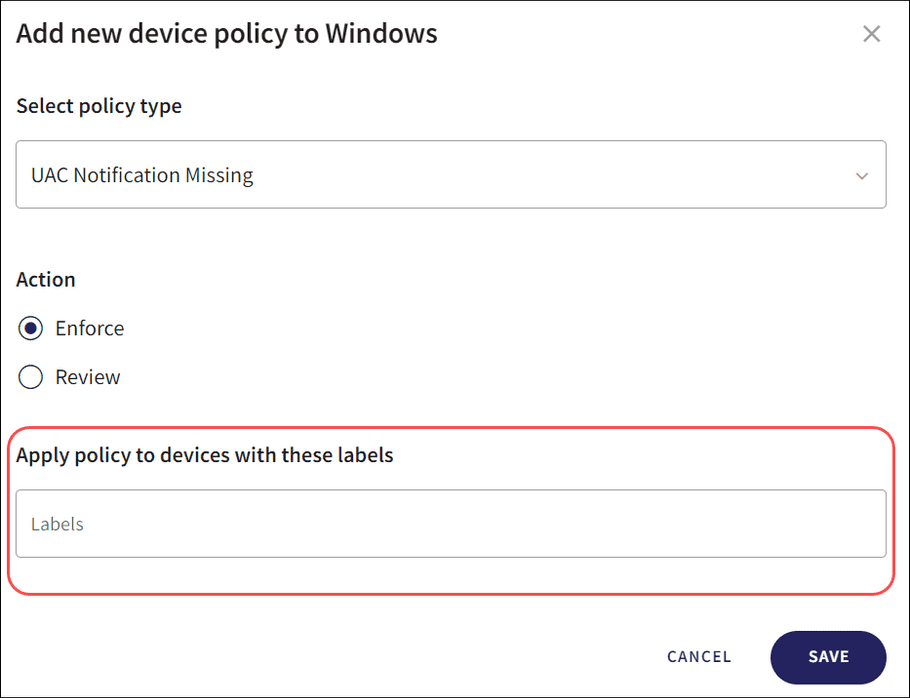
Select from the list of pre-defined or custom device labels.

You can remove a device label by selecting the delete icon.

Select the Save button to apply the selected device labels.

The new policy is created, and the selected device labels to which the policy is applied are displayed when the specific policy is expanded by selecting the dropdown.

2.2.2 - Adding device label(s) to an existing device posture policy
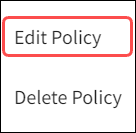
Select the 3-dot menu icon adjacent to the existing device labels listed under a particular device posture policy.

Select Edit Policy.
From the Edit device Policy dialog, select the Labels section under the Apply policy to devices with these labels header.
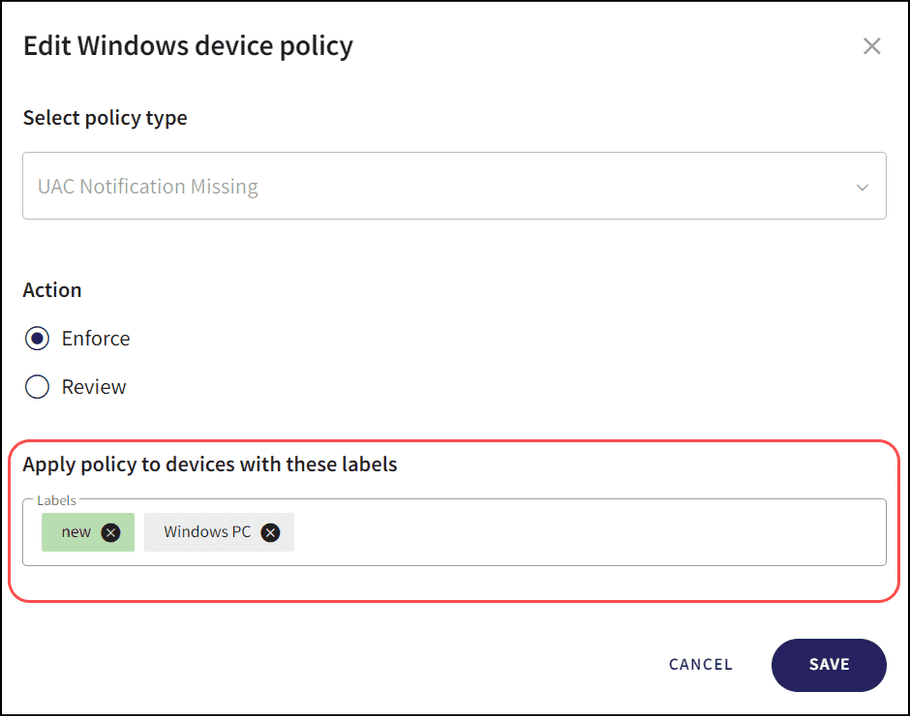
Select from the list of pre-defined or custom device labels.

You can remove a device label by selecting the delete icon inside an individual device label.
Select the Save button to apply the selected device labels.
3 - Updated activity log message for disabled devices
When a device is disabled from protection, the Activity Log now displays in the following format:
Endpoint protection for device <devicename> (deviceid) has been disabled.

4 - Improved email notification information related to data tickets
The email notifications containing information related to Data tickets have been improved to provide more detail to assist you in determining whether or not the ticket requires critical review.
The notifications now contain the following information (with example data):
- Trigger : PHI (Protected Health Information)
- Policy Violations : User admin@coroautorivka.onmicrosoft.com is not permitted to expose PHI
- Sender : admin@coroautorivka.onmicrosoft.com
- Recipient : admin@coroqa2.onmicrosoft.com
- Subject : Medical File
- File Name : /builds/coronet/bugatti/qa-and-automation/automation/backend-automation/helpers/fixtures/files/PHI test file.txt
- Type : "Bank routing number"; "Person name"
note
For shared file email notifications, Sender is replaced with Shared by, and Recipient is replaced with Shared with.
5 - Quarantining incoming emails with attachments from a predefined list of file extensions
Coro administrators can trigger an email security ticket by configuring a list of blocked email attachment file extensions. Select Quarantine emails with attachments of these specified file types (by default, Off). Add and remove file attachment extensions using the File types list.
The list of default file extensions is as follows:
- .exe
- .dll
- .bat
- .vb
- .js
- .com
- .iso
- .chm
- .lnk
- .htm
- .html

Select Reset to re-add the list of default extensions.
Incoming emails containing attachments of the file types defined are automatically quarantined, and an Email Phishing ticket is created with a finding of Blocked attachment type:

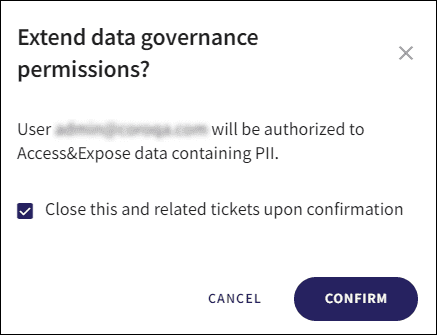
6 - Improved ticket action confirmation message
The confirmation dialog that is displayed when performing an action on a single ticket has been enhanced. The Close upon confirmation option is now Close this and related tickets upon confirmation.
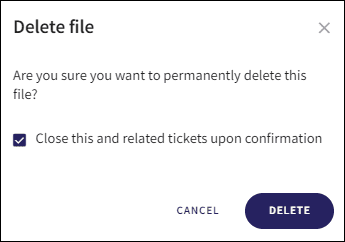
After confirming the action from the confirmation dialog, the current ticket, as well as all related tickets are closed, and the following confirmation message is displayed:

Select the VIEW button to display the closed ticket in the Ticket Log:

Fixed items
The following fixes are included with version 2.0:
- Tickets no longer display empty IP/Country details as "(undefined)" in the Key Details section. The field is now left blank.
- Fixed an inconsistency in the Activity Log where the All Activity button was redirecting users to an empty page.
- Added additional countries to the Access Permission list under Cloud Applications settings.
- Updated cloud application logos.
- Fixed an issue impacting Data tickets, where text enclosed between "< >" was not being displayed.
Additional updates
This section describes the following additional updates that we are releasing with version 2.0:
1 - macOS agent 1.9
macOS agent 1.9 releases 28 May 2023, and includes the following:
1.1 - Enhanced agent UI
We have made the following enhancements to the macOS agent UI:
After the macOS agent is installed and the Bitdefender database update process initiates, the download progress of the Bitdefender database is now displayed:

After a disk scan is remotely initiated, a notification is displayed.

After the scan completes, a notification is displayed. If any threats were detected and quarantined by the scan, a separate notification is displayed. Select more info to display further information related to the quarantined threats.

The path where the remote scan detected the malware is displayed.

Select Clear to clear remove all notifications.

All notifications are cleared.

The Save Diagnostics option allows you to download a zip file containing diagnostic information. You can send this file to the Coro support team and they can use it to troubleshoot issues.

After the download is complete, a notification is displayed.

1.2 - Enhanced UX on agent update notification
- A macOS notification now displays to inform you an update is available.
- The macOS notification includes an Install action. Selecting the Install action or the macOS notification itself displays the Sparkle update UI, from which you can optionally install the update.
- The macOS notification remains visible when the Sparkle UI is dismissed (closing the prompt window or selecting Remind me later .) This ensures you are always aware of available updates.
1.3 - Bug fixes
- Internal bug fixes.
2 - Windows agent 2.0
Windows agent 2.0 releases 21 May 2023, and includes the following:
2.1 - Improved log collection system
- All logs are collected, including those which are rotated and zipped.
- Four backup zipped logs are saved on the device for 30 days (previously 14 days).
2.2 - Bug fixes
- Fixed issue preventing agent uninstallation.
- Internal bug fixes.
note
The relevant agent must be updated on your endpoint device before changes take effect.