Integrating with ConnectWise PSA
ConnectWise Professional Services Automation (PSA) is a comprehensive business management platform designed for IT service providers, including managed service providers (MSPs). It streamlines operations such as billing, project management, and service ticketing to improve efficiency and customer service.
Coro integrates with ConnectWise PSA to enable MSPs to report workspace usage data by mapping services (Coro modules and add-ons) and accounts (managed workspaces).
Important
PSA connectors are only configurable within channel workspaces. For further information, see Workspace overview.
Prerequisites
Before you begin this guide, make sure you have:
- A ConnectWise Manage administration account.
- Familiarity with the ConnectWise Manage environment.
- Admin user access to a Coro console channel workspace.
Configure a ConnectWise PSA connector
note
The processes discussed here are the minimum requirements for configuring ConnectWise.
To integrate Coro with ConnectWise, a PSA connector must be configured. To configure a PSA connector:
Configure ConnectWise
Perform the following steps to configure ConnectWise:
- Sign in to your ConnectWise Manage environment
- Create a new API member
- Retrieve public and private keys
Sign into your ConnectWise Manage environment
To sign into your ConnectWise Manage environment:
-
Enter the URL provided by ConnectWise, for example,
https://example.connectwise.com. -
Enter the company, username, and password provided by ConnectWise and then select
LOGIN
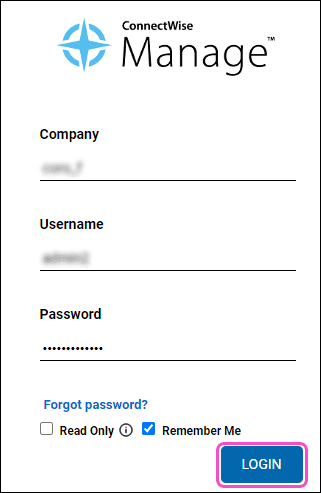
Provided your login credentials are correct, you successfully log in to your ConnectWise Manage environment:

Create a security role
note
The security role permissions discussed here represent the minimum required to create a ConnectWise connector from the Coro console.
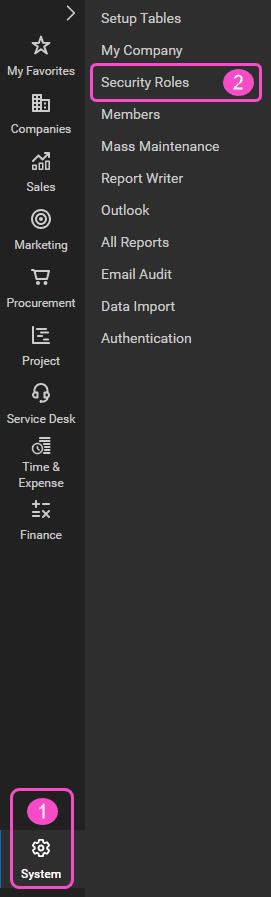
To create a new security role within your ConnectWise Manage environment:
-
Go to
System
>
Security Roles
:
-
Select
+
(
New Item
) to create a new security role:

-
Enter a
Role ID
and select
Save
:

You can now assign permissions to the new security role.
Assign permissions to a security role
To assign permissions to an existing security role:
- Go to System > Security Roles .
-
Select the
Role
dropdown:

Coro displays the Select a Role dialog:
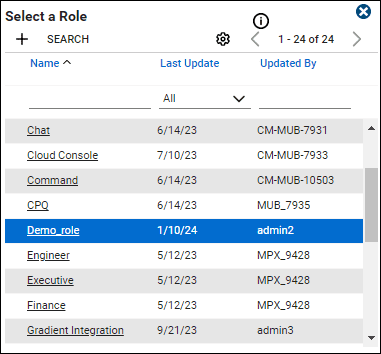
-
Select an existing security role.
Coro displays a list of role permission categories:

-
Configure the following role permissions:
-
Expand
Companies
and set
Inquire Level
to
All
for
Company Maintenance
:

-
Expand
Finance
and set
Inquire Level
to
All
for
Agreement Sales
:

-
Set
Add Level
,
Edit Level
, and
Inquire Level
to
All
for
Agreements
:

-
To configure
Agreements
, select
Customize
and verify all sections are set to
Allow
, and then select
SAVE
:

-
Expand
Procurement
and set
Inquire Level
to
All
for
Product Catalog
and
Products
:

-
Expand
Service Desk
and set
Add Level
,
Edit Level
, and
Inquire Level
to
All
for
Close Service Tickets
,
Merge Tickets
, and
Service Tickets
:

-
Expand
System
and set
Add Level
, and
Inquire Level
to
All
for
Table Setup
:

-
To configure
Table Setup
, select
Customize
and verify
Company/Company Status
,
Company/Company Type
,
Invoicing/Billing Cycle
, and
Service/Service Board
are set to
Allow
, and then select
SAVE
:

-
Expand
Companies
and set
Inquire Level
to
All
for
Company Maintenance
:
-
Select
Save
:

Coro displays a confirmation notification:

Create a new API member
A ConnectWise API member is a specific type of user account created within the ConnectWise Manage platform designed to interact with the platform's API.
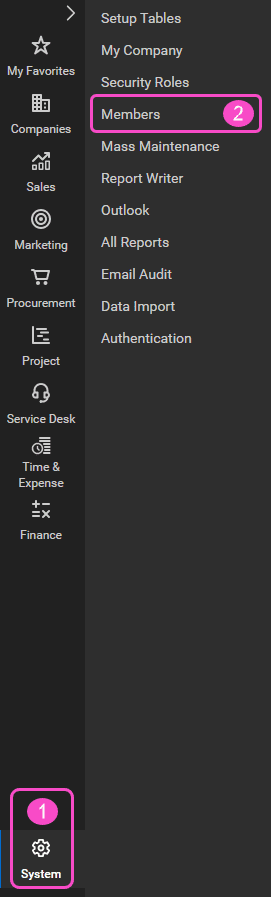
To create a new API member:
- Sign in to ConnectWise Manage .
-
Go to
System
>
Members
:
-
Select the
API Members
tab:

-
Select
+
(
New Item
) to create a new API member:

-
Enter the following API member
Profile
information:
- Member ID
- Member Name
- Time Zone
- Email (Optional)

-
Select the following API member
System
information:
- Role ID : See Creating a security role
- Level
- Name
- Location
- Business Unit
- Default Territory

-
Use the
Notes
section to enter additional information related to the API member. Additionally, select the clock option to auto insert a timestamp:

-
Select
Save
:

Coro displays a confirmation notification:
Retrieve public and private keys
After creating an API member and assigning the minimum security roles, you can generate and retrieve the public and private keys.
To generate and retrieve the public and private keys for an API member:
-
Go to
System
>
Members
:
-
Select an existing API member:

-
Select the
API Keys
tab, and then select
+
(
New Item
):

-
Enter a relevant
Description
, and then select
Save
:

The API member record is updated, and both the public and private keys are generated:

Important
The private key is available only at the time of creation and is not retrievable later.
Configure the Coro console
After configuring ConnectWise, perform the following steps to configure the Coro console:
Create a ConnectWise connector
To create a ConnectWise PSA connector:
- Sign in to the Coro console .
-
From the sidebar, select
 to access the
Control Panel
.
to access the
Control Panel
.
-
Under
Workspace
, select
Connectors
:

Coro displays the Connectors page:

-
Select the
PSA
tab:

-
Select
ADD CONNECTOR
:

If you have existing PSA connections, select + ADD CONNECTOR:

Coro displays the Add PSA Connection dialog.
-
Select
Connectwise
:

Coro displays the Add ConnectWise connector dialog:

-
Enter the following information:
- Company name : provided by ConnectWise.
-
ConnectWise domain
: Your domain is typically the URL provided by ConnectWise (see
Sign in
), excluding the
https://
prefix. For example, if your ConnectWise URL is
https://api-staging.connectwisedev.com, the domain isapi-staging.connectwisedev.com. - Public key : See Retrieving public and private keys .
- Private key : See Retrieving public and private keys .
-
Select
CONNECT
:

Provided the credentials are correct, Coro creates the ConnectWise connector, and it appears in the PSA Connectors list as Connected:

The Workspace mapping and Service mapping columns appear with a Setup required status.
After the ConnectWise connector is created and listed as Connected in the PSA Connectors list, you can map workspaces and services.
Map workspaces
Workspace mapping allows you to link Coro child workspaces to ConnectWise companies. A ConnectWise company represents a Coro child workspace.
Important
Make sure your ConnectWise data is configured correctly to ensure there is a one to one mapping between your Coro workspaces and ConnectWise companies.
To map a ConnectWise company to a Coro workspace:
-
Under
Workspace mapping
, select
Setup required
:

Coro displays the Workspace mapping page:

The Coro workspace column displays all Coro child workspaces that are linked to the current channel workspace.
-
From the
ConnectWise Company
column of the intended workspace record, select the dropdown next to
Map
:

Coro displays a list of ConnectWise companies:

-
Use the search field to find the required ConnectWise company:

-
Select the company from the filtered list:

Coro maps the ConnectWise company to the Coro child workspace:

The company selected from the ConnectWise company dropdown in the Coro console corresponds to the Company Name in ConnectWise Manage:


Important
Ensure the ConnectWise company is mapped to the correct Coro child workspace.
-
Select the
PSA
tab on the
Connectors
page:
The Workspace mapping column now shows that one (out of four) Coro child workspaces is mapped to a ConnectWise company:

note
Perform additional workspace mapping as required.
Map services
After mapping your workspaces, proceed to service mapping to associate Coro services with ConnectWise products. A ConnectWise product represents a specific Coro module or add-on, for example, Endpoint Security or Secure Messages.
Important
Make sure your ConnectWise data is configured correctly to ensure there is a one to one mapping between your Coro services and ConnectWise products. Ensure each company has an agreement that contains only one of each Coro product type.
To map a ConnectWise product to an available Coro service:
-
Select the value listed under the
Service mapping
column:

Coro displays the Service mapping page:

-
From the
ConnectWise Services
column of the targeted workspace record, select the
Map
dropdown:

Coro displays a list of ConnectWise products:

-
Use the search field to find the required ConnectWise product:

-
Select the product from the filtered list:

The ConnectWise product is successfully mapped to the Coro service:

The service selected from the ConnectWise services dropdown in the Coro console corresponds to the product listed on the Product Catalog in ConnectWise Manage:


Important
Ensure the ConnectWise product is mapped to the correct Coro service.
-
Select the
PSA
tab on the
Connectors
page:
The Service mapping column now shows that one (out of 21) Coro services are mapped to a ConnectWise product:

note
Perform additional service mapping as required.
After successfully mapping workspaces and services, the integration setup between ConnectWise Manage and Coro is complete. Device and user data across all connected company Coro workspaces is synchronized daily.