Managing enrolled devices
Coro enables you to monitor and manage your enrolled mobile devices through the Devices page.
To view your MDM-enrolled devices, perform the following steps:
From the Mobile Device Management page, select the Devices tab:
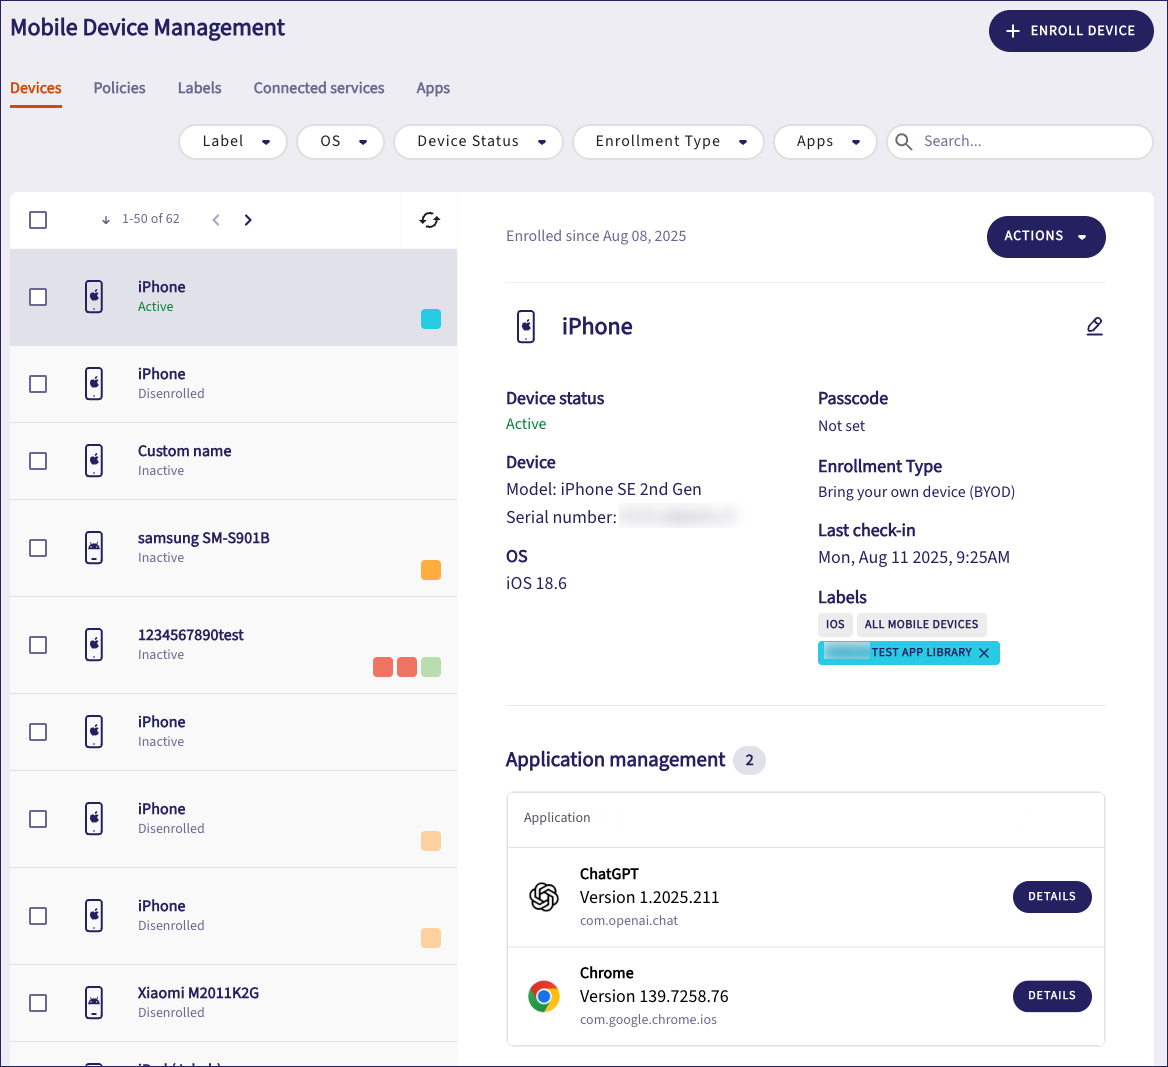
On this tab, you can:
View a list of enrolled devices.
See details for a selected device.
Enroll a new device. For more information, see Enrolling iOS and iPadOS devices or Enrolling Android devices.
Filter the display by label, policy, operating system, status, and enrollment type.
Sort the device list in ascending or descending order of last check-in date, as indicated by the arrow next to the column heading.
Search for a specific device by serial number (three characters minimum).
See the applications installed on a device, and remotely uninstall a managed app.
Add and remove device group labels.
Perform device actions such as activating a remote wipe request, clearing a passcode, or activating lost mode.
View policy violations (BYOD iOS and iPadOS devices only).
Resynchronize device connections. Use the refresh option at the top-right of the device list to request Coro to send a check-in request to each enrolled device:

The Last Check-in Date field is updated as each device responds.
Device information and options
The right-hand pane contains details for the selected device, showing the following information:
| Property | Description |
|---|---|
| Device status | An indicator of the status of the device: Active (green indicator): The device is active and connected. Inactive (Amber indicator): The device has not responded for at least three days. Tagged for disenrollment (Grey indicator): The device is tagged for disenrollment. Disenrolled (White indicator): The device has been disenrolled. |
| Device | The device model and serial number. NOTE: Due to Google's privacy policy, BYOD Android devices are prevented from reporting their serial number. Instead, such devices report a substitute identifier, which Coro displays. |
| OS | The operating system running on the device. |
| Passcode/Password | The status of the device passcode (iOS/iPadOS devices) or device password (Android devices). |
| Enrollment type | The type of enrollment. For example, Supervised or Bring Your Own Device (BYOD). |
| Last Check-in | The date the device last checked-in with Coro. |
| Labels | Predefined and custom labels representing the device groups this device belongs to. For more details, see Adding and removing labels. |
| Application Management | A list of applications installed on the device as reported to Coro. Select Details to view a dialog showing more information. |
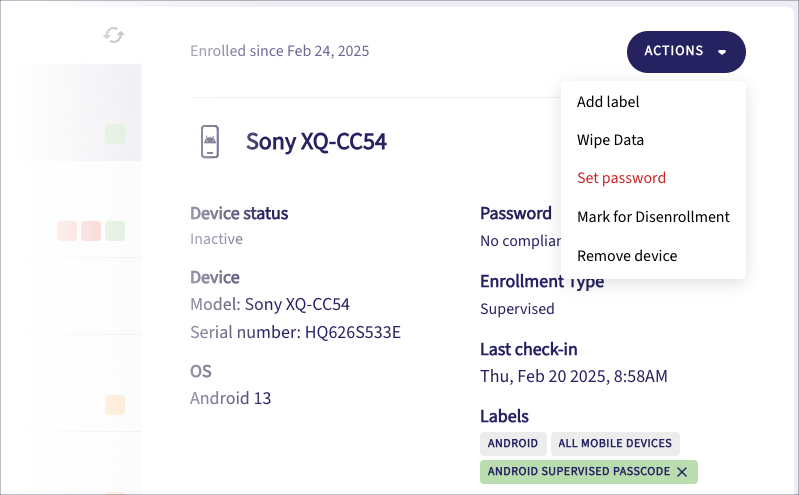
In addition, Coro provides an ACTIONS menu for each device. Available actions are (as applicable):
Add label: (Enrolled devices only) Add a device group label to this device. See Adding and removing labels.
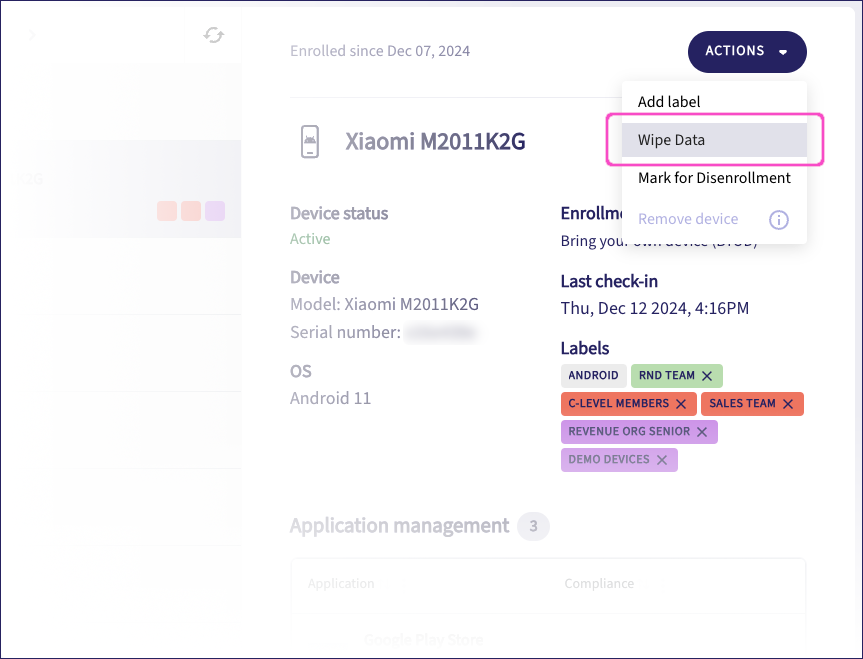
Wipe Data: Initiate a remote wipe on the device. See Remotely wiping a device.
Clear passcode: (iOS/iPadOS devices only) Clear the device passcode. See Clearing passcodes.
Set password: (Android devices only) Set a password on the device. See Setting passwords.
Mark for Disenrollment: (Enrolled devices only) Mark this device as no longer enrolled with Coro MDM and remove the profile and assigned policies from the device (at the next successful synchronization). The device remains in the list, but is shown as disenrolled and device details are no longer available. Disenrolled devices cannot be re-activated directly, but can be reenrolled with Coro MDM through the normal method (see Enrolling iOS and iPadOS devices or Enrolling Android devices).
Turn on lost mode: (Enrolled devices only) Lock this device and activate Lost mode. See Lost mode.
Remove device: Remove a disenrolled or inactive device.
ImportantYou cannot remove active enrolled devices. Mark these devices for disenrollment first.
Installed app information
Select DETAILS for an app in the Applications management section to display the Application management details dialog:
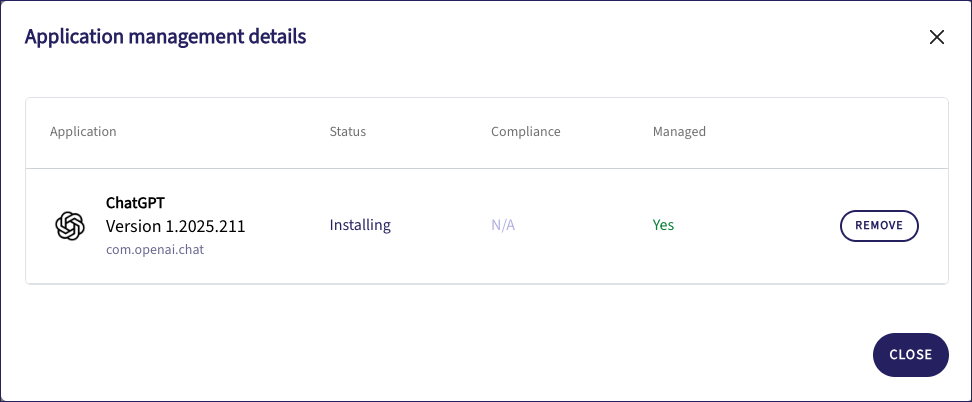
This dialog shows:
- Application: Details for the app:
- Display name
- Installed version
- Unique bundle identifier
- Status: The current installation status of the app.
- Compliance: Whether this application is in violation of an applied policy.
- Managed: Whether this app is remotely installed and managed by Coro from the managed apps list.
If the app is installed and managed from Coro, select REMOVE to uninstall the app from this device. To remove a managed app from all devices, see Managed apps.
This function is available only for managed apps. To remove a manually-installed app, perform the operation from the device.
Changing the device name
Coro identifies and names devices according to the name set in the device settings. If your organization requires a specific identifying scheme, or to improve identification of similarly-named devices, admin users can edit the device display name. This capability is only for identification in Coro MDM and does not affect the device or it's settings.
To edit the device display name, select ![]() :
:
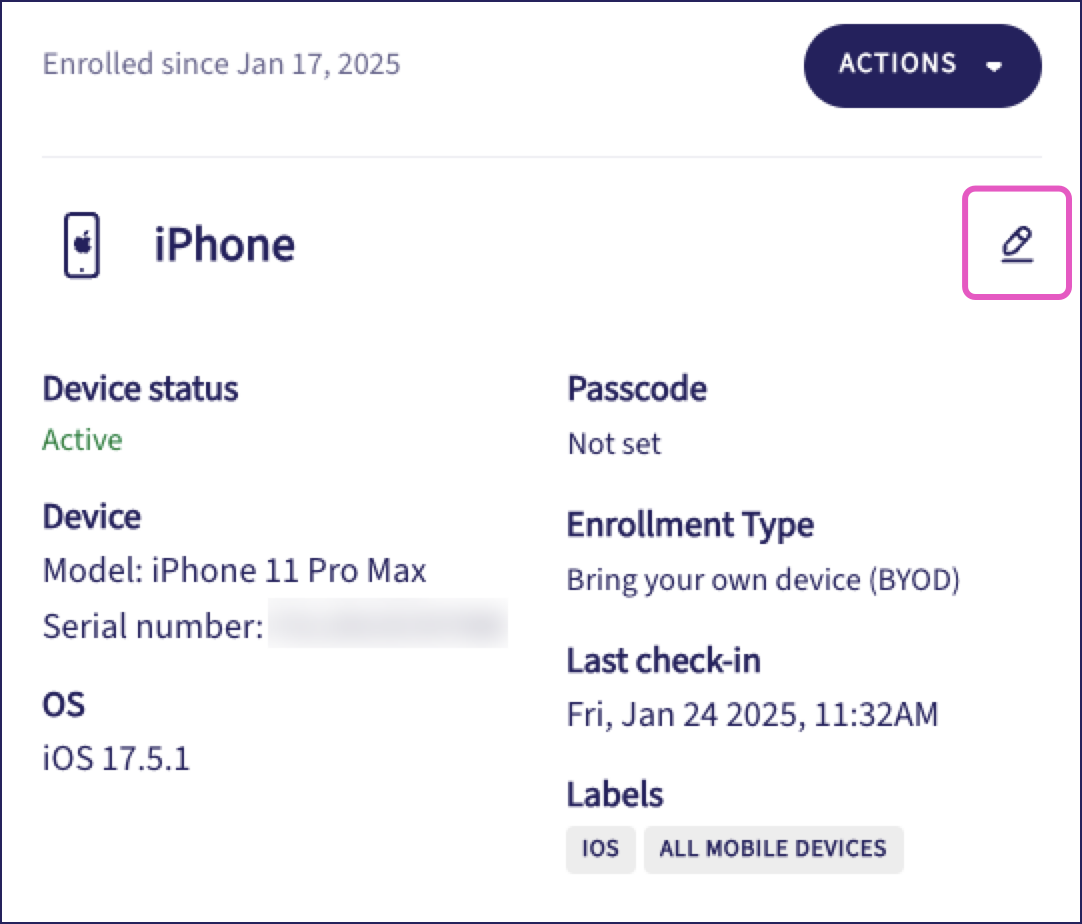
Enter the new device name and select ![]() to save. Alternatively, select
to save. Alternatively, select ![]() to cancel:
to cancel:

Remotely wiping a device
Coro can initiate a remote wipe on an enrolled device to prevent sensitive data from being viewed by unauthorized individuals.
To request the remote wipe, select the Action menu for a device and choose Wipe Data:
For iOS/iPadOS:
Remote wipe is possible only with supervised devices.
For devices running iOS/iPadOS 17 or later, a remote wipe performs a factory reset. However, where your device was previously enrolled as supervised, you can optionally select to retain this state.
For devices running iOS/iPadOS versions earlier than 17, the device is fully reset and no state or user data remains.
For Android:
On company-owned devices, a remote wipe request performs a full factory reset.
On BYOD devices, a remote wipe request removes the work profile and all related data. Any personal profile is unaffected.
Adding and removing labels
A labelled device marks it as part of a functional group. You can search and filter on labels to see associated devices, and also apply device policies.
To add a label to a device:
From the Devices tab, locate and select the device.
From the ACTIONS menu in the right pane, select Add Label:
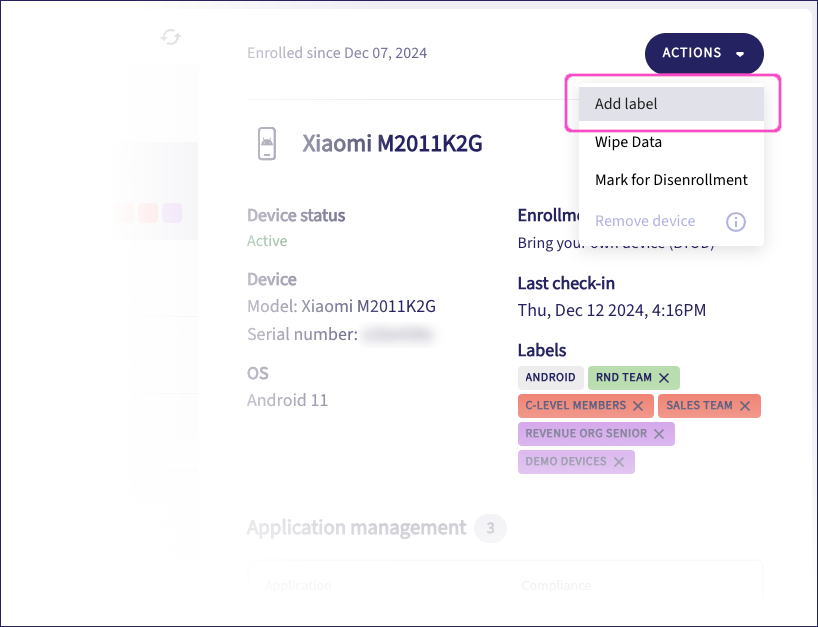
The Add label action is available only for enrolled devices. A label is applied immediately to active devices, and is applied to inactive devices when they next synchronize with Coro.
Coro displays the Add device label dialog:
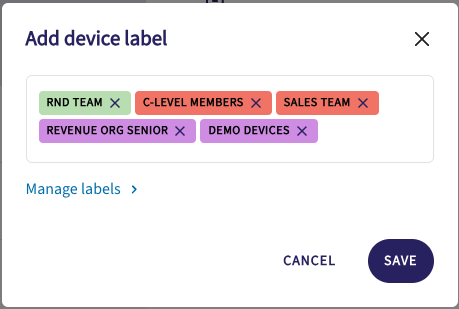
Select the label field to view a dropdown containing all current labels. Select one or more labels to populate the device label list.
To remove a label from the list, select X in the label tag.
(Optional) Select Manage labels to manage your label list in the Labels tab. For more details, see Managing labels.
To save your label list to the device, select SAVE.
Coro shows added labels in the device information pane:
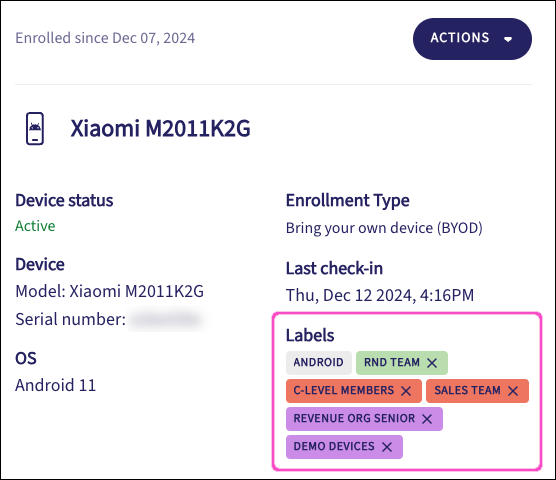
To remove a label from a device, select X within the label tag.
Clearing passcodes
Only applicable for iOS/iPadOS devices enrolled as BYOD, supervised, or device-based MAID.
If you clear a device passcode, the device becomes freely accessible and presents a potential security risk. As a result, Coro recommends making sure you have the device in-hand before you perform this action. Coro also recommends applying a Passcode Restrictions policy to the device before starting. Through the application of a passcode policy, the device holder is forced to set a new passcode on first use.
For enrolled iOS and iPadOS devices, Coro enables you to clear the passcode on a device. This feature is useful where a previous device owner has left the device locked without declaring the passcode.
To clear a passcode:
Make sure the device is turned on and connected to the internet.
In the Coro console, go to Mobile Device Management > Devices.
Select an iOS/iPadOS device.
Select ACTIONS > Clear passcode:
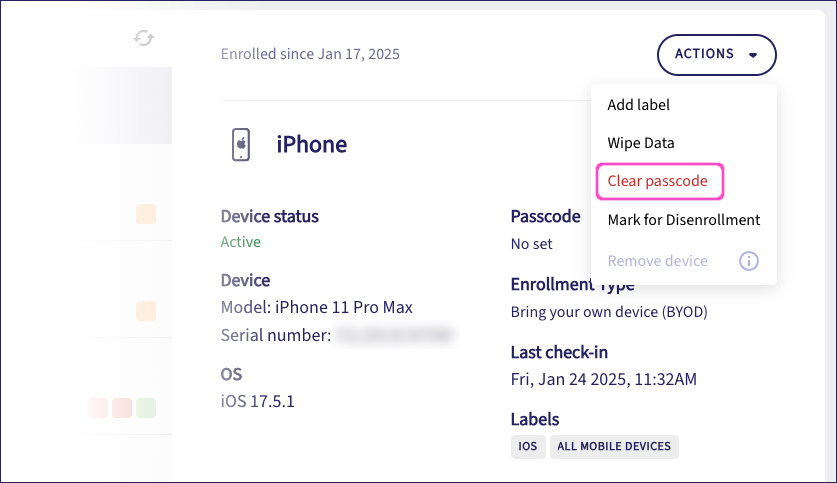
Select CLEAR PASSCODE in the confirmation dialog.
Upon confirmation, Coro sends a clear passcode instruction to the device.
Setting passwords
Applicable only to Android devices.
For enrolled Android devices, Coro enables you to remotely set a password on a device. This feature is useful for regaining control over a locked device or where the password was forgotten.
To set a password:
Make sure the device is turned on and connected to the internet.
In the Coro console, go to Mobile Device Management > Devices.
Select an Android device.
Select ACTIONS > Set password:
Coro displays the Set new password dialog:
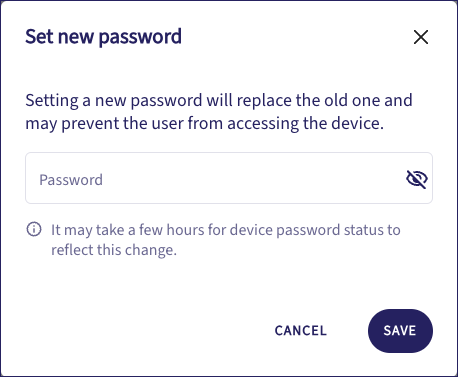
Enter a new Password, then select SAVE.
Coro sends a set password instruction to the device.
Lost mode
Lost mode activation is not available on BYOD iOS/iPadOS devices.
If a device is misplaced, lost, or stolen, admin users can remotely activate Lost mode to lock the device and provide guidance for finders to contact or return it to your organization.
When lost mode is activated, Coro shows the device status as Lost in the console and presents the device's last known location (if available):
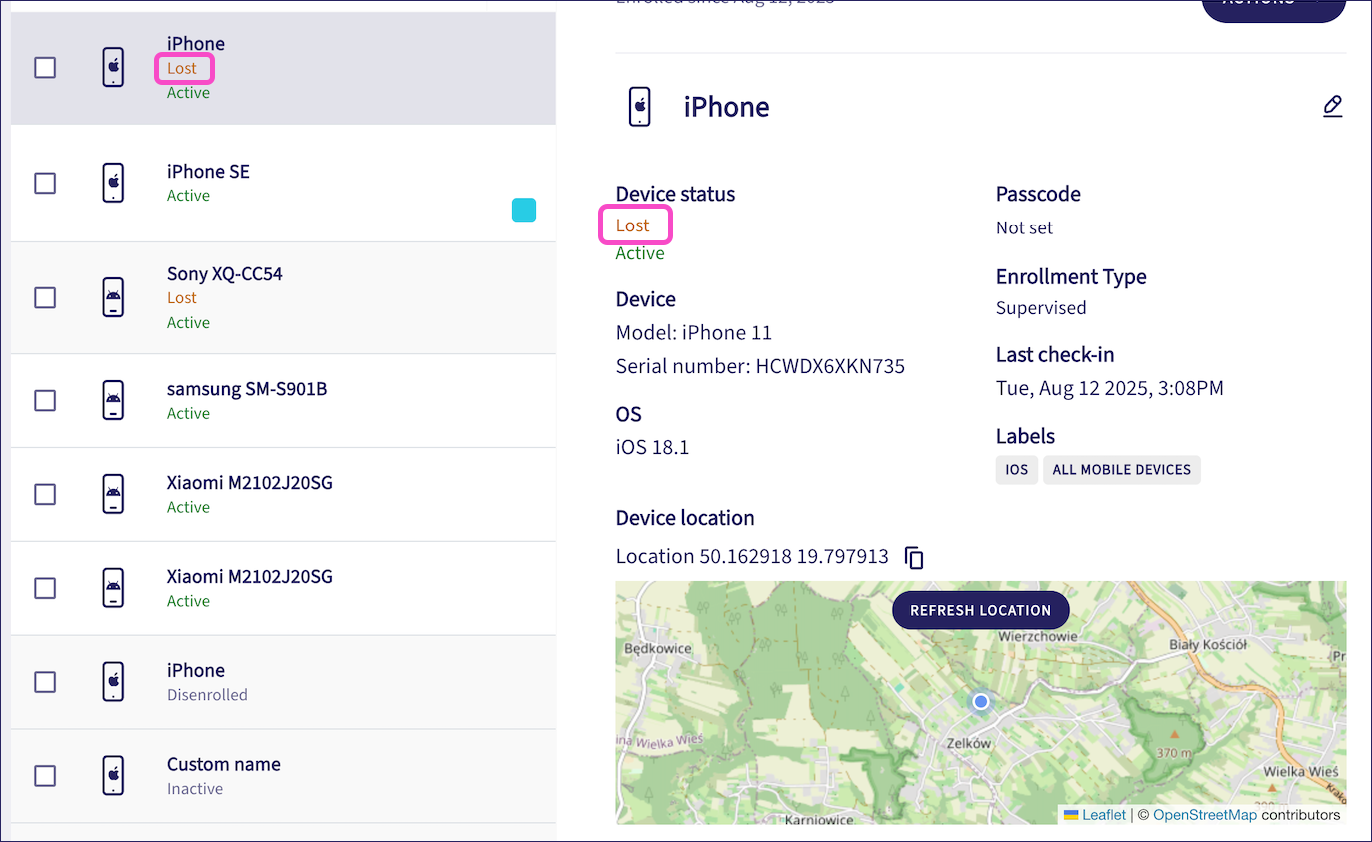
On iOS devices, select REFRESH LOCATION to ask the device for its latest location.
Android devices update their location automatically.
Activating lost mode
To activate lost mode:
From the Devices tab, locate and select the device.
Select ACTIONS > Turn on lost mode.
Coro displays the Turn on lost mode dialog.
For iOS/iPasOS devices:
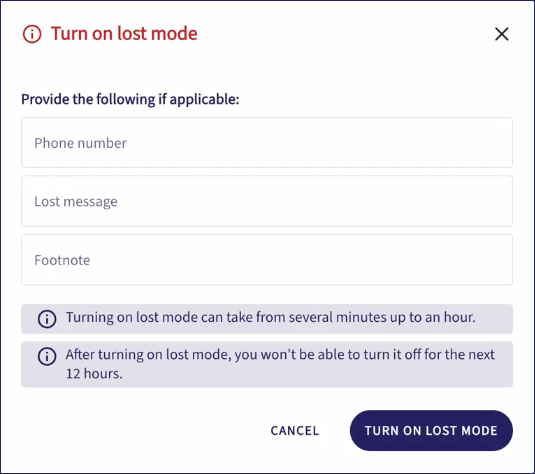
Enter the following details:
- Phone number: The contact phone number you want to display.
- Lost message: The greeting message you want to display.
- Footnote: A smaller message presented at the bottom of the display.
For Android devices:
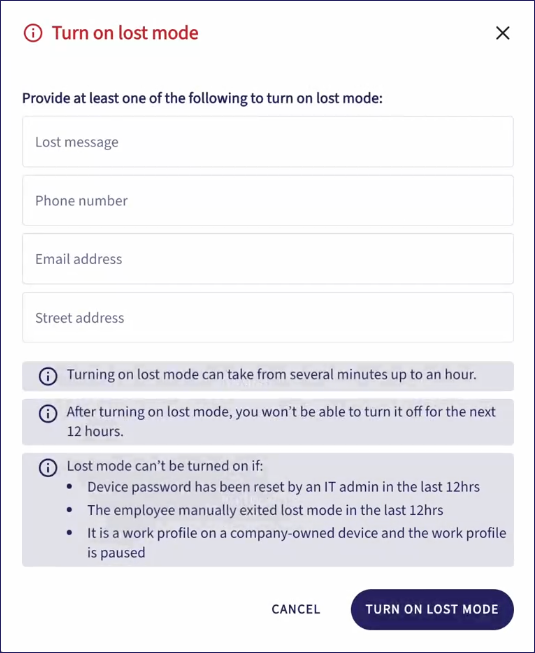
Enter the following details:
- Lost message: The greeting message you want to display.
- Phone number: The contact phone number you want to display.
- Email address: The contact email address you want to display.
- Street address: The postal address you want to display.
Select TURN ON LOST MODE.
Coro contacts the device to activate lost mode.
Lost mode activation can take up to an hour depending on the status of the device. If the device is unavailable, Coro activates lost mode at the next successful check-in.
Deactivating lost mode
If a lost device is successfully recovered, admin users can deactivate lost mode remotely and return it to normal use, but only after a minimum period of 12 hours has passed since lost mode was activated.
A device holder can deactivate lost mode from the device if they know the passcode. However, deactivation is still prohibited for the first 12 hours.
To deactivate lost mode from Coro:
From the Devices tab, locate and select the device.
Select ACTIONS > Turn off lost mode.
Coro displays the Turn off lost mode dialog:
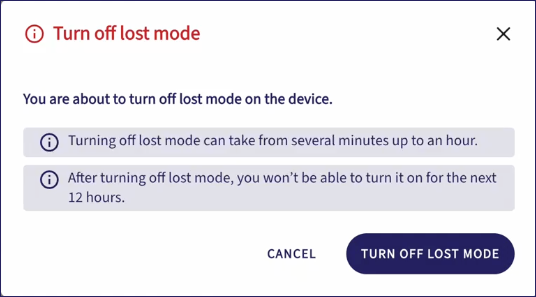
Select TURN OFF LOST MODE.
Coro contacts the device to deactivate lost mode.
Lost mode deactivation can take up to an hour depending on the status of the device. If the device is unavailable, Coro deactivates lost mode at the next successful check-in.