Configuring a site-to-site VPN tunnel with Coro Network and FortiGate
As part of a virtual office, Coro includes the ability for customers to configure VPNs together with site-to-site tunnels.
This guide describes how to configure Coro to integrate with Fortinet's FortiGate firewall, and how to configure FortiGate to allow traffic for your VPN from both inside and outside the network.
Prerequisites
Before you start, make sure you have the following:
- Access as an admin user to the Coro console for your workspace
- An active subscription (or trial) for the Coro Network module
- Access to the FortiGate admin interface. Screenshots used in this guide originate from v7.2.6.
Configuring Coro Network
Configure Coro with details of your site-to-site tunnel and firewall:
- Sign in to the Coro console .
-
From the sidebar, select
 to access the
Control Panel
.
to access the
Control Panel
.
-
Select
Network
:

-
Select
Site-to-site tunnels
:

- Select + ADD to add a new site-to-site tunnel configuration.
-
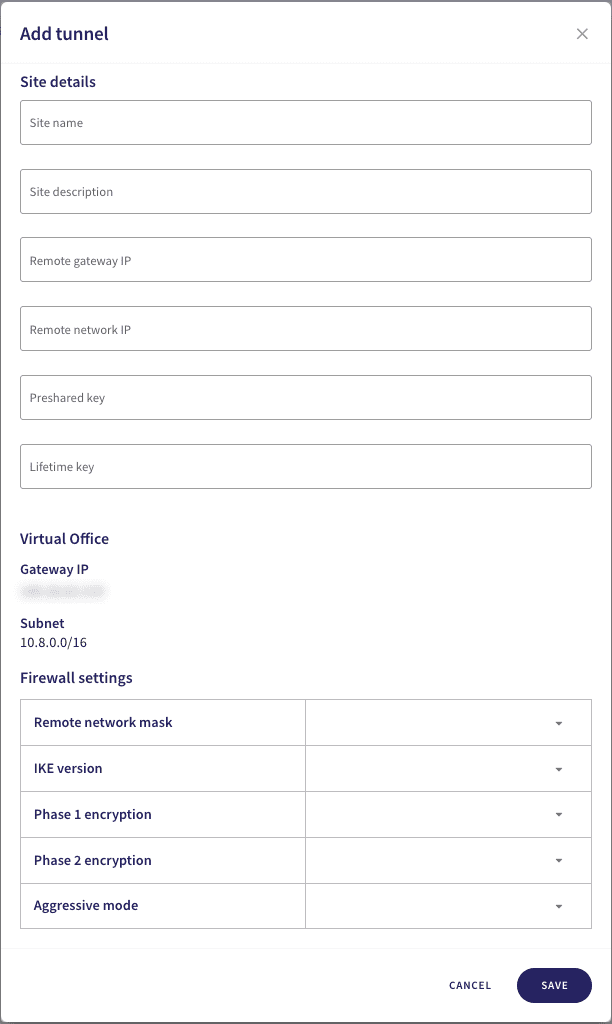
Configure your
Site details
:
note
Avoid using special characters or spaces in your site details or preshared key.
- Site name : Enter a suitable name for your site-to-site tunnel.
- Site description : Enter a suitable short description for this tunnel.
- Remote gateway IP : Enter the firewall/router WAN IP address for the remote site.
- Remote network IP : Enter the private IP address range used at the remote site.
- Preshared key : Enter a shared password (secret) that both sites use to authenticate and secure the tunnel. Use a minimum of 20 characters, and keep a note of the key for configuration on the FortiGate device.
- Lifetime key : Enter 86400 .
-
In the same dialog, configure the
Firewall settings
:
- Remote network mask : Select your local network subnet mask. For example, 16 or 24.
- IKE version : Select IKEv2 .
- Phase 1 encryption : Select AES256-SHA1-D14 .
- Phase 2 encryption : Select AES256-SHA1-D14 .
- Aggressive mode : Select No .
- To save your configuration, select SAVE .
- Finally, make a note of your virtual office IP address; locate the IP address displayed at the top of the Virtual Office tab. You need this when configuring your FortiGate firewall.
Configuring FortiGate
Configure your FortiGate firewall to allow traffic from inside and outside the network:
- Sign in to your FortiGate admin console.
- Go to VPN > IPsec Tunnels .
-
When you create a new VPN tunnel, or edit an existing tunnel, confirm your configuration matches the following making sure to add Coro configuration values where indicated:
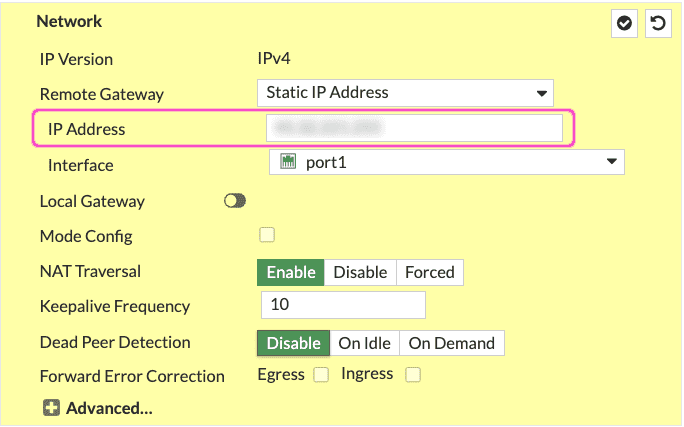
-
In the
Network
section, make sure your settings match the following. Enter your Coro virtual office IP address in the
IP address
field:
-
In the
Authentication
section, make sure your settings match the following. Set the encryption method to
Pre-shared Key
and specify your Coro preshared key in the field provided:
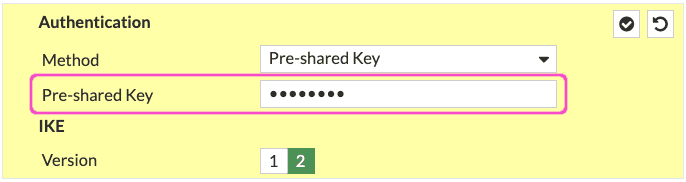
note
The preshared key must match exactly as specified in the Coro site-to-site tunnel configuration, otherwise the tunnel cannot be established.
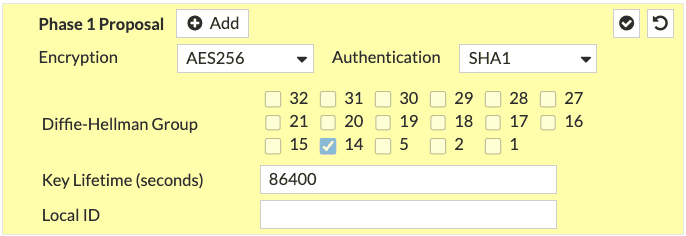
-
In the
Phase 1 Proposal
section, make sure your settings match the following:
-
In the
XAUTH
section, make sure your settings match the following:

note
This section is available only when you create a new tunnel.
-
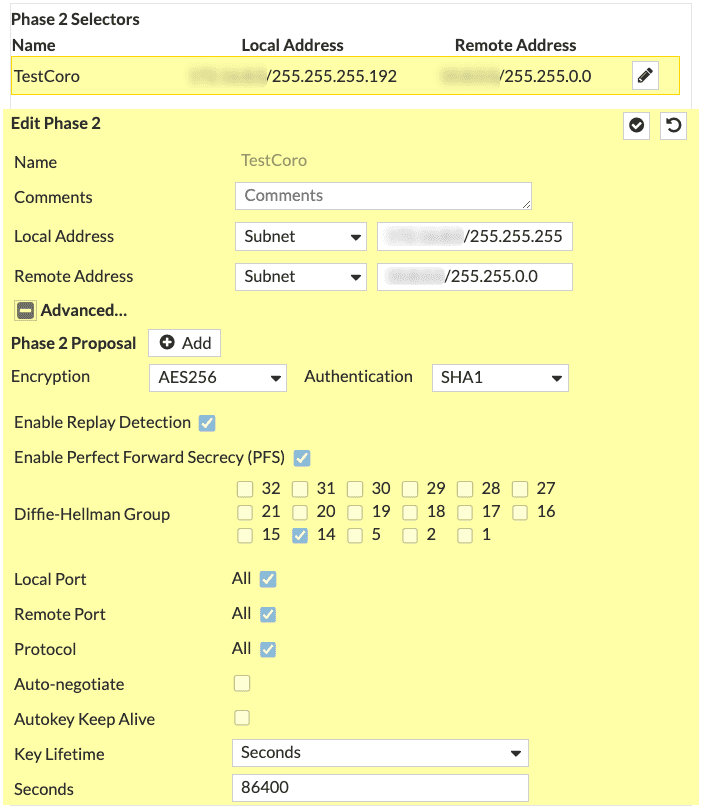
In the
Phase 2 Selectors
section, make sure your settings match the following:
-
In the
Network
section, make sure your settings match the following. Enter your Coro virtual office IP address in the
IP address
field:
- Make sure to save your configuration.
Important
You must configure a static route and firewall policy in your FortiGate configuration to allow Coro access to the subnet. Since each customer's LAN configuration may be unique, Coro cannot provide instructions. This guide describes establishing the site-to-site tunnel only.
Test the configuration
After you have completed configuration of Coro Network and your FortiGate firewall, test the connection from the Coro console:
- Sign in to the Coro console.
- Go to Control Panel > Network > Site-to-site tunnels .
- Select the three-dot menu adjacent to your tunnel configuration, then select Test tunnel to trigger a synchronization test.
- Upon completion of a successful test, the Test status field updates to show Success .