An allowlist enables admin users to declare known safe email sender addresses, domains, IP addresses, or IP ranges that Coro can check if an Email Security event occurs. For instance, if an email is flagged by Coro's detection mechanisms as containing spam, potentially malicious content, or a possible phishing attack, Coro continues to allow the email if the sender is listed in the allowlist (and the sender is genuine).
A blocklist lists known bad senders, domains, IP addresses/ranges, or countries where, regardless of content or authentication status, corresponding emails are blocked from being received by the named recipients.
Allowlists and blocklists in Coro are workspace-specific and configured by admin users. When scanning emails for threats, Coro checks the lists defined in the current workspace and also from global allowlists and blocklists.
Coro uses two distinct types of global allowlists and blocklists:
Coro internal allowlists and blocklists: Maintained by Coro and automatically applied to the current workspace, and for MSP-managed workspaces, to the channel workspace and all descendant workspaces. This list is based on continuous research and security observations and is not user accessible.
MSP global allowlists and blocklists: Available to Managed Service Provider (MSP) admin users with sufficient permissions to view and manage rules across channel and descendant workspaces. For more information, see Global allowlists and blocklists.
Coro raises a Blocklisted Sender ticket where the sender address appears in a local or global blocklist.
Coro raises a Blocklisted IP ticket where the sender's IP address falls into one of the following categories:
- The IP address is in the blocklist.
- The IP address falls within a blocked range.
- Coro identifies it as originating from a geo-blocked country.
Coro allows admin users to add countries to the workspace blocklist. Emails where the connecting mail-server's country is on the blocklist are prevented from being delivered to recipients.
Senders added to the allowlist override geo-blocked countries. This means that if you add a sender domain or address to the allowlist, Coro will still allow emails from that sender even if they originate from a blocked country.
Coro allows geo-blocking by country only from adding them individually on this page.
To ensure the integrity of emails, Coro continues to check for indications of suspicious activity even where the sender appears in the allowlist. This helps prevent spoofed identities bypassing Coro's standard detection mechanisms.
This applies only if the allowlisting is by sender email address or domain. Coro treats emails received from an allowlisted IP address, or from within an allowlisted IP address range, as fully trusted.
This can particularly affect internal email where the sender is assumed to be safe by virtue of originating from within the same organization. When a customer signs up to Coro, Coro automatically allowlists a customer's own domains - negating the need for full threat scanning on internal email traffic. However, if an email contains a sender identity spoofed to appear as internal, the recipient might assume the email to be safe when it is not.
To address this, Coro applies certain checks to all emails, internal and external. If the email is from an allowlisted email address or domain, Coro checks the email message headers for confirmation of verified sender authentication. If this check fails, Coro performs a full scan of the email to determine the risk. Therefore, Coro might still block or quarantine an email (or have warnings added, depending on your workspace settings) even though the email appears to be from an allowlisted source.
If you find that allowlisted and confirmed safe emails continue to trigger Coro's detection mechanisms, make sure any incoming or outgoing gateways used for your email domain are properly configured and do not cause Sender Policy Framework (SPF) failures. If you are satisfied that the sending server is trusted and properly configured, consider allowlisting by IP address or IP address range.
To view the Email Security allowlist and blocklist:
Go to the Email Security configuration page.
Select the Allow/Block tab:
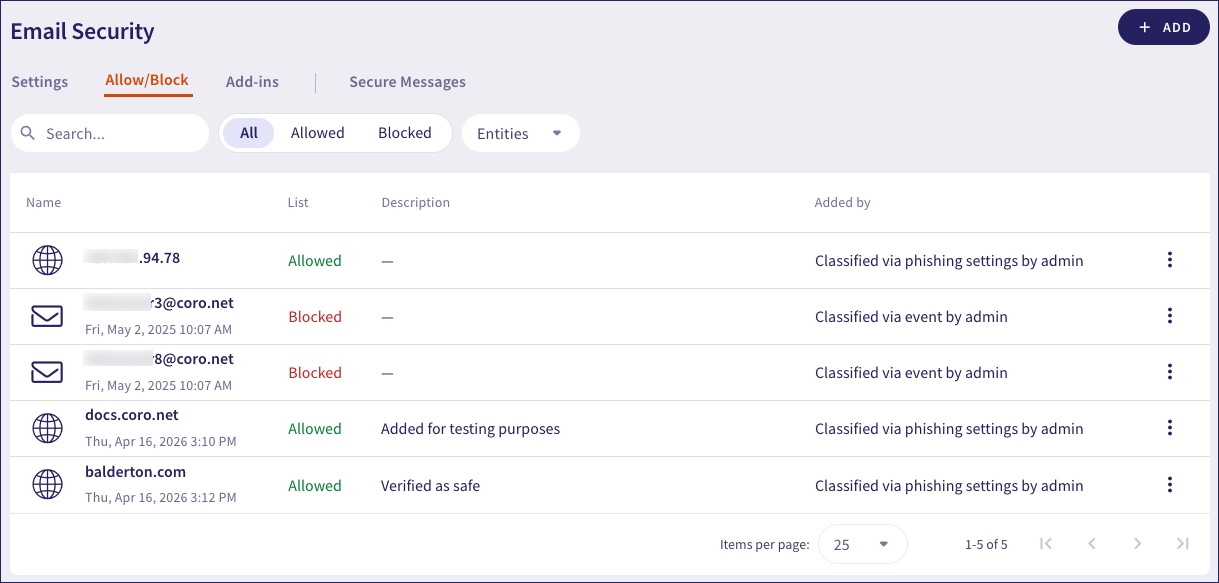
Data in the list includes:
Name: the sender email address, IP address/range, domain, or country. The creation date is displayed underneath.
List: whether the entry belongs to the allowlist or blocklist.
Description: (optional) A description of why the entry was created. This field is non-editable after submission to preserve the audit trail.
Added by: The user who added the entry and the method used. One of:
- Classified via phishing settings by <admin user>: Added directly to the list, individually or as part of a bulk upload.
- Classified via event by <admin user>: Added via the ticket actions in an Email Security ticket.
- System (domain belongs to the customer): Added automatically by Coro as this domain belongs to your organization.
Use the Search box to filter the Name column using a free text search:

Use the list switcher to toggle the view between All, Allowed, or Blocked lists:

Select Entities to filter the list by Email, Domain, IP, IP range, or Country:

Coro enables you to add email addresses, domains, and IP addresses/ranges to the allowlist or blocklist through the following methods:
Entries in the allowlist or blocklist cannot be edited after submission. You can only create or delete entries.
Coro prevents admin users from adding internal, private, and local non-routable IP addresses to the blocklist.
If you are using API-based Email Security, Coro supports the use of both IPv4 and IPv6 addresses in the allowlist and blocklist. if you are exclusively using the Inbound Gateway email proxy, Coro supports IPv4 addresses only.
Coro raises Email Security tickets in response to events such as phishing and malware detection. For protected users, these tickets are typically remediated automatically by Coro - in that the suspicious email message is deleted, quarantined, or delivered with a warning notice (depending on the event type and your selected security mode) and the ticket is closed.
An admin user can view these tickets and make decisions as to whether to add the sender to the allowlist or blocklist.
To do this, open the Ticket Log and review your Email Security tickets. Each ticket involving a protected user includes an ACTIONS button, which provides actions applicable to that ticket type:
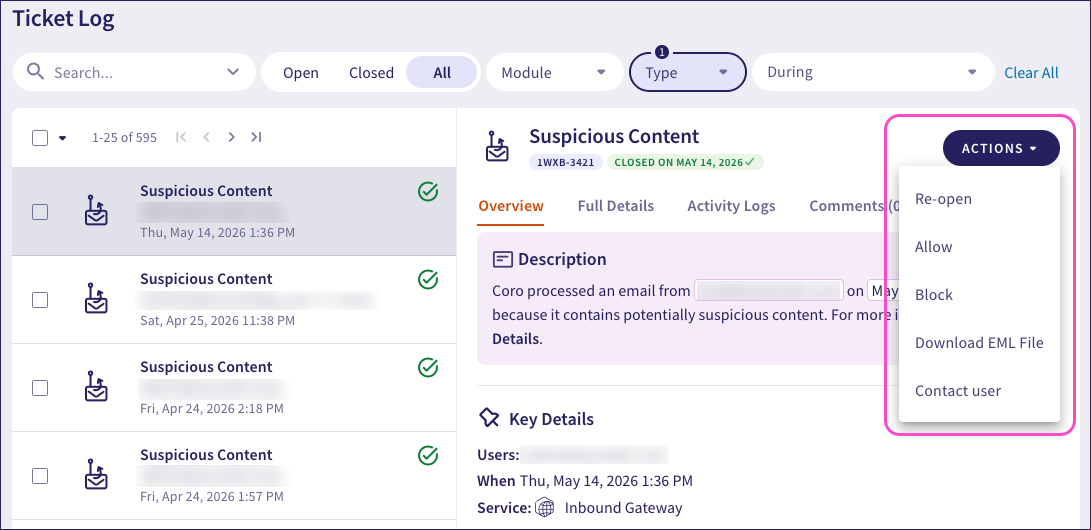
To add the sender to the allowlist, select Allow. Or, for the blocklist, select Block. Coro presents a dialog offering options for each list.
Coro adapts the allow or block options based on a combination of the ticket type and your Email Security settings. For example, if the email contains suspected phishing and you selected a security mode of Quarantine, Coro quarantines the email. As a result, your allow options include the ability to restore the email as well as affect future remediation by adding the sender to the allowlist. However, if the email contains malware, Coro deletes the email automatically and the allow choices are then limited to adding the sender's identity to the allowlist for future remediation decisions only.
Equally, for block options, Coro present choices that take into account remediation that has already taken place. You can only act on the email that triggered the ticket if it has not already been deleted.
This is also true where you have configured threat detection to warn recipients only. The email is already delivered to recipients so the Allow this email or Block this email options are disabled.
For a complete list of all Email Security ticket types and the available options in each case, see Ticket types for Email Security.
The following Allow choices represent an example where the email is in quarantine and therefore recoverable:
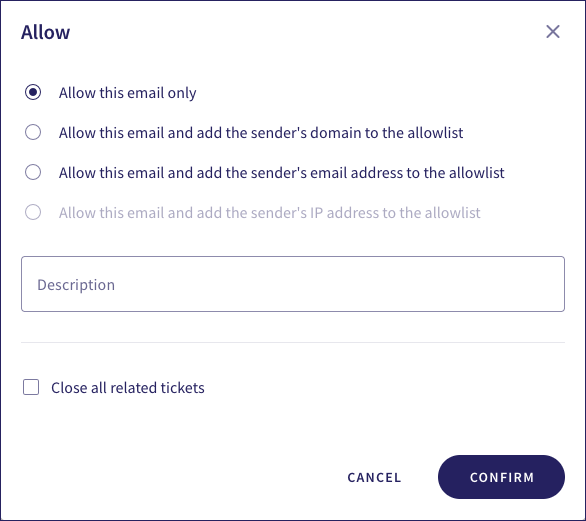
Choose from:
Allow this email only: Allow the quarantined email that triggered this ticket to reach its recipients, but DO NOT add the sender's identity to the allowlist. Future emails from this or any other sender in the same domain can still trigger a ticket in Coro.
Allow this email and add the sender's domain to the allowlist: Allow the email, and instruct Coro to add the sender's domain to the allowlist. Future emails from any senders in this same domain continue to be received by all named recipients.
Allow this email and add the sender's email address to the allowlist: Allow the email, and instruct Coro to add the sender's email address to the allowlist. Future emails from this specific sender continue to be received by all named recipients.
Allow this email and add the sender's IP address to the allowlist: Allow the email, and instruct Coro to add the sender's IP address to the allowlist. Future emails from this specific IP address continue to be received by all named recipients.
This option is disabled if Coro cannot determine the IP address from the sender's identity.
Use Description to optionally provide a reason for adding this entry to the allowlist.
Select CONFIRM to proceed.
In the same scenario, the following Block choices are available:
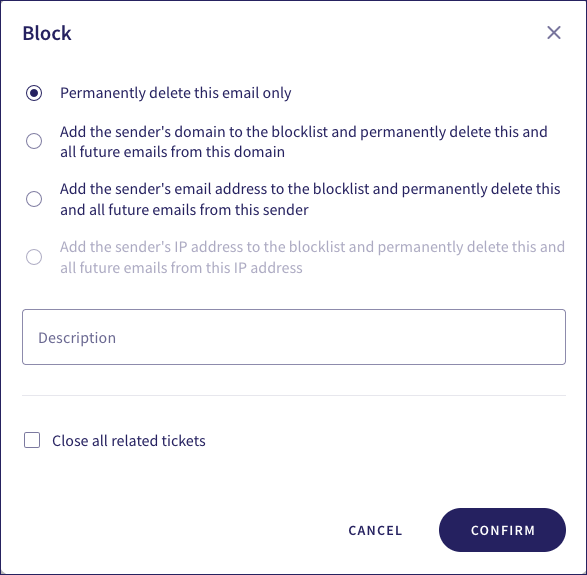
Choose from:
Permanently delete this email only: Permanently delete the email that triggered this ticket, but DO NOT add the sender's domain or email address to the blocklist. Future emails from this or any other sender in the same domain can still trigger a ticket in Coro.
Add the sender's domain to the blocklist and permanently delete this and all future emails from this domain: Instruct Coro to add the sender's domain to the blocklist, and permanently delete this and all future emails that originate from any sender in the same domain.
Add the sender's email address to the blocklist and permanently delete this and all future emails from this sender: Instruct Coro to add the sender's email address to the blocklist, and permanently delete this and all future emails that originate from the same email address.
Add the sender's IP address to the blocklist and permanently delete this and all future emails from this IP address: Instruct Coro to add the sender's IP address to the blocklist, and permanently delete this and all future emails that originate from the same IP address.
This option is disabled if Coro cannot ascertain the IP address.
Use Description to optionally provide a reason for adding this entry to the blocklist.
Select CONFIRM to proceed.
Both dialogs include the option to enable Close all related tickets. This requests Coro to close all related tickets connected to the event.
Coro prevents adding well-known email provider domains to the allowlist or blocklist. In this situation, the option to add the entire domain is disabled, although you can still add individual email addresses or IP addresses.
To add senders directly into the allowlist or blocklist:
Select ADD:

Select an option:
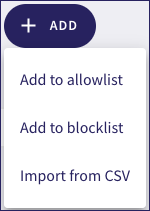
Choose from:
Select Add to allowlist to add item(s) in the Add to allowlist dialog:
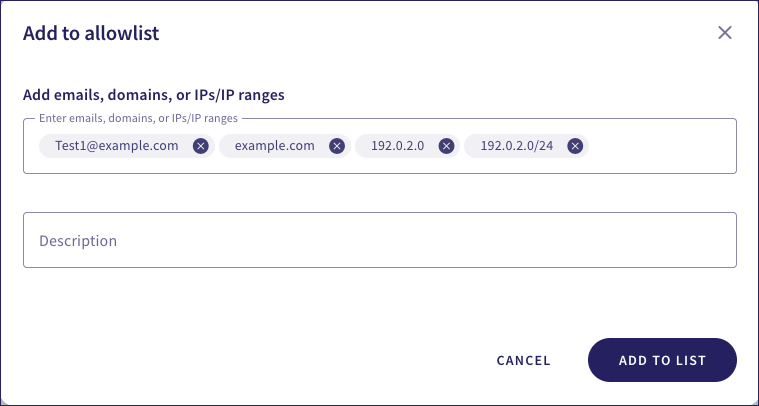
Use Description to optionally provide a reason for adding this entry to the allowlist, then select ADD TO LIST.
Select Add to blocklist to add item(s) in the Add to blocklist dialog:
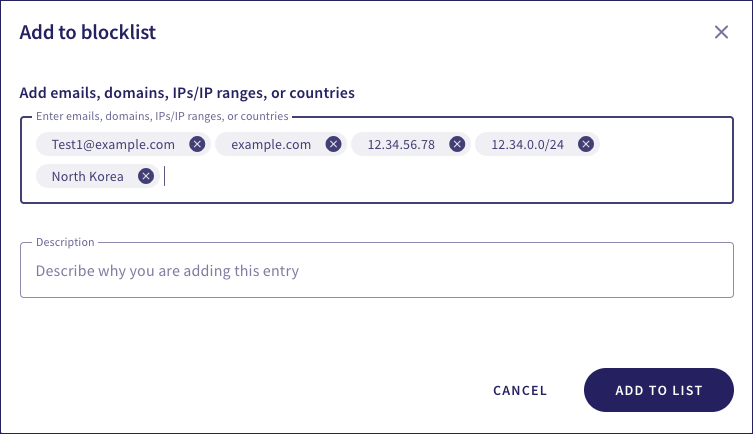
Use Description to optionally provide a reason for adding this entry to the blocklist, then select ADD TO LIST.
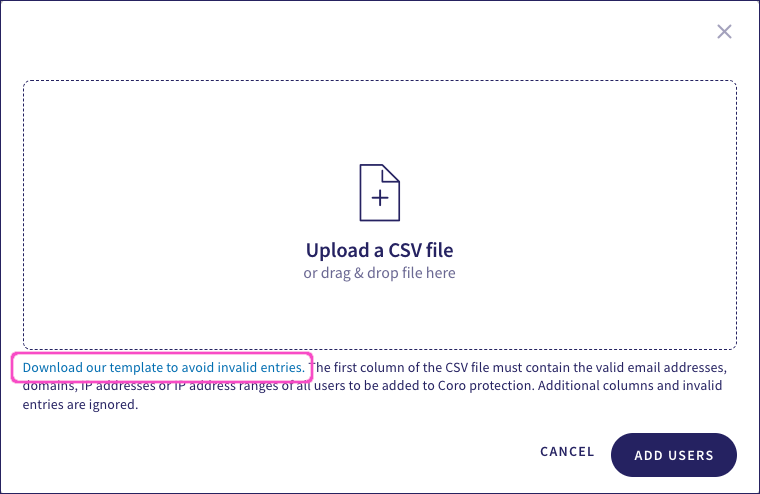
Select Import from CSV to upload a comma-separated value (CSV) file containing your allowlist and/or blocklist data.
To learn more about creating a valid CSV file, see In bulk using a CSV file.
Select Upload a CSV file to browse your filesystem, or drag-and-drop a file into the dialog:
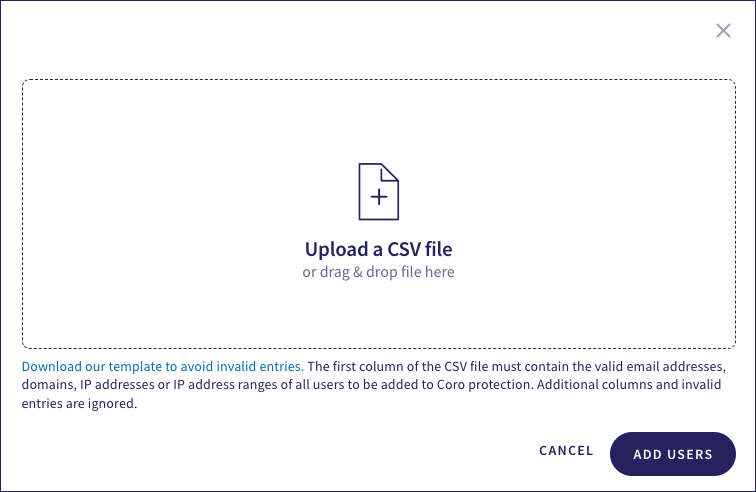
To begin the import process, select ADD USERS.
Coro presents a confirmation dialog that the import is now in progress:
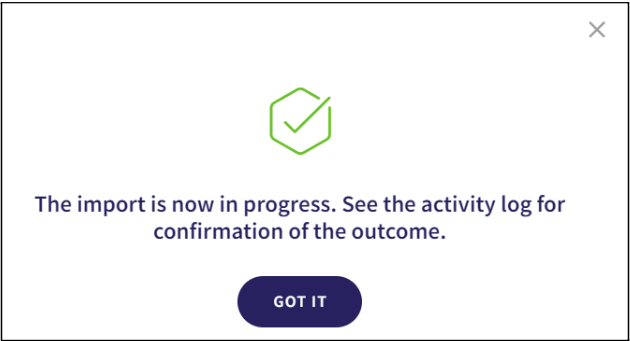
Select GOT IT to continue.
After the import process is complete, Coro displays an acknowledgement notice in the Console and places an entry in the Activity Log providing details of the import operation.
Your added items are displayed in the Allow/Block list, showing the list they belong to.
Coro enables you to add allowlist and blocklist data in bulk by importing a CSV file of senders and the list (allow/block) to which you want them to be added.
Entries in your CSV file must follow the pattern:
<item>,<policy>
Each entry must be on a separate line, with the following allowed values in each field:
| Field | Description | Allowed values |
|---|---|---|
| <item> | The sender's email address, domain, IP address, or IP address range. | coro1@example.com, example.com, 192.0.2.0 or 192.0.2.0/24 |
| <policy> | Whether to allow or block the item. | Allow or Block |
Files must adhere to the following rules:
- You must specify valid values in both columns. Entries with extra columns or invalid values are ignored.
- The maximum file size is 5 MB.
- A maximum of 100,000 records are permitted.
- Country-based blocking does not apply.
To facilitate creating a valid CSV file, Coro provides a link to a template in the Upload a CSV file dialog: