Coro provides a standard MCP (Model Context Protocol) server to enable organizations to connect their AI services to Coro's secure data repositories. This means that AI agents can query and act on security data and configuration in connected workspaces.
This article describes Coro's MCP server and explains what functionality it provides.
An MCP server is an industry-standard, secure intermediary between an organization's AI tools and Coro's workspace security data. It provides a consistent, controlled way for AI agents to query and interact with workspace data without requiring direct access or custom integration.
You link your AI tools directly to a single MCP server endpoint that manages request validation, authentication, and routing. This guarantees that all interactions are secure, auditable, and subject to established policies for data access.
This approach abstracts the complexity of Coro's internal systems and provides a stable interface for external AI integrations.
Admin users create a connection between their AI client and Coro's MCP server as a Connector or App (depending on AI client vendor terminology), enabling requests and instructions made through the client to be directed at the Coro MCP server.
Requests can be based against a series of published tools. For example, if Coro publishes a tool called list_workspaces, a request prompt can include an instruction like show me a list of my workspaces. The AI client recognizes that this request matches one or more available tools and can send the request to the MCP server.
When an AI agent sends a request:
- The request is sent to the Coro's MCP server endpoint.
- The MCP server authenticates and validates the request.
- The server translates the request into one or more calls to Coro's underlying public REST API.
- The response is normalized and returned to the AI agent as a structured JSON response object.
Your AI agent should be configured to translate the JSON response into a human readable format. This is outside the scope of Coro's MCP server.
Coro authenticates connection requests from an AI client against an existing user account in the Coro console. To establish a connection to the MCP server, your account must be an applicable admin user role.
Applicable roles are:
- Workspace administrator
- Workspace super admin
- MSP administrator
- MSP super admin
To connect to Coro's MCP server, use the following endpoint URLs depending on your workspace region:
https://api.secure-ca.coro.net/mcp- Canadahttps://api.secure-eu.coro.net/mcp- Europehttps://api.secure.coro.net/mcp- United States
Coro's supports connections from all AI clients that have the capability to connect to standard MCP endpoints.
Before you start, make sure you are signed-in to the Coro console in your web browser as as admin user with an applicable role.
This section offers two examples of app or browser-based connections, one from ChatGPT and another from Claude AI, along with an example of connecting through a command-line tool.
To connect via ChatGPT:
Make sure your ChatGPT subscription allows Developer mode and connections to custom unverified apps.
Sign into ChatGPT in a web browser or through the desktop app.
Select your user account, then select Settings:

Select Apps, then select Advanced settings:

If Advanced settings is not an available option, you may not have permissions to perform this operation. Contact your account administrator.
Make sure that Developer mode is enabled, then select Create app:
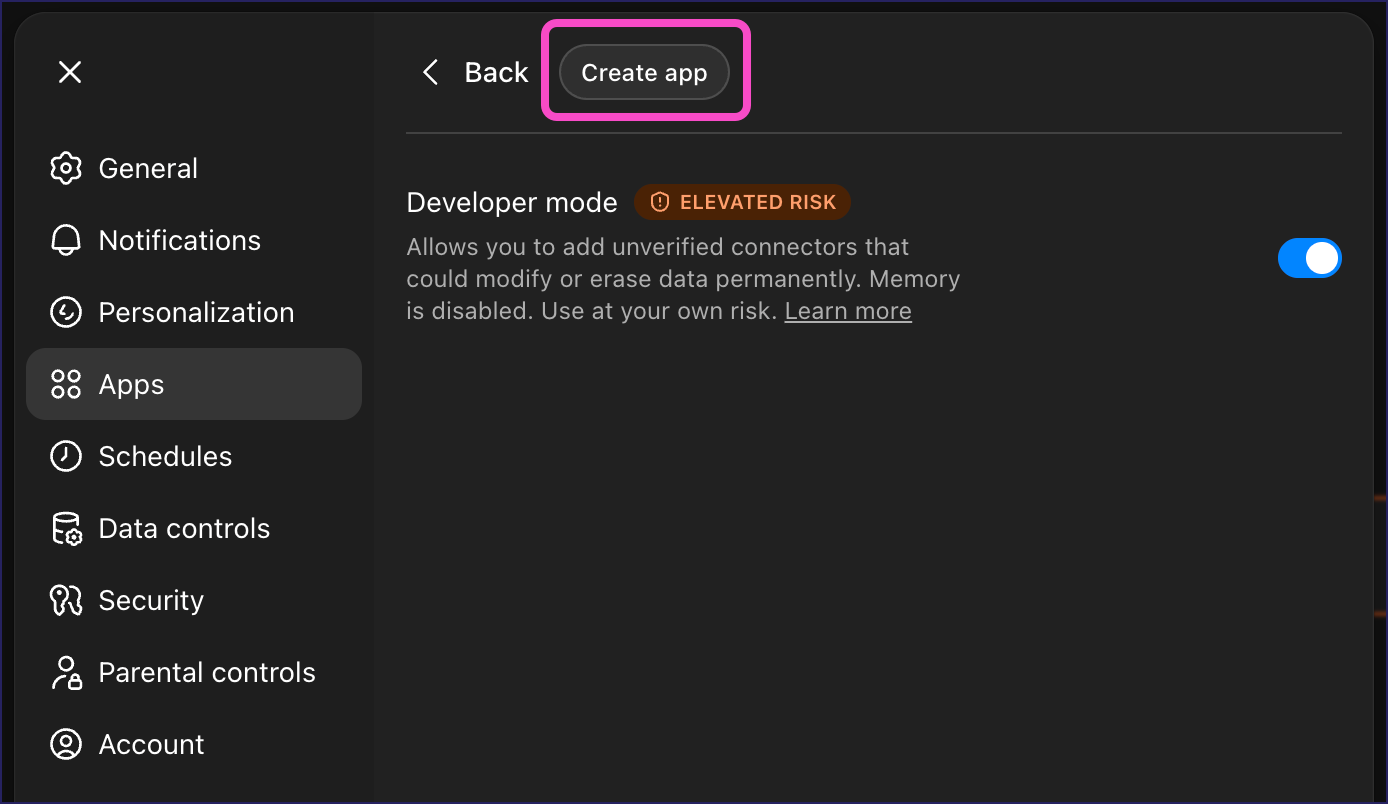
ChatGPT shows the New App dialog:
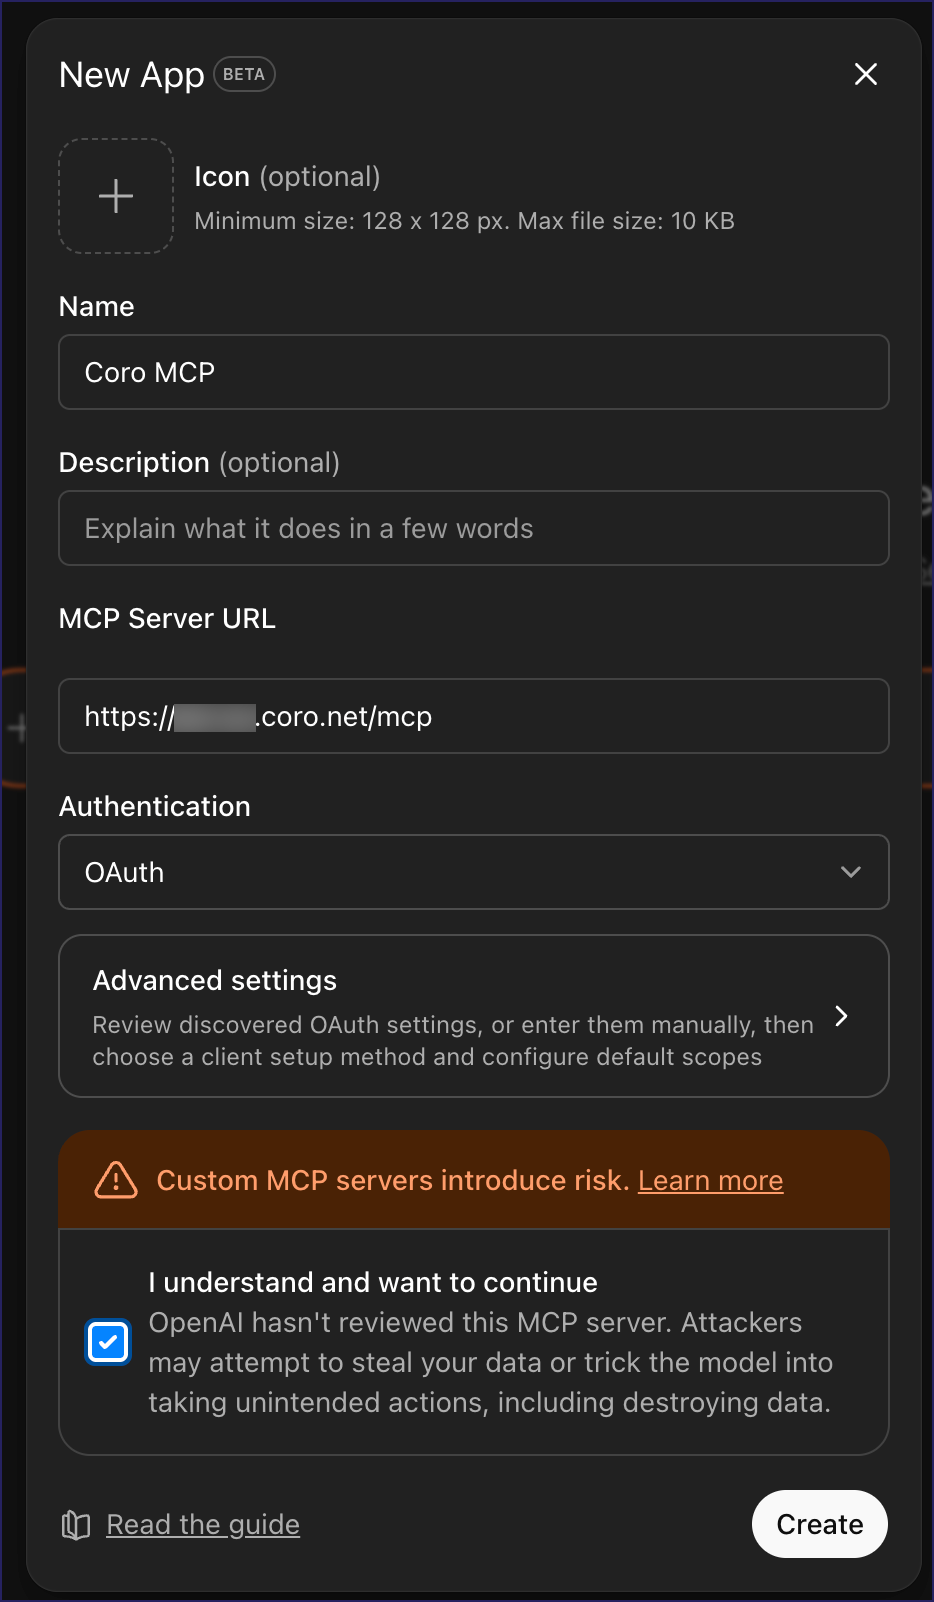
Enter the following details:
- Name: Enter a name for the MCP Server app.
- Description: (Optional) Enter a description for the app.
- MCP Server URL: Enter the Coro MCP Server URL that corresponds to the region containing your workspaces.
- Authentication: Select OAuth.
Read and accept the notice about custom apps, then select Create.
ChatGPT creates the new custom app and redirects you to Coro to authenticate the access request for your Coro account.
Coro displays the access confirmation dialog:
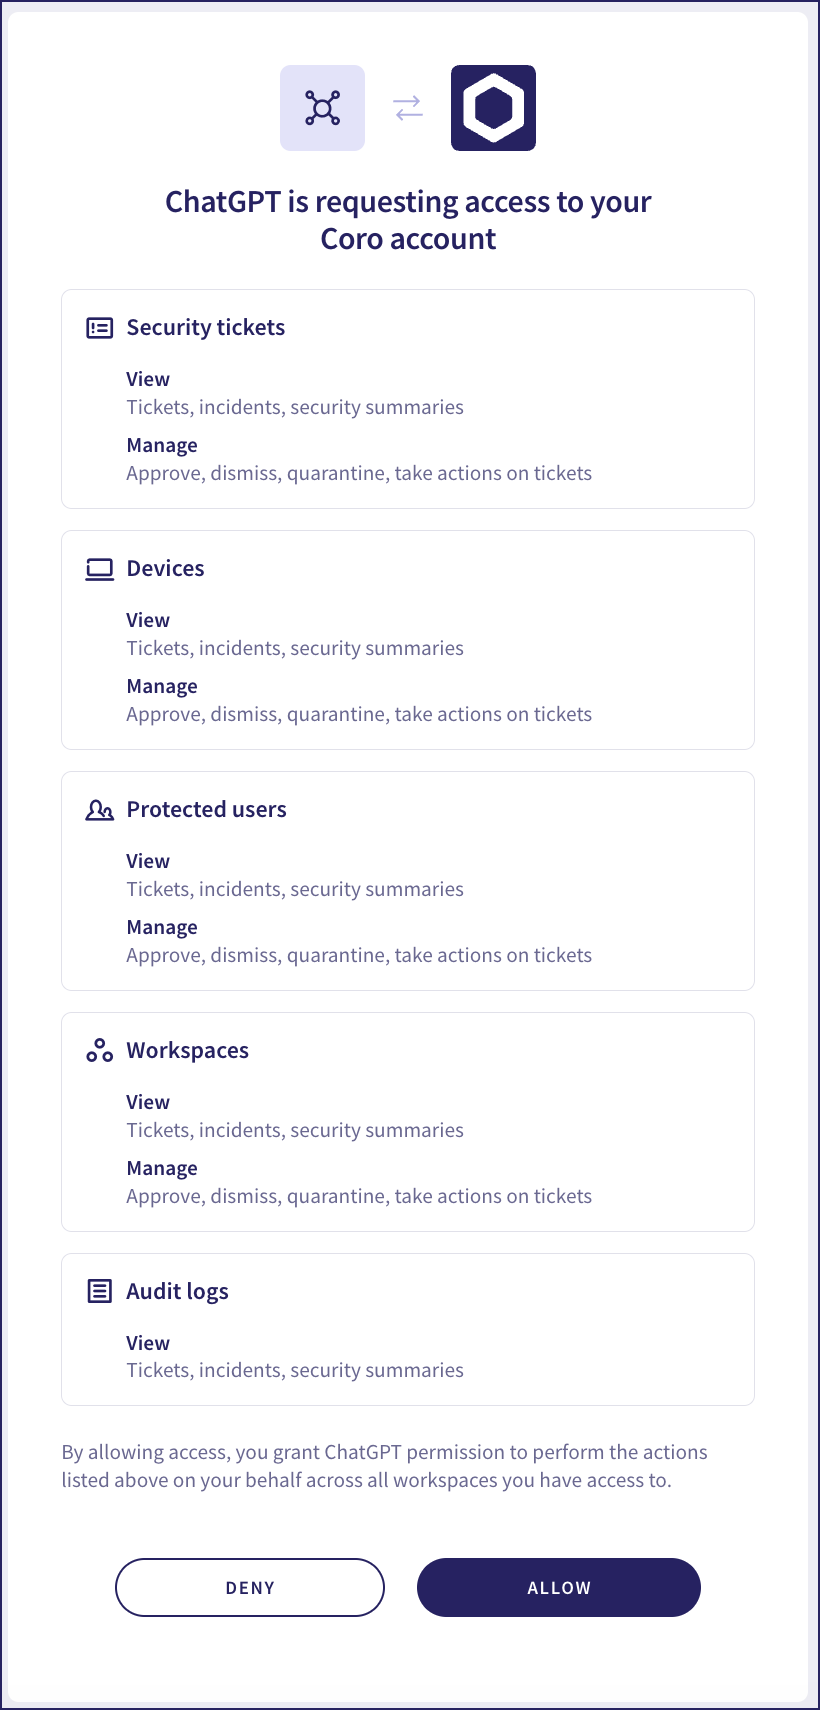
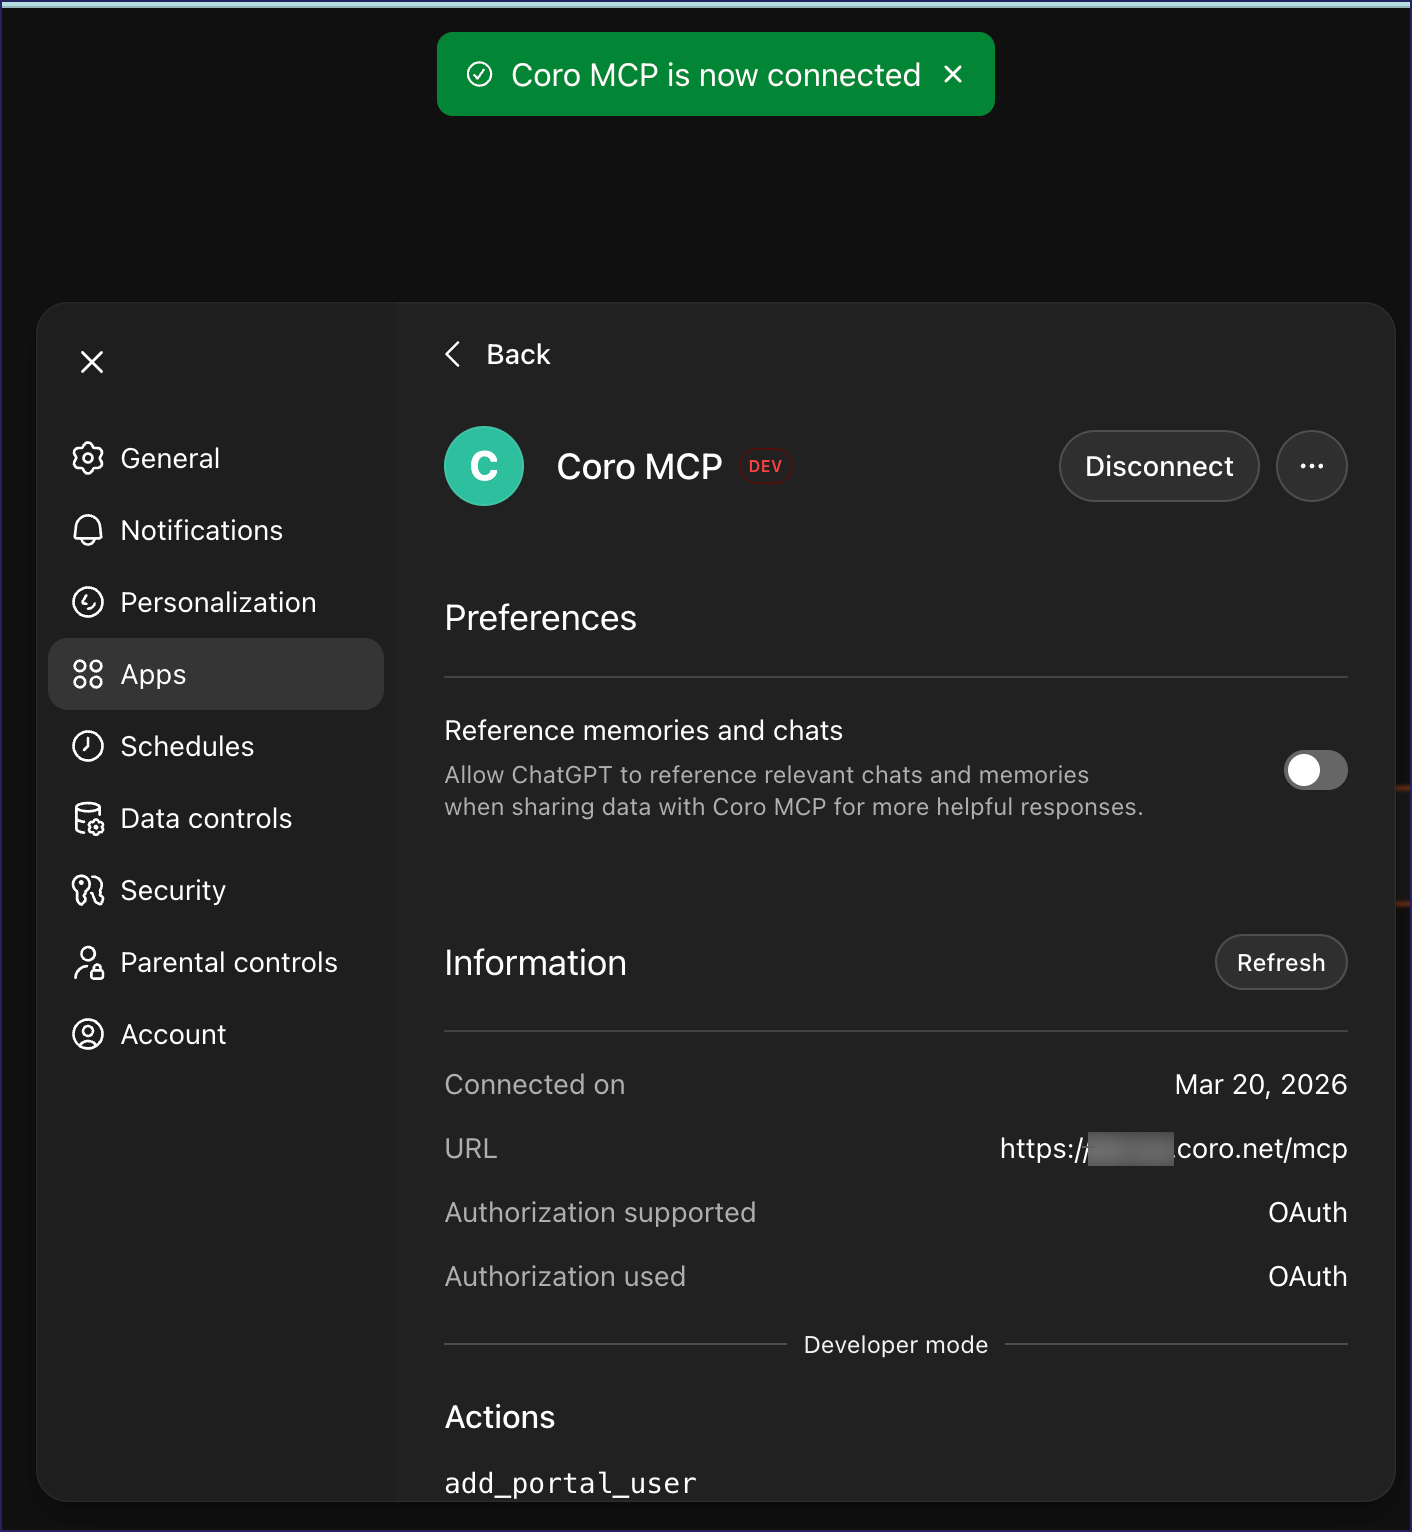
Review the access request, then select ALLOW. Coro redirects you back to ChatGPT, showing the app as successfully connected:
To connect via Claude AI:
Make sure your Claude AI subscription allows you to create custom connectors.
Sign into Claude AI in a web browser or through the desktop app.
From the menu bar, select your user avatar. From the menu, select Settings:

Select Connectors, then locate and select Add custom connector:
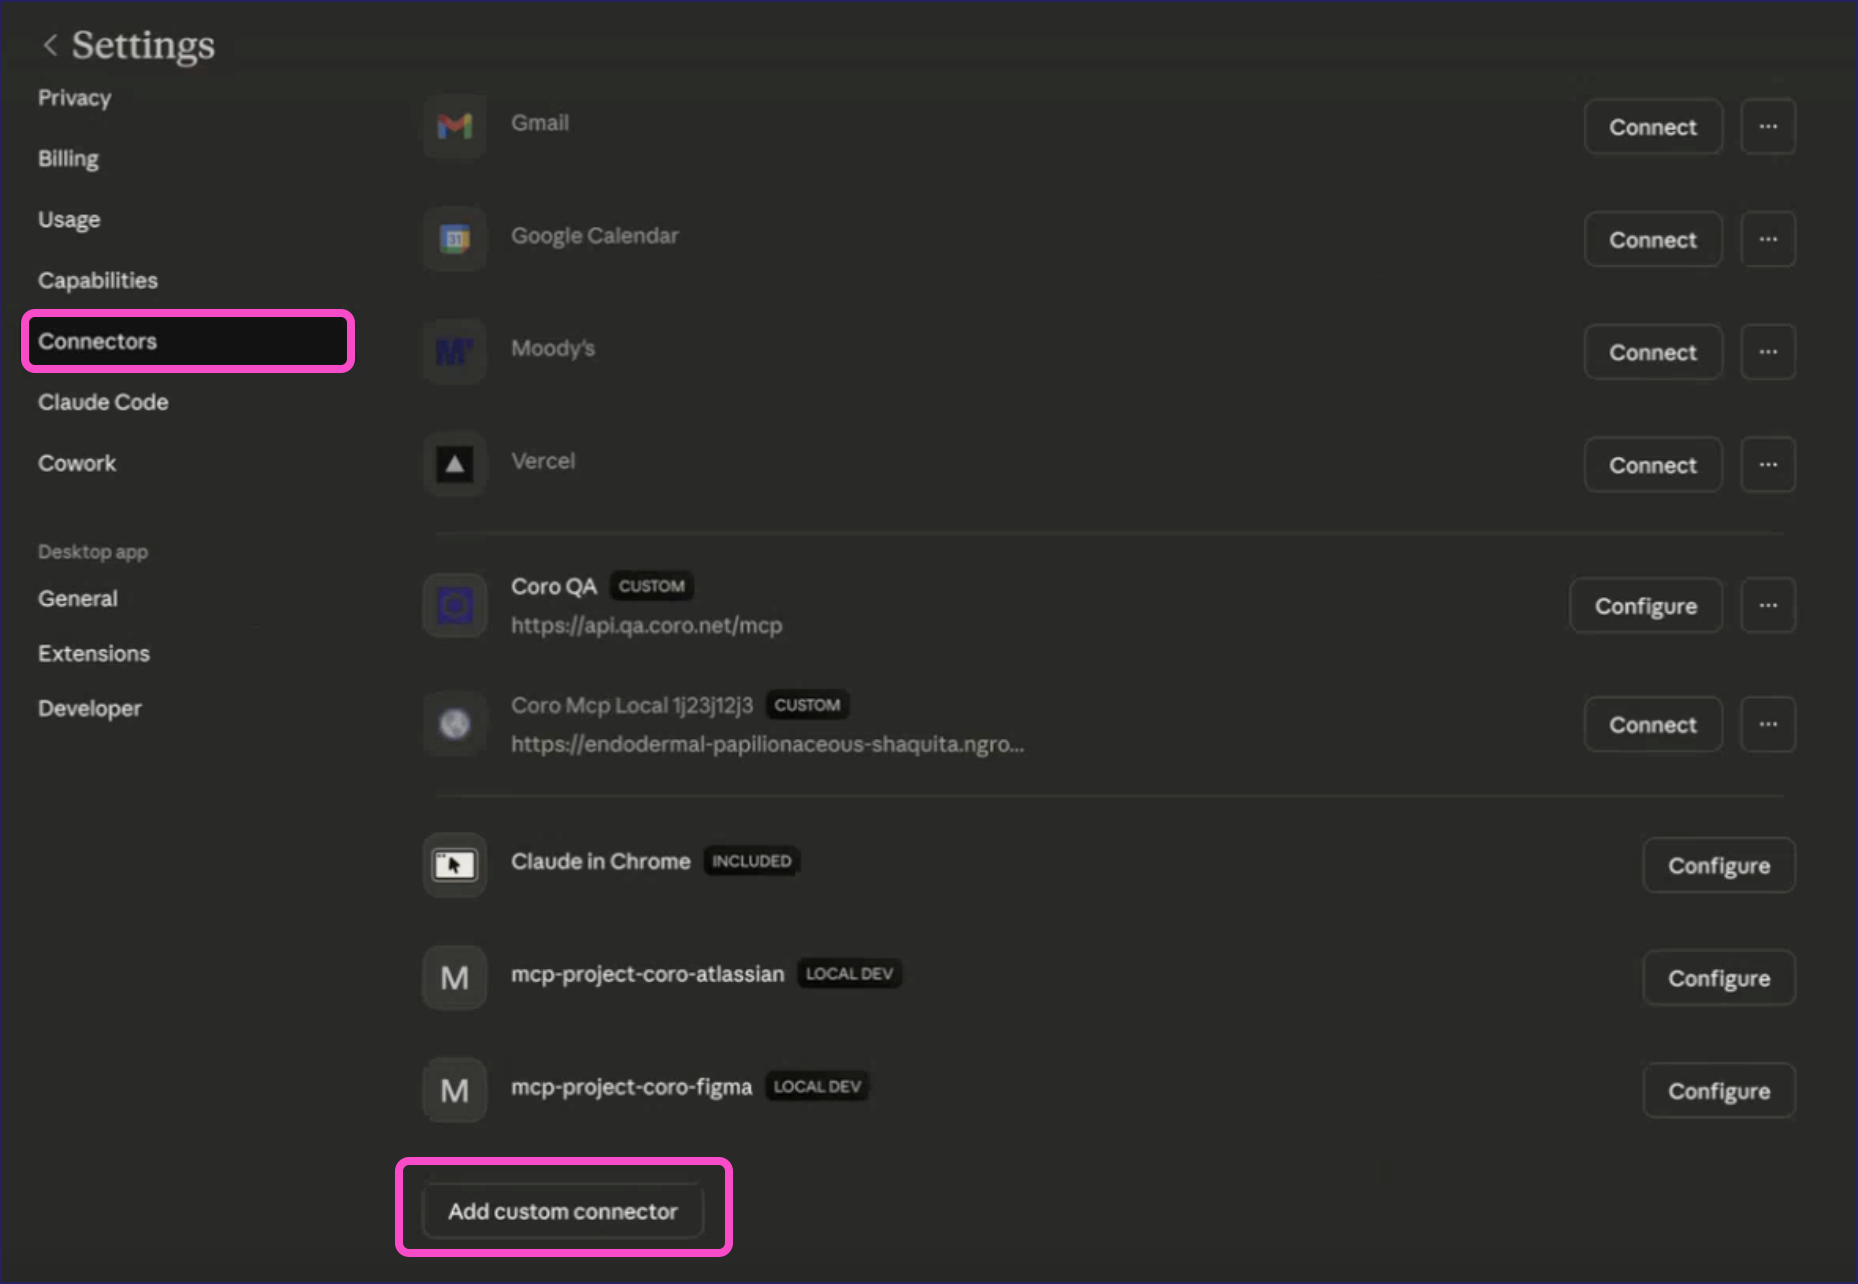
If Add custom connectors is not an available option, you may not have permissions to perform this operation. Contact your account administrator.
Claude displays the Add custom connector dialog:
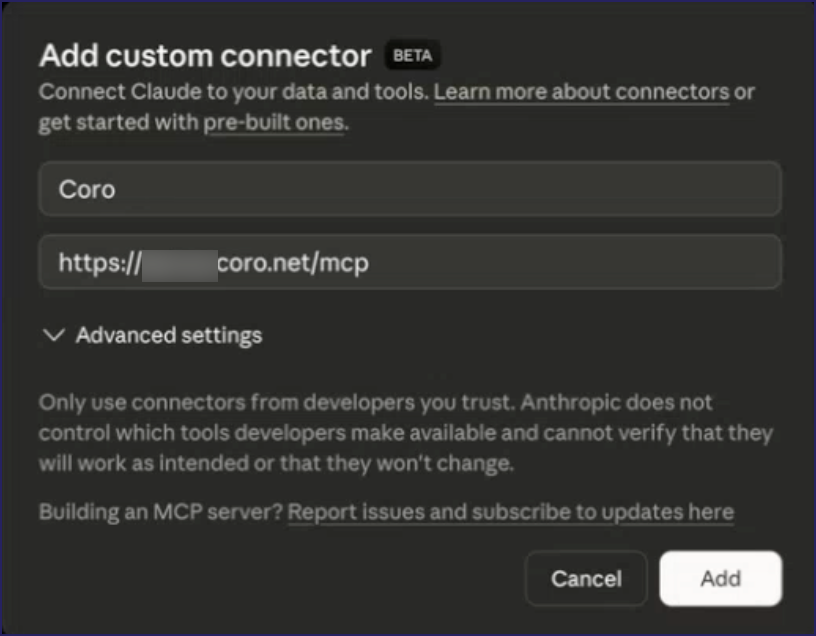
Enter the following details:
- Name: Enter a name for the connector.
- Remote MCP server URL: Enter the Coro MCP Server URL that corresponds to the region containing your workspaces.
Select Add.
Claude creates the connector and shows it in your list of defined connectors.
Locate the Coro connector and select Connect:

Claude redirects you to Coro to authenticate the access request for your Coro account.
Coro displays the access confirmation dialog:
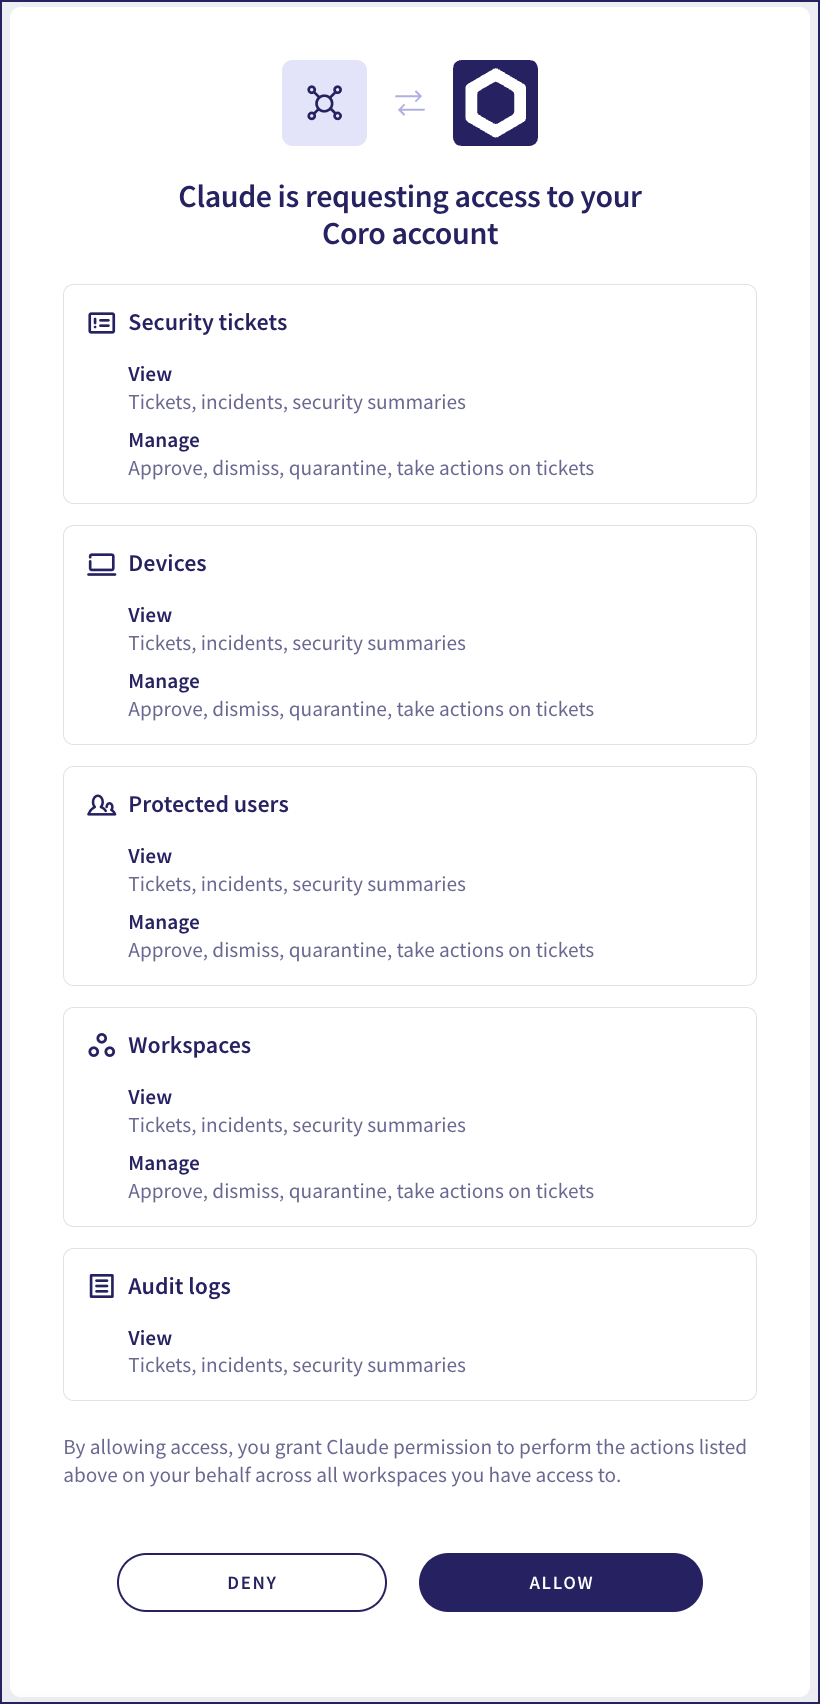
Review the access request, then select ALLOW. Coro redirects you back to Claude, showing the connection as successful:

Configure your AI command-line tool with the following MCP server definition:
"coro": {
  "url": "https://api.<region>.coro.net/mcp",
  "type": "http",
}
Use the URL that corresponds to your workspace region. For details, see Authenticating with Coro.
After you have saved this definition to your MCP server list file, instruct the tool to authenticate the connection. The process for this varies by tool.
For example, using Claude Code:
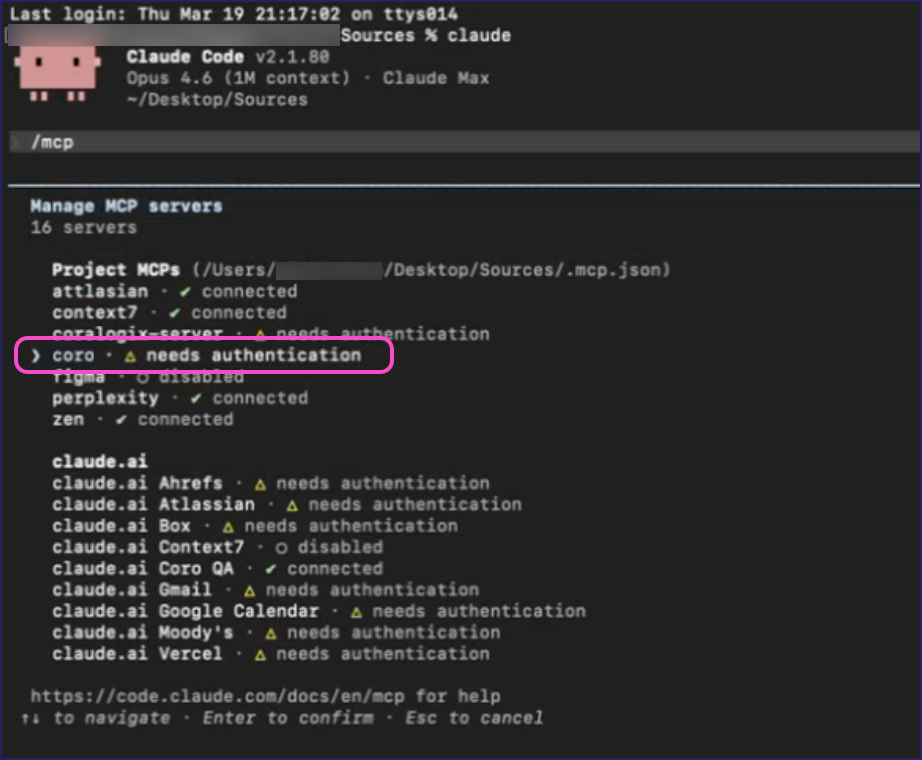
Enter
/mcpat the prompt to manage your MCP servers: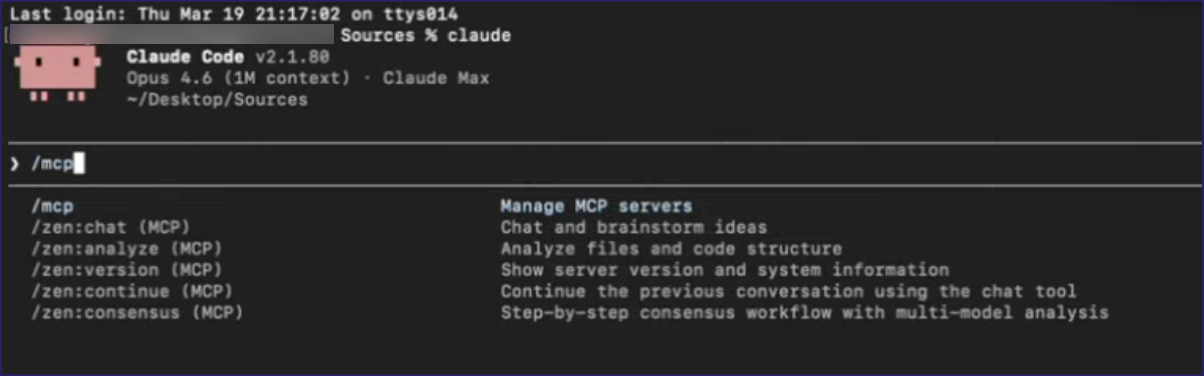
Select the Coro MCP server:
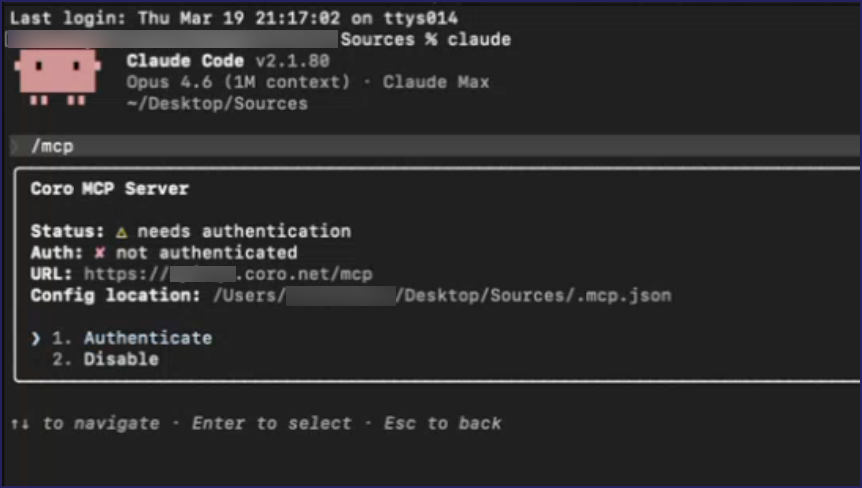
Select Authenticate:
Claude Code redirects you to Coro to authenticate the access request for your Coro account.
Coro displays the access confirmation dialog:
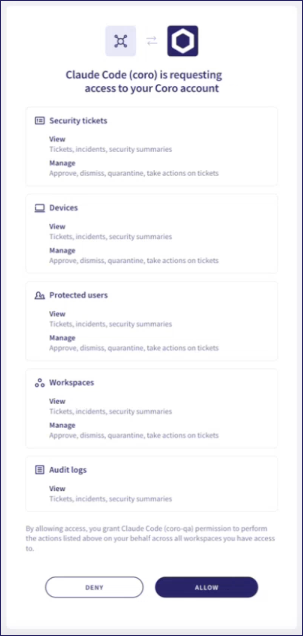
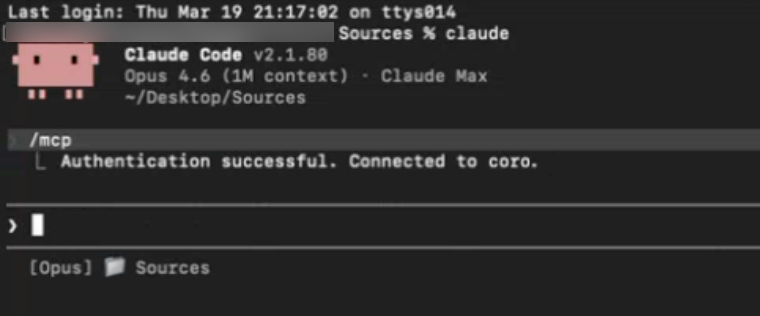
Review the access request, then select ALLOW. Coro redirects you back to Claude Code, showing the connection as successful:
Coro's MCP server supports the following tools for connected AI clients:
| Tool | Description |
|---|---|
| list_workspaces | List all accessible workspaces. |
| get_workspace | Get full workspace details. |
| create_workspace | Create a new child workspace. |
| search_workspaces | Search workspaces by name/domain/ID. |
| Tool | Description |
|---|---|
| get_subscription | Get subscription state and active modules. |
| start_subscription | Activate a workspace subscription. |
| stop_subscription | Freeze a workspace subscription. |
| get_bundle_info | Get details of specific bundles. |
| get_usage | Get billing usage data for a time range. |
| Tool | Description |
|---|---|
| list_tickets | List security tickets with filters. |
| get_ticket | Get detailed ticket information. |
| get_ticket_actions | Get available actions for a ticket. |
| perform_ticket_action | Execute an action on a ticket. |
| get_tickets_summary_devices | Aggregate device ticket summary. |
| get_tickets_summary_users | Aggregate user ticket summary. |
| get_tickets_summary_emails | Aggregate email ticket summary. |
| get_tickets_summary_cloud_apps | Aggregate cloud application ticket summary. |
| get_tickets_summary_data | Aggregate data governance ticket summary. |
| Tool | Description |
|---|---|
| list_devices | List protected devices. |
| get_device_actions | Get available actions for a device. |
| perform_device_action | Execute an action on a device. |
| get_latest_agent_versions | Get latest agent versions per platform. |
| Tool | Description |
|---|---|
| list_users | List protected end-users. |
| get_user | Get protected user details. |
| add_users | Add users for protection (up to 200). |
| update_user | Update user details/protection status. |
| delete_user | Remove a user from protection. |
| Tool | Description |
|---|---|
| list_portal_users | List admin console users. |
| get_portal_user | Get admin user details. |
| add_portal_user | Add a new admin portal user. |
| Tool | Description |
|---|---|
| search_audit_logs | Search audit logs with filters. |