Deploying Coro on Windows devices
This guide describes the process for deploying the Coro Agent to Windows devices.
Prerequisites and system requirements
Before you begin, make sure your Windows device meets the following prerequisites:
- Coro Security Platform utilizes a Bitdefender Software Development Kit (SDK). To avoid conflicts that may interfere with the installation of the Coro Agent, Bitdefender and any other antivirus software based on Bitdefender must be uninstalled prior to installing the Coro Agent.
- Windows devices must meet the minimum specifications .
- You must have administrative permissions to install applications on your Windows device.
Deployment options
Install the Coro Agent through one of the processes described below:
- Self-install on single devices : An admin user provides specific users with an installer link via email. Users select the link and follow the on-screen instructions to install the software on their devices. This method also applies to upgrading existing Agent versions (for version 1.5 and later).
-
Mass deployment
: An admin user downloads the Agent installer package and deploys it across all devices using a mass deployment tool.
Coro provides a number of articles covering mass deployment scenarios. To learn more:
note
For details on upgrading the Agent software, see Upgrading the agent.
Downloading and installing the Agent
To download and install (or upgrade) the Coro Agent, follow these steps:
- Sign into the Coro console .
-
Select
Control Panel
:

-
Select
Devices > Agent Deployment
.
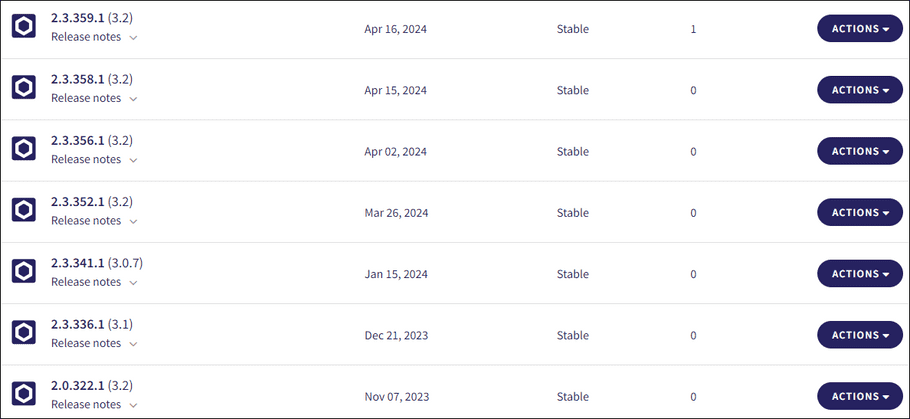
The Coro Agent deployment list appears:

- Scroll down to the Windows section.
-
Select
ACTIONS
:

Admin users can perform the following actions:
-
Obtain a download link URL for the Agent installer:
- Select Copy link .
-
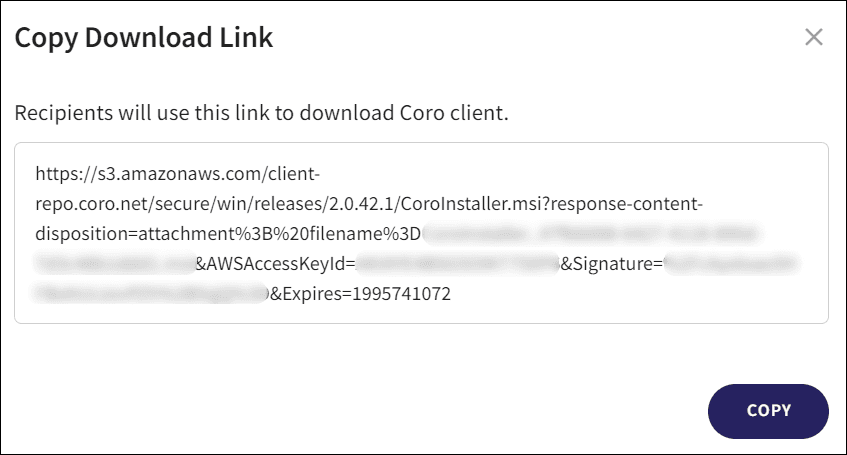
A
Copy Download Link
dialog is displayed, which contains a URL link to the Agent installation file:

-
Select
COPY
.
The download link is copied to your clipboard.
- Paste the link into a web browser and follow the instructions to install.
note
Admin users can distribute this link to endpoint device users for direct installation of the Agent. Additionally, they can use the same link for mass deployment through appropriate tools.
-
Download the Agent installer file:
-
Select
Download
.
The Agent installation file is downloaded to your local device.
warning
Do not rename the downloaded Agent installation file.
- After the download is complete, open the installation file and follow the instructions to install.
-
Select
Download
.
After completing the installation, the Agent may download additional updates:

-
Obtain a download link URL for the Agent installer:
-
After the installation and update process completes, open the Agent from the Windows system tray:

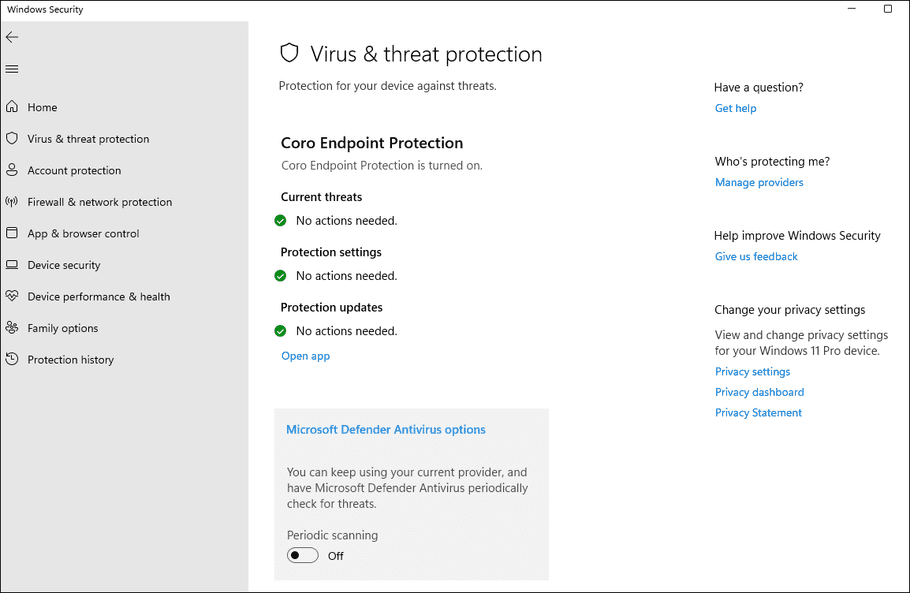
Coro is now the primary antivirus (AV) software for the device and is listed as an authorized Windows Security Center (WSC) provider in the Virus & threat protection section of the Windows Security component:

Important
To register Coro as an authorized WSC provider, your device must have:
- Coro Agent v3.2 (beta 2.5.65.1) or later installed.
- Windows 10 or later installed.
note
After the installation is complete, ensure you disable any firewall rules that may interfere with Coro Agent connectivity.
Known issues
-
The Coro Agent might not appear immediately in Windows Security Center (WSC) after deployment.
To verify the WSC registration of the Coro Agent:
-
Run the following PowerShell command:
Get-WmiObject -Namespace "root\SecurityCenter2" -Class "AntiVirusProduct" -
Locate
displayName: Coro Endpoint Protection
:

The Coro Agent is confirmed as an authorized WSC provider.
-
Run the following PowerShell command:
See also:
Configuring endpoint monitoring (Optional)
In addition to its basic functions, Coro provides specific endpoint monitoring capabilities that you can enable or disable.
To configure your endpoint monitoring settings, log in to your Coro console and select Control Panel > Devices > Settings. To learn more, see Protection Settings.
These settings apply to all devices in the workspace.
Using the Coro deployment script
Coro also provides the following PowerShell deploy script to enable organizations to install the Coro Agent to their Windows devices either individually or through Remote Monitoring and Management (RMM) tools:
Expand for more details
#Please add Coro installation URL below (in between quotes "")

$url = "please paste Coro download URL here, but don't delete the quotes"

###NO NEED TO AMEND ANYTHING BELOW THIS LINE###

#Elevate the script, if not elevated

$elevated = ([Security.Principal.WindowsPrincipal] [Security.Principal.WindowsIdentity]::GetCurrent()).IsInRole([Security.Principal.WindowsBuiltInRole]"Administrator")

if (-not $elevated) {

    try {

        Write-Host "This Powershell instance is not elevated. Elevating now..."
        $args = "-ExecutionPolicy Bypass", "-File `"" + $myinvocation.MyCommand.Path + "`" " + $myinvocation.UnboundArguments
        Start-Process powershell -Verb runAs -ArgumentList $args
        exit

    } catch {

        Write-Host "Error while trying to elevate: $($_.Exception.Message) (Error code: $($_.Exception.HResult))" -ForegroundColor Cyan
        Write-Host""
        Write-Host"The script requires elevated permissions, please run it as Administrator" -ForegroundColor Cyan
        Start-Sleep -Seconds 3
        exit 1
    }

} else {

    Write-Host ""
    Write-Host "This instance is now elevated, proceeding to the next step"
    Write-Host ""
}

#Variables

$softwareName = "Coro"
$logFilePath = "C:\Windows\Temp\CoroInstallerlog.txt"

#Display OS version

try {

Write-Host ""
Write-Host ""
$operatingSystem = Get-CimInstance -ClassName Win32_OperatingSystem
$osVersion = $operatingSystem.Version
$osEdition = $operatingSystem.Caption
$osArchitecture = $operatingSystem.OSArchitecture
$OSVersion = "$osEdition $osArchitecture $osVersion"
Write-Host "$OSVersion"

    } catch {
}

#Extract file name from the URL

$filename = [System.IO.Path]::GetFileName([System.Uri]$url)

if ($filename -match 'CoroInstaller_(.*?)\.msi') {

    $newFilename = "CoroInstaller_$($matches[1]).msi"
    $msiFilePath = "C:\Windows\Temp\$newFilename"

    } else {

    Write-Host ""
    Write-Host "Could not trim the URL" -ForegroundColor Cyan
    Write-Host "Please contact Support and send a screenshot of this output" -ForegroundColor Cyan
    Start-Sleep -Seconds 5
    exit 1
}

#Download Coro installer

Write-Host ""
Write-Host "Downloading $newFilename file"
Write-Host "This might take some time, depending on download speed"

$webClient = New-Object System.Net.WebClient

try {

    $webClient.DownloadFile($url, $msiFilePath)
    Write-Host "Done! The file placed in C:\Windows\Temp" -ForegroundColor Green

} catch {

    Write-Host "Error when downloading. Error message: $($_.Exception.Message)" -ForegroundColor Cyan
    Write-Host "Please contact Support and send a screenshot of this output" -ForegroundColor Cyan
    Start-Sleep -Seconds 5
    exit 1
}

$webClient.Dispose()

#Install the downloaded file

try {
        Write-Host ""
        Write-Host "Installing $softwareName"
        $coroInstall = Start-Process msiexec.exe -PassThru -Wait -ArgumentList "/i `"$msiFilePath`" /qn /L*V `"$logFilePath`""
        $exitCode = $coroInstall.ExitCode

        if ($exitCode -eq 0) {

        Write-Host "Done!" -ForegroundColor Green
        Start-Sleep -Seconds 1
        $success = $true

        } elseif ($exitCode -eq 1619) {

        Write-Host "Installation failed because of value of msiFilePath variable" -ForegroundColor Cyan
        Write-Host "Error code: $exitCode" -ForegroundColor Cyan
        Write-Host "Please contact Support and send $logFilePath log file along with a screenshot of this output" -ForegroundColor Cyan
        Remove-Item -Path $msiFilePath -Force -Confirm:$false
        Start-Sleep -Seconds 10

        exit 1

        } elseif ($exitCode -eq 1639) {

        Write-Host "Installation failed because of incorrect argument(s) (-ArgumentList in coroInstall variable)" -ForegroundColor Cyan
        Write-Host "Error code: $exitCode" -ForegroundColor Cyan
        Write-Host "Please contact Support and send a screenshot of this output" -ForegroundColor Cyan
        Remove-Item -Path $msiFilePath -Force -Confirm:$false
        Start-Sleep -Seconds 10

        exit 1

        } else {

        Write-Host "Installation failed, error code: $exitCode" -ForegroundColor Cyan
        Write-Host "Please contact Support and send $logFilePath log file along with a screenshot of this output" -ForegroundColor Cyan
        Remove-Item -Path $msiFilePath -Force -Confirm:$false
        Start-Sleep -Seconds 10
        exit 1

        }

    } catch { }

#Display success message

if ($success -eq $true) {

Remove-Item -Path $logFilePath -Force -Confirm:$false
Remove-Item -Path $msiFilePath -Force -Confirm:$false

Write-Host ""
Write-Host "Deleting installation and log files as these are no longer required"
Write-Host "All done, $softwareName is now installed"  -ForegroundColor Green
Start-Sleep -Seconds 5

} else { }
In this script, replace the following markers with real values:
- $url : The download URL for the latest version of the Coro Agent installer for Windows, obtained from the Coro console. For details, see Deploying Coro on windows endpoints .

For example:
https\://s3.amazonaws.com/client-repo.coro.net/beta/win/releases/2.0.412.1/CoroInstaller.msi?response-content-disposition=attachment%3B%20filename%3DCoroInstaller_123abc-456def-789abc.msi&AWSAccessKeyId=AKIA5XP6&Signature=y4V3Tq2dU9mE%3D&Expires=2005954595

Important
Make sure you do not delete the quotations when replacing the placeholder text for \$url.
note
If you manage multiple workspaces, you must create a copy of the standard Coro deployment script and repeat this process for each workspace.